
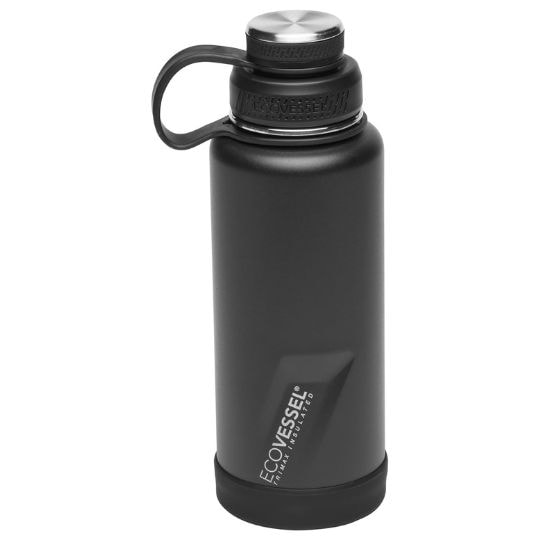
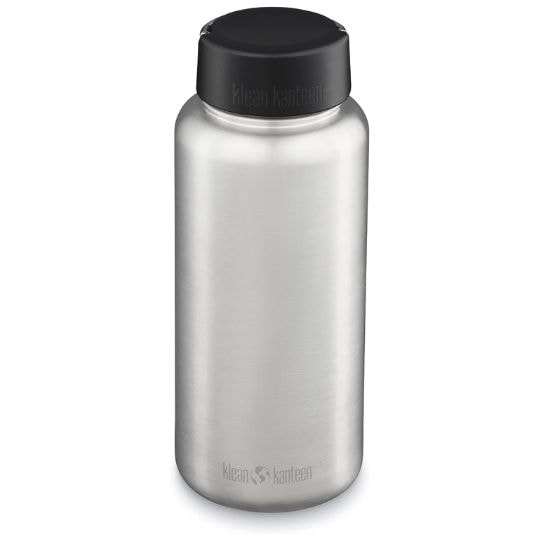
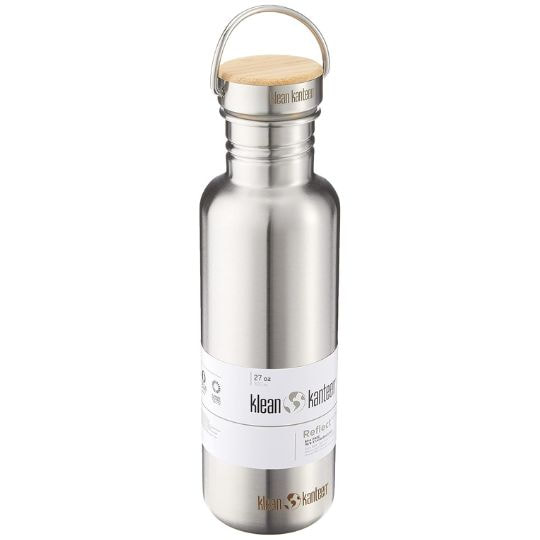
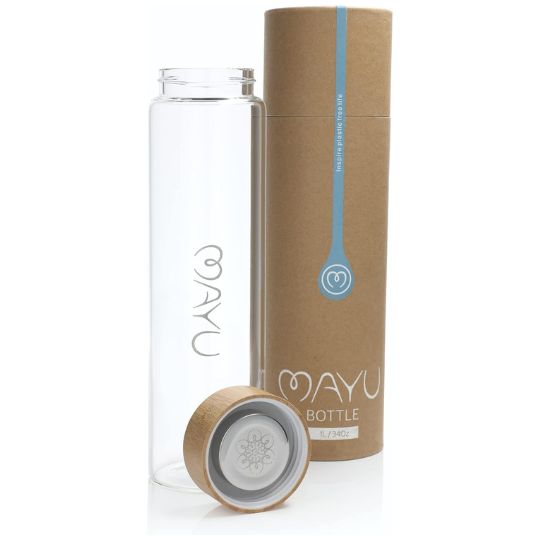
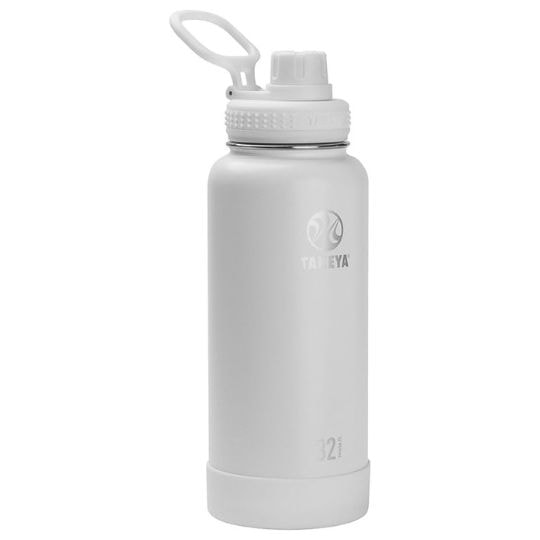
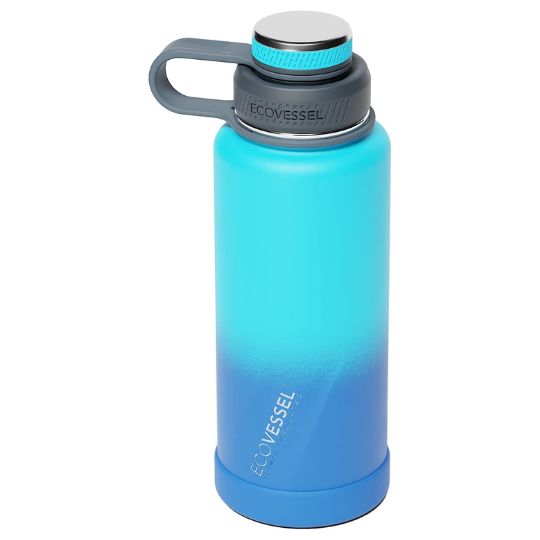
 What are the Best Bottles and Accessories for Infusing Water with Fruit, Tea, and Coffee? What are the Best Bottles for Infusing?If you're like me, you get bored drinking regular, plain water all day. I used to be addicted to sodas, so switching from extremely sugary drinks to water was a big shift. The thing that helped me the most was adding my own flavors. Now, technically sodas are flavored water with carbonation and you can also add flavor with enhancers like Mio, but for the purposes of this video I'm calling flavored water anything that gets its taste from more natural sources like fresh fruit, loose-leaf tea, or coffee grounds. And at the end, I'll also give my take on two bottle brands that have more recently taken social media by storm, Cirkul and air up. (spoiler alert, it might not be positive) Video Review: Which Bottles are Best for Infusing?We also cover this in a YouTube video if you'd prefer to watch the recap! Links to Products: As an Amazon Associate, we earn a small commission if you purchase after clicking a link. It doesn't cost you anything extra, and it really helps. Thank you! Adding Fruit Directly into Your Bottle (No Infuser)First, I have to mention the most obvious way to flavor your water, and that's simply by adding fruit like lemons, cucumber, mint, or a whole range of other flavors directly into your bottle! This works well enough, but the problem is that you ideally would have some way to strain it so it's not a good option with most bottles. The good news is that more and more bottles are coming to market with built-in stainless steel strainers at the lid. For stainless steel, EcoVessel is one brand that's been around awhile, and for glass, Mayu is a brand I've mentioned a few times on this channel. Just add your fruit, snap the strainer into place, and you're good to go. It's also worth noting that these strainers double as ice-blockers, which can be a life-saver when driving in particular.
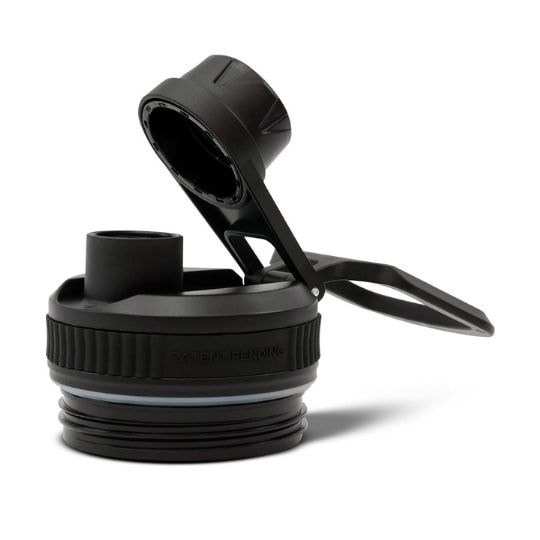
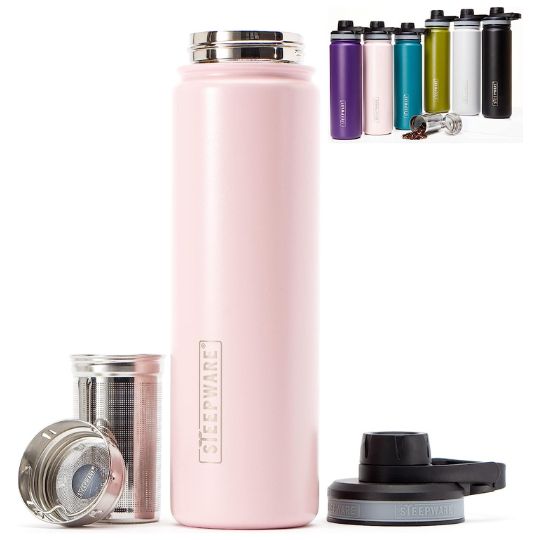
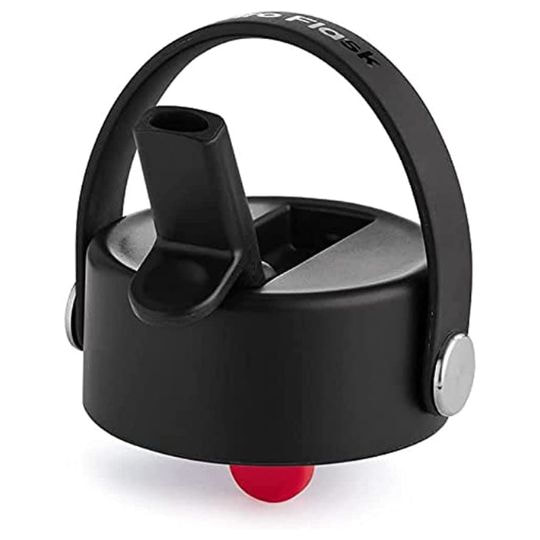
Bottles with Built-In InfusersSome brands take the built-in strainer a step further by having a larger strainer that screws into the smaller one, which makes it a better option for tea or coffee. It's also a good option if you want your fruit to be contained instead of free-floating. Notably, none of the "major" brands that I'm aware of currently have bottles with built-in infusers, including Stanley, YETI, and Hydro Flask. We would not be surprised if they come out with options within a few years, but for now you'll have to go with lesser-known brands or add-on accessories (see further down the page). The first brand I tried with a larger infuser was Steepware, but honestly I'm not too much of a fan of this bottle. It did the worst by far on an insulation test, and the handle isn't anything to write home about. A much better all-around option is a new brand I came across called Vesmoon. Now to be clear, there do appear to be other similar bottles with the same size strainer coming to market, but this is the one I've tested in person and I'm a pretty big fan. Unfortunately, Vesmoon was not available for purchase as of 6/2/2024. This is sometimes a problem with brands that are smaller and newer because the water bottle market is incredibly competitive But there are other options on the market today, and these ones by Hemli and Akvati look to be comparable. Stanley Bottle with a Fruit InfuserNow I'm not a huge fan of Stanleys, but I recognize many people love them. Unfortunately, Stanley does not have a fruit infuser bottle option at this time, though a good alternative is from a brand called Fimibuke. It's essentially a Stanley knockoff with a large built-in infuser for one third the price, and while I can't say much about the company or brand itself, the design and functionality look pretty solid. Best Bottle Infusers for Fruit InfusingLlet's say you're in the market for an add-on infuser because you don't want to buy an entire new bottle. Well, there are a few options you can look at. Let's start with ones for fruit, which generally have larger openings that work well for fruit but not for loose leaf tea or coffee grounds.
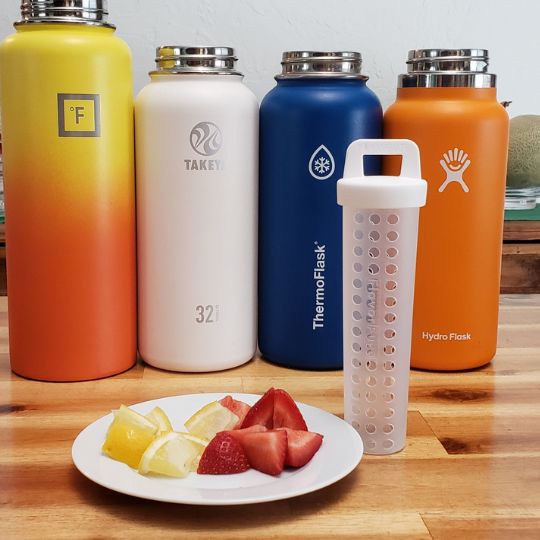
Best Bottle Infusers for Tea and Coffee InfusingNow each of the add-on infusers I mentioned is made with either plastic or silicone, so let's look at some stainless steel ones, which can be used for fruit but are also better for tea and coffee because they have a finer mesh strainer.
Bottles with Flavor Pods (Cirkul and Air Up)And finally, let's take a look at the two elephants in the room that have taken social media by storm recently, Cirkul and air up. They each have flavor pods, but they work very differently.
0 Comments
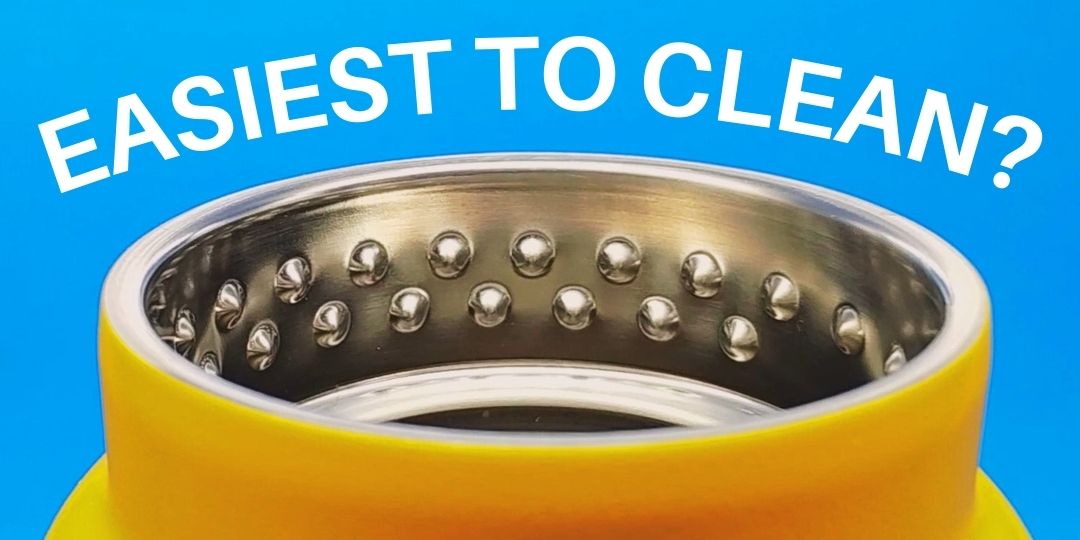 Best Water Bottles for Cleaning What is the Best Water Bottle for Clean Freaks?Let’s face it, reusable water bottles are amazing for many reasons, but they’re also great at hiding bacteria and germs. So today, let's look at some bottles that have features designed specifically to make it easier to keep them clean. In this post, I’m only going to cover dual wall vacuum insulated stainless steel bottles because they're some of the more popular bottle in today's market. LONG STORY SHORT Here's the summary of the bottles. Keep reading for more details about each one!
Water Bottle Cleaning TipsBefore we dive into specific bottles, let's start with some general water bottle cleaning tips and guidelines.
Can You Use your Dishwasher to Clean your Bottle? Many bottle manufacturers state that their bottles and lids are dishwasher safe, which at first makes this seem like a great option. Besides, why go through all the work of using a bottle brush and cleaning tablets when you can let the dishwasher do everything? Different people will have different opinions, but here's ours. For the most part, we do not recommend putting reusable bottles or accessories in dishwashers. These bottles can be expensive, so we think it's better to take a hands-on approach to make sure your bottle is cleaned sufficiently while minimizing the chances that it could get damaged or chipped from knocking into something else while your dishwasher is running. Also, you'll probably want to remove and hand-wash the seals anyways periodically because the dishwasher won't be able to get all around them. And it's not always clear which products are really dishwasher safe. For example, newer Hydro Flasks are dishwasher safe, but older ones are not. For the average user, it can be confusing or difficult to really know, so we generally like to play it safe and recommend handwashing. What are the Easiest Water Bottles to Keep Clean?Let’s move on to some bottles that have features designed specifically to make them easier to keep clean, and at the end I'll give my overall recommendation. Bottles with Internal Threads
Bottles with No Threads
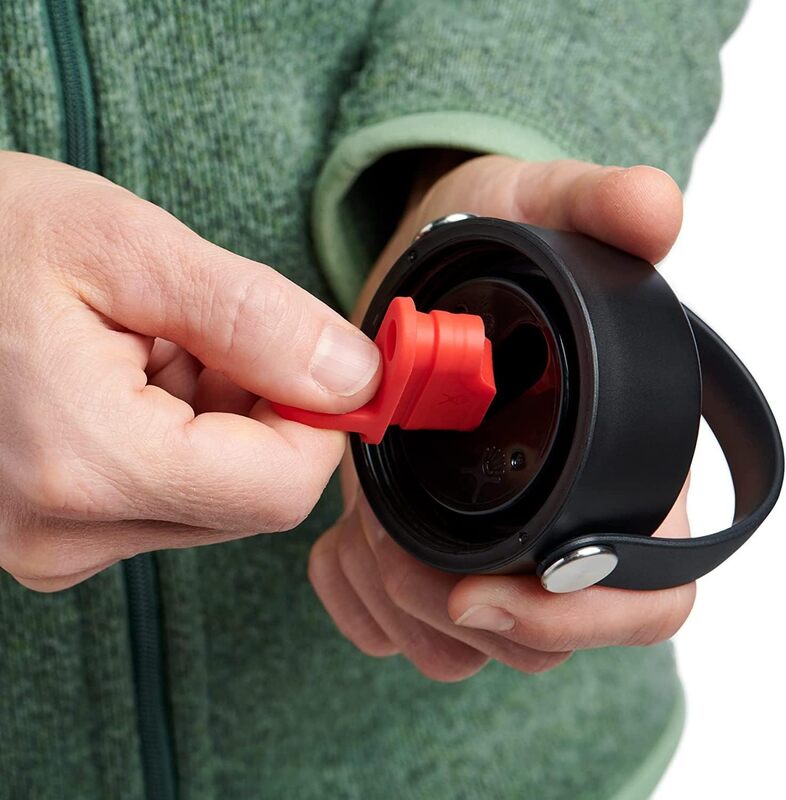
Bottles with Seals with Pull Tabs
Bottles with Removable Bottoms
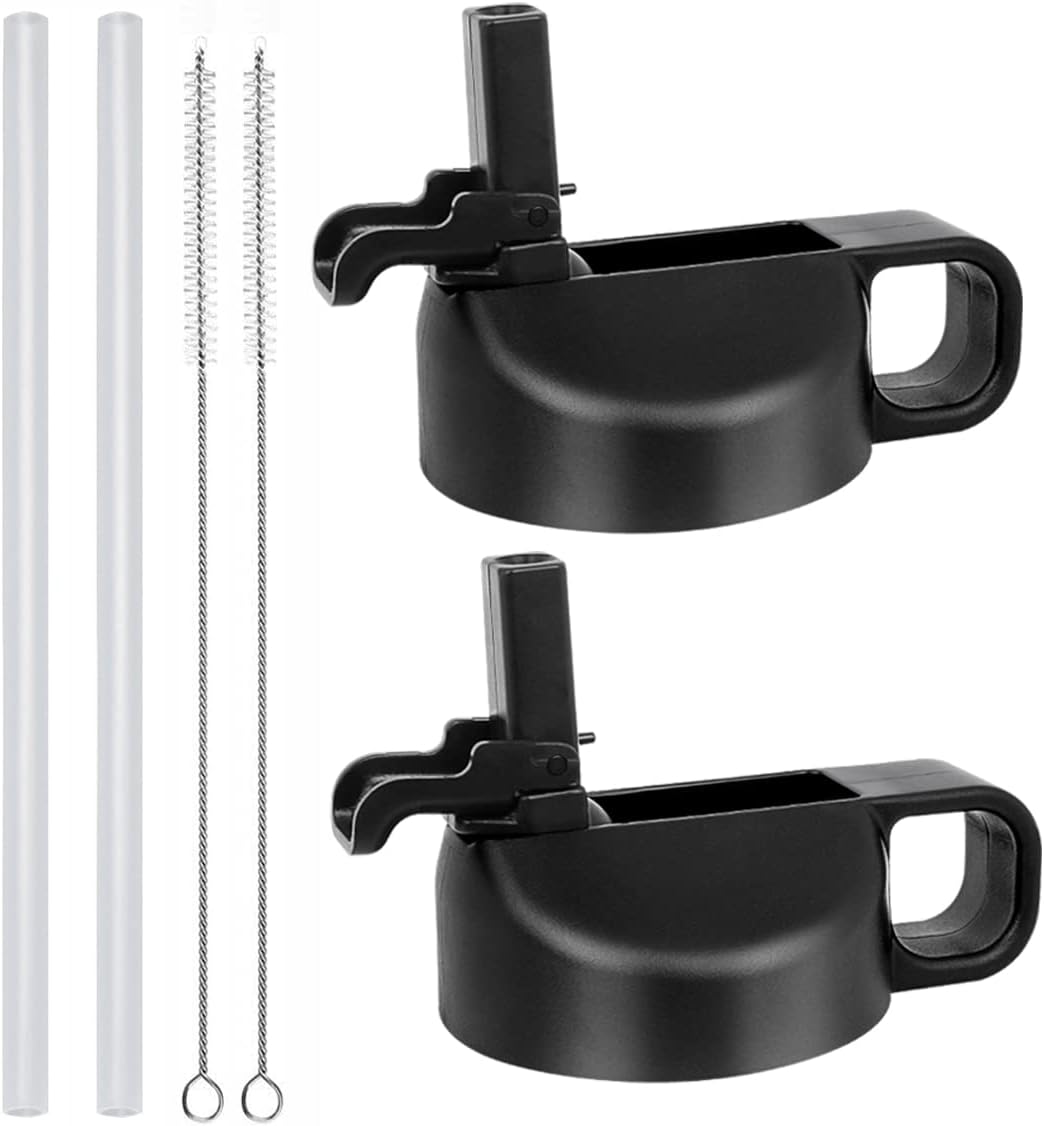
Bottles with FiltersThere are a ton of filter bottles and accessories to choose from at this point, and while they don't help clean your bottle, they do help clean the water you'll drink so they are worth mentioning. A few include Lifestraw, Simple Modern, and Brita. I'm planning another post later this year where I'll compare different filter options, so I'll have much more info about this subgenre coming soon. Bottles with UV LightEasiest Straw Lids to Keep Clean
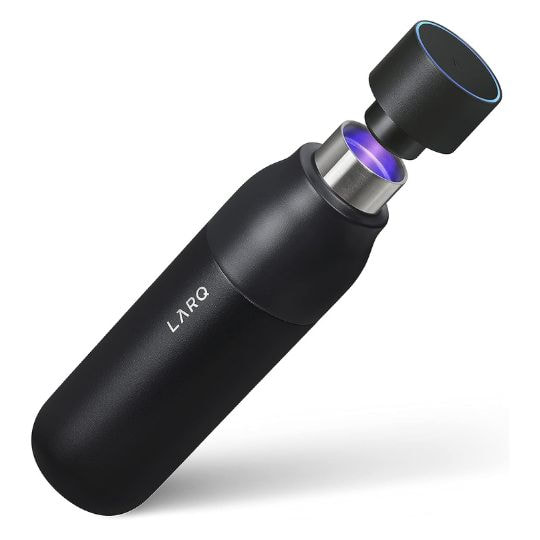
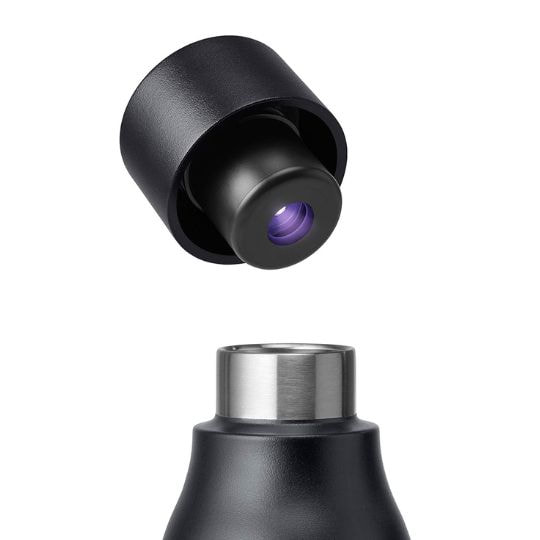
Conclusion: What is the Easiest Bottle to Keep Clean?From an objective standpoint, it's hard to beat the LARQ bottle because UV light is proven to kill bacteria and viruses. Of course that doesn't replace cleaning with a brush and bottle tablets, but it's an extra step to santize your water that the other bottles simply don't have. But for over $100 for the 25oz bottle, it's understandably outside of most people's price point. So for most people, Zulu Ace is probably the best choice. Being able to take off both sides of the bottle makes it so much easier to make sure you're cleaning the bottle thoroughly, so we'll give the nod to this one for anyone who prioritizes cleaning your bottle over everything else. But ultimately, you can make any of these bottles work if you have a good brush kit, use cleaning tablets periodically, and develop a habit of cleaning your bottle often. Now we just need someone to come out with a bottle that has a UV light, seals with pull tabs, easy-to-clean-threads, and a detachable bottom. 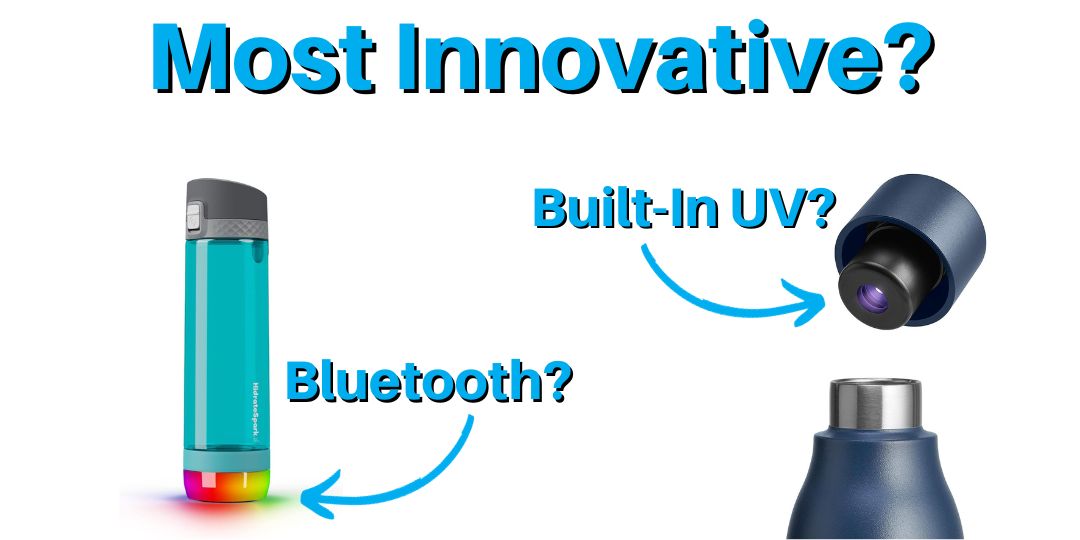 8 Bottles that Change HydrationToday’s water bottle market is crowded and complex, and manufacturers are always looking for innovative ways to stand out. Many times, these features are just gimmicks, but some bottles really do improve what water bottles are capable of. At BottlePro, we’ve reviewed and seen a lot of these market changes, and we’re going to share with you 8 of our favorite innovators. The first ones start with some simpler quality-of-life improvements, and towards the end of the video we’ll show some of the more high-tech options on the market. We’ll also branch out a bit and show a couple of coffee mugs that you might want to take a look at. Video ReviewWe also cover this in a YouTube video if you'd prefer to watch the recap! As an Amazon Associate, we earn a small commission if you make a purchase through one of the links. Thank you for your support! The Big PictureBonus: Coffee MugsThe DetailsFJbottle (Convenience)
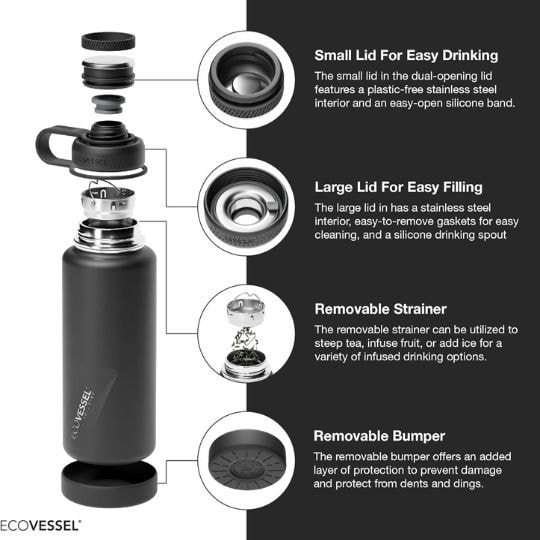
EcoVessel (Multi-Use)
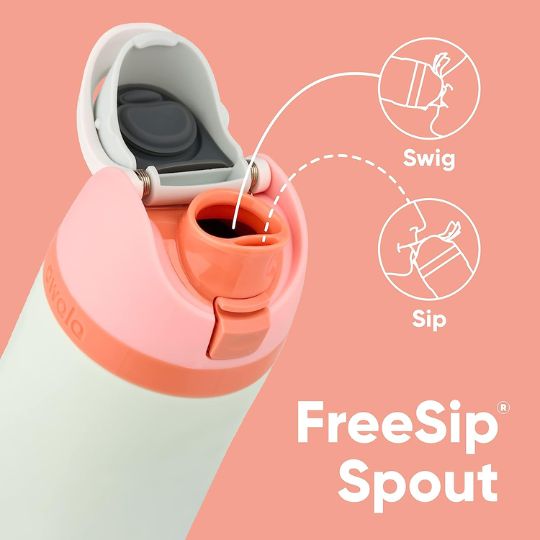
Owala (Combo Lid)
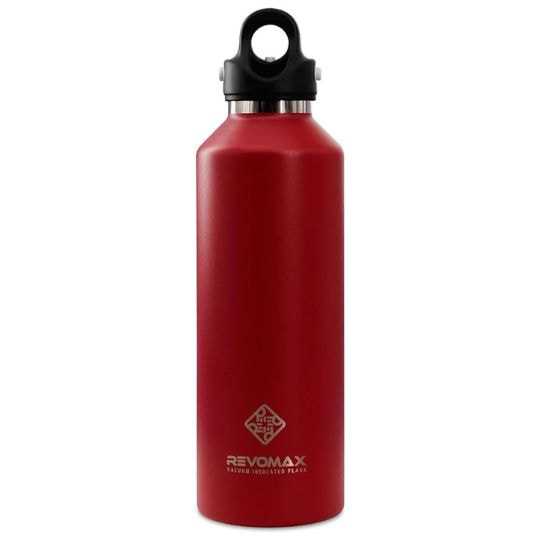
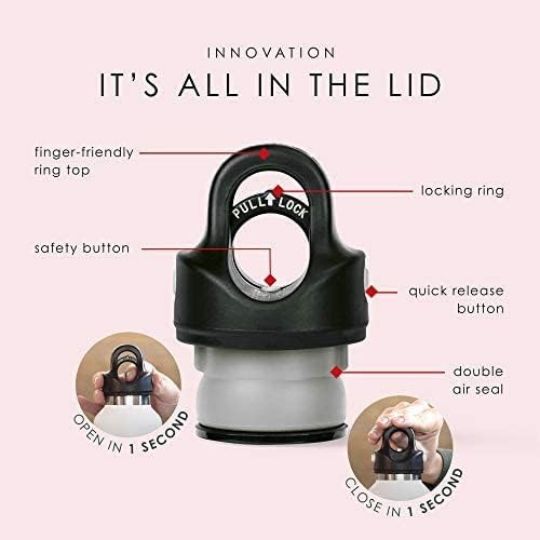
RevoMax (Threadless Lid)
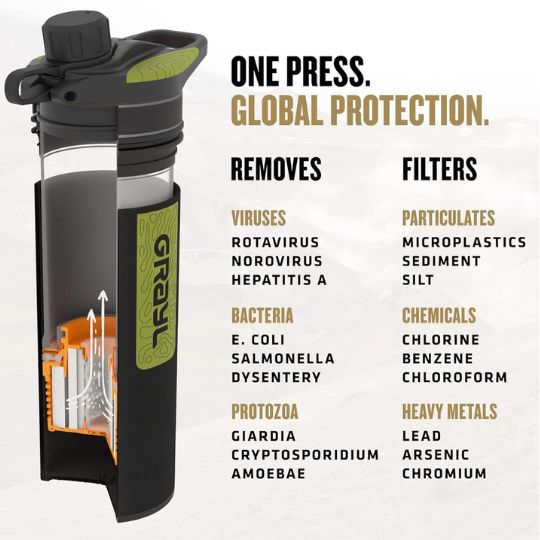
GRAYL Geopress (Filter)
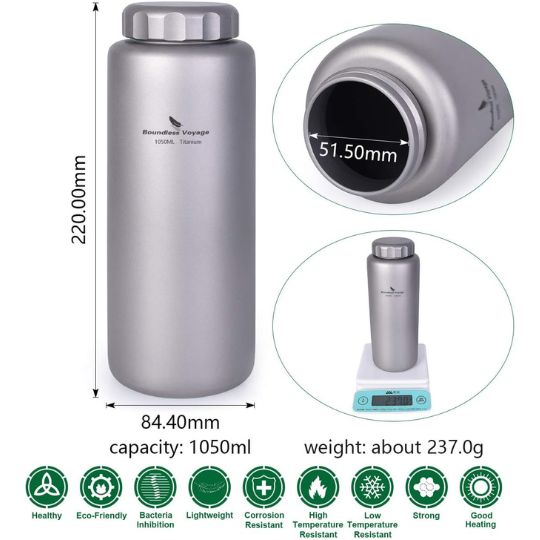
Boundless (Titanium)
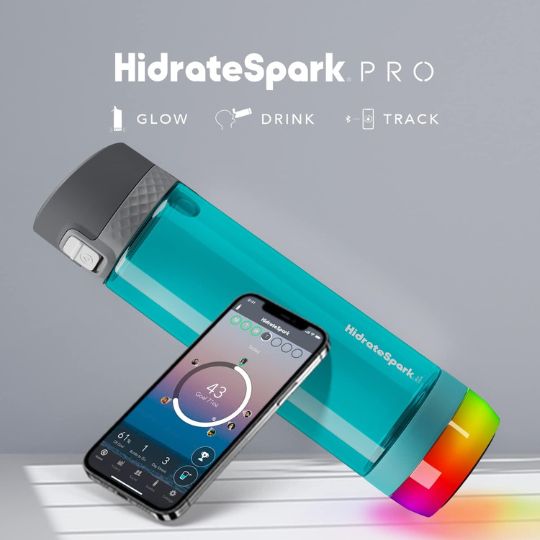
Hidrate Spark (Hydration Tracking)
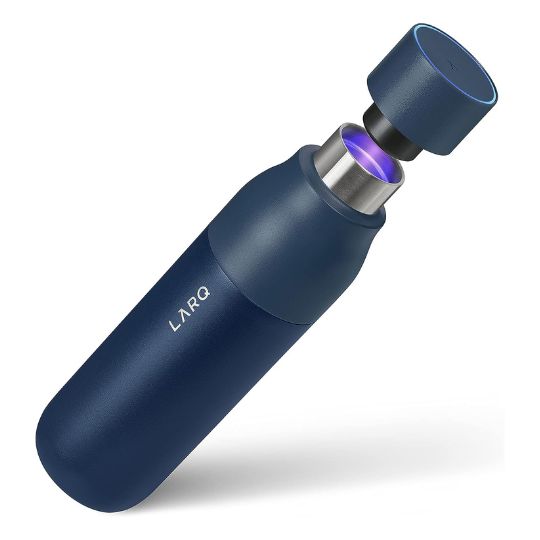
LARQ (UV Sanitizing)
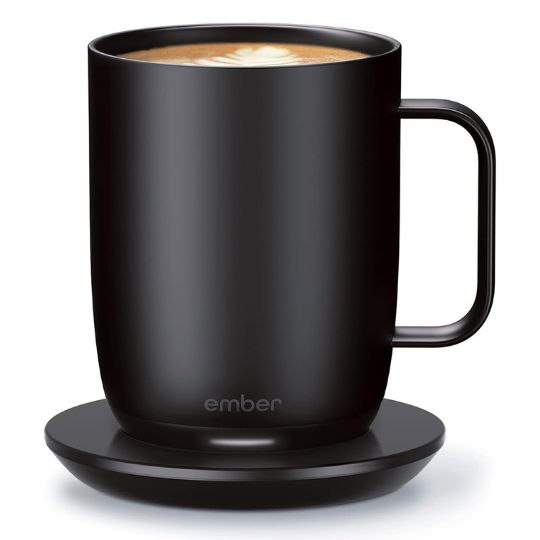
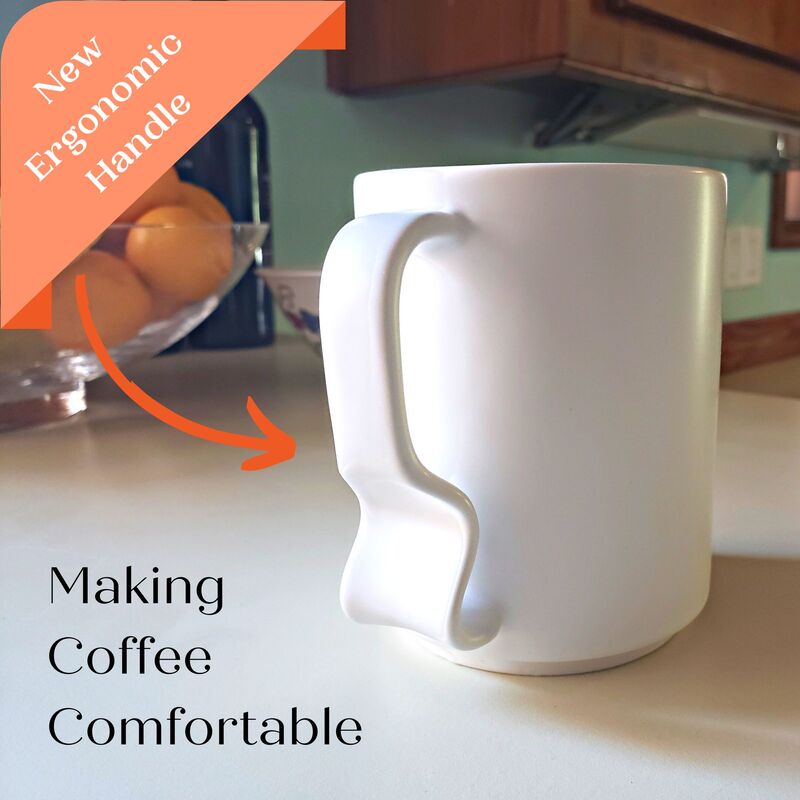
Ember (Temperature Control)Momnt Mugs (Ergonomic, No-Slip Grip)
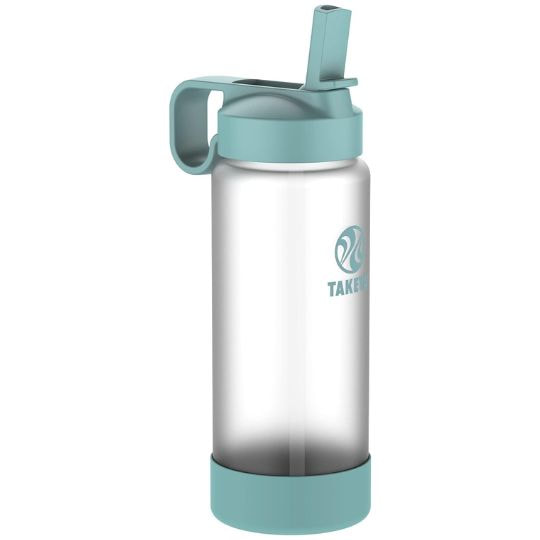
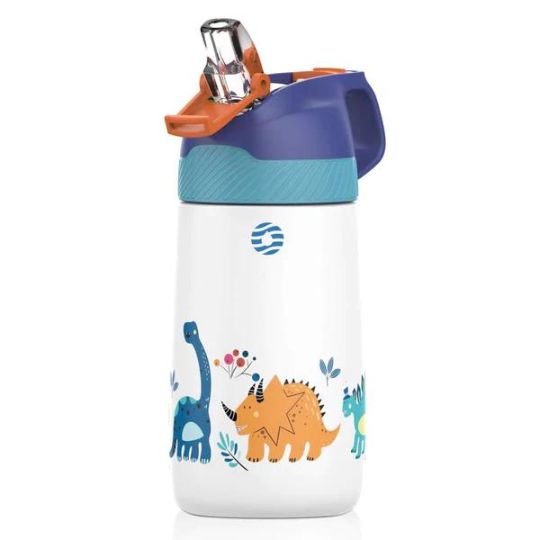
 Top 3 Questions to Ask before Buying a Water Bottle for your Child As a parent, you have a lot to think about when it comes to your child. In this post, we we'll talk through three important questions to consider before buying a bottle for your little one. And we’re glad you’re here. BottlePro is all about health through hydration, and teaching your child to use a reusable water bottle will have many benefits in the long run. Proper hydration habits are tied to better health, and avoiding single-use bottles will help your child’s future wallet as well as the environment that he or she is inheriting. So without further ado, let's get started! Question #1 - Is Your Water Bottle Safe?Moving on to question number one, is it safe? As with anything with your child, the first question you should ask is, will this be safe for my child to use every day. Normally the concern with bottles is about leaching, or whether chemicals or toxins seep from your bottle into your drink. Aside from that, there are physical hazards, which is particularly true with glass because it can break into sharp pieces. The Safest Water Bottle Materials for ChildrenThe safest bottle materials that we recommend using for children are:
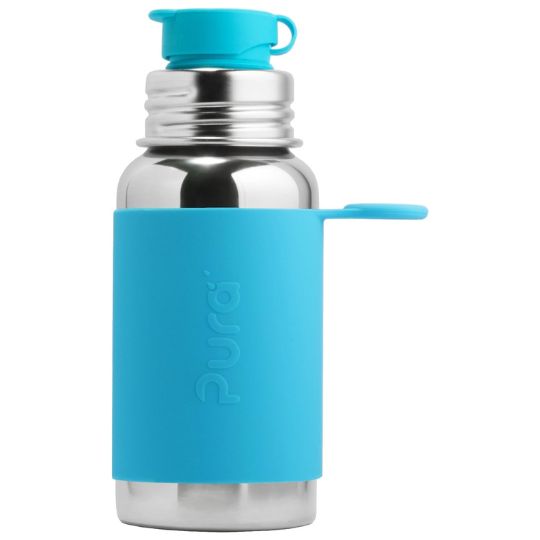
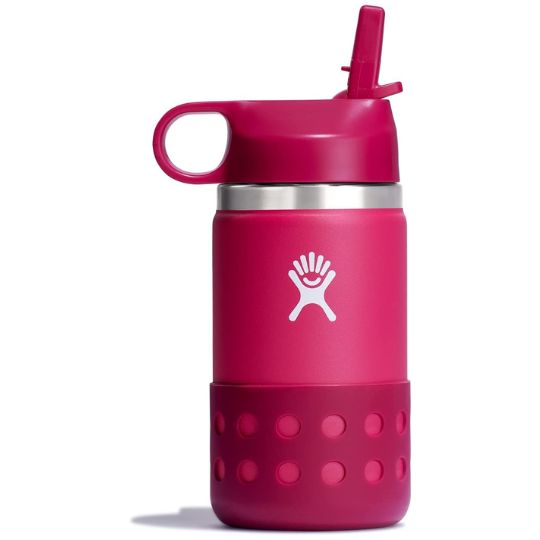
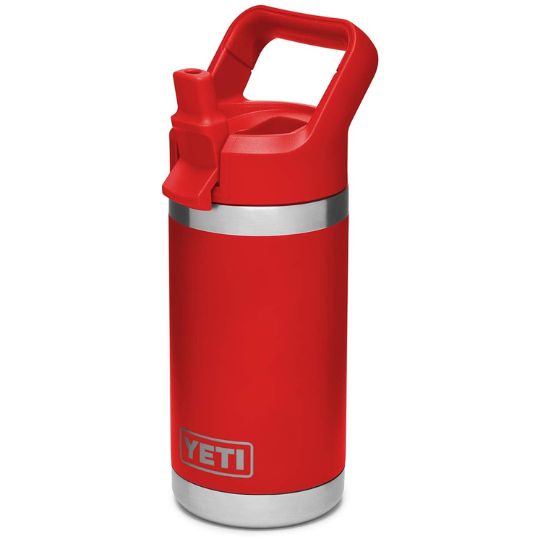
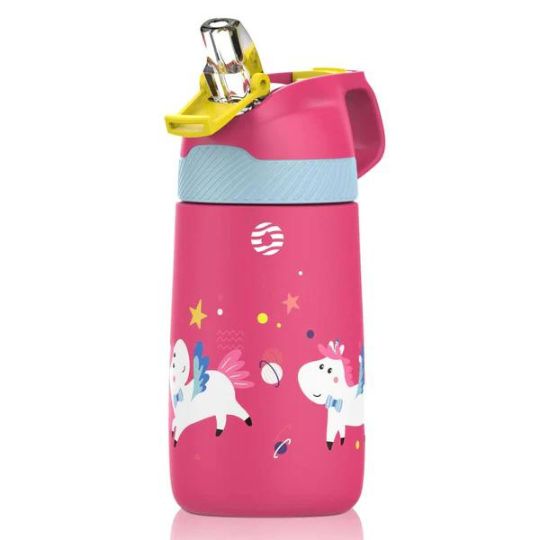
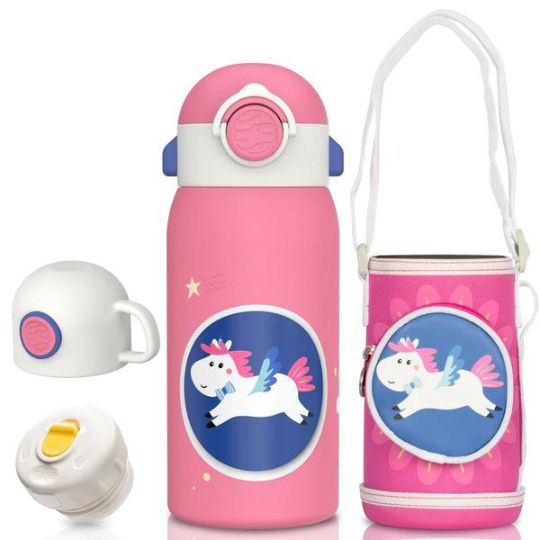
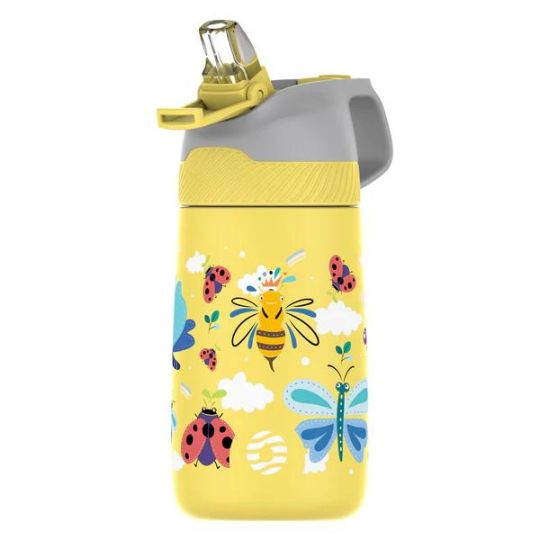
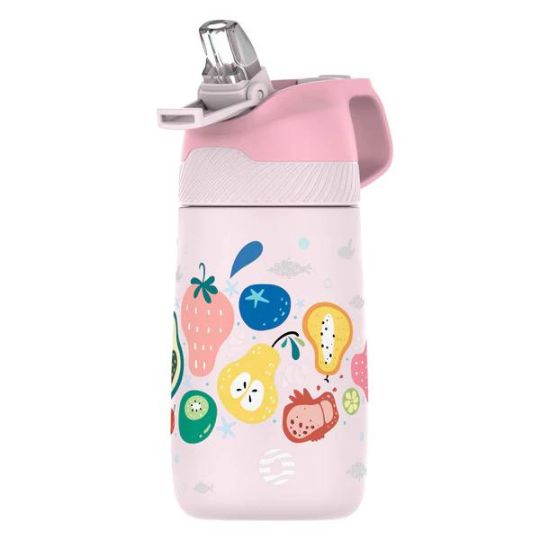
STAINLESS STEELAre Stainless Steel Bottles Safe for Kids? In many ways, stainless steel bottles are the best option for children. They’re widely shown to be safe, are easy to clean, and don’t have an inner liner like aluminum bottles. There are plenty of reputable brands with many different style to choose from, so you have plenty of options to pick what’s right for you and your child. And unlike glass, they won’t shatter and potentially create a physical hazard if your child drops the bottle. Stainless steel bottles typically come in one of four alloys or grades: 304, 316, 18/8 and 18/10. Any of these grades should be fine with normal use, but if you’re really looking for the best grade, consider buying a bottle made with 316 steel because it’s more corrosion resistant. Should You Avoid Stainless Steel Bottles for Kids? For the most part stainless steel bottles are a pretty proven and safe option, but there's one thing to keep in mind with many of them. Make sure you look at the lid construction. Many bottles that are made with stainless steel bodies still have exposed plastic under the lid that can come in contact with the water, so if your goal is to completely avoid plastic contact, keep this in mind. I’ll give some links in the description to bottles that I’m aware of that completely prevent plastic from contacting your water, and if anyone else knows of other options, please leave a comment below to let us and other viewers know. The Best Stainless Steel Bottles for Kids There is a lot of competition in the stainless steel water bottle market, so there are plenty of options to choose from. These are some of our favorites!
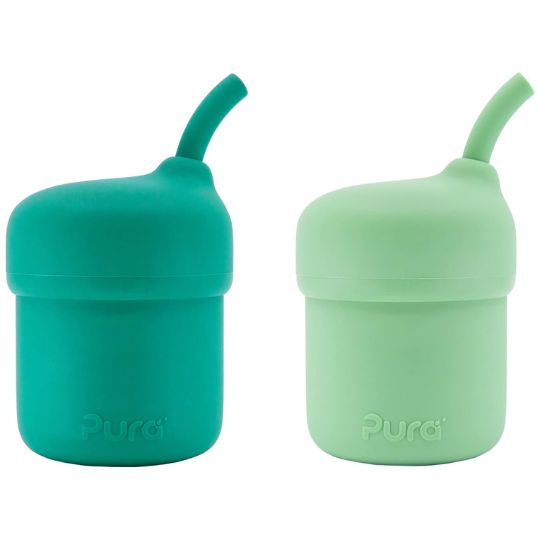
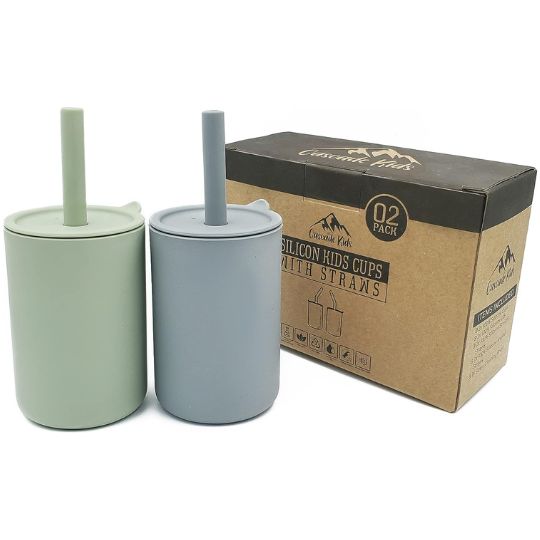
SILICONEAre Silicone Bottles Safe for Kids? For silicone, most research shows that it is very safe and a great alternative to plastic. It is BPA-free, extremely durable, lightweight, and flexible. Just make sure it says food-safe or food-grade. Pretty much every bottle with silicone will list this on the packaging, but it doesn’t hurt to check. And if you’re buying from a lesser-known brand, you could also reach out to the manufacturer for more testing info if you’d like to learn more. Pura is a brand we haven’t tested yet, but looking at their website, they are leaning heavily into silicone-based options and are a good one to check out. Should You Avoid Silicone Bottles for Kids? In my opinion, the biggest potential downside to silicone is what we don’t know. While research has mostly shown it to be safe, compared to some other materials like glass, silicone is still relatively new and it’s always possible that new research could bring up potential concerns. I wouldn’t blame you if you want to avoid silicone bottles for this reason, but keep in mind that most water bottles use some silicone, either in the seals, straw, or spout. It’s very hard to completely avoid silicone in water bottles nowadays. The Best Silicone Bottles for Kids The 100% silicone bottle market is relatively new, so there aren't nearly as many options to choose from compared to stainless steel. Many do not have great reviews, so we're waiting for this sub-genre to develop more. Still, here are a few worth considering for children of varying ages.
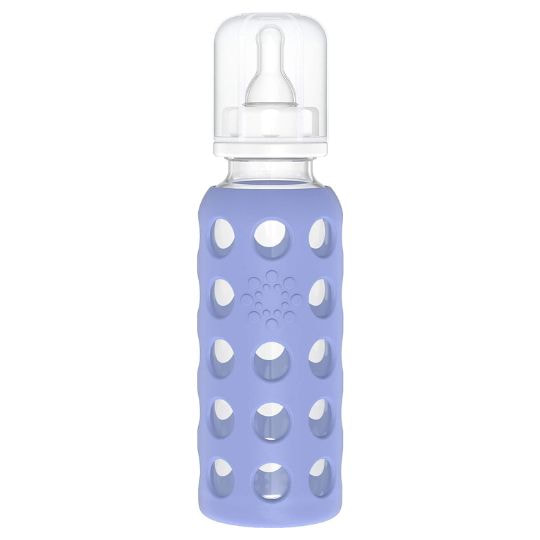
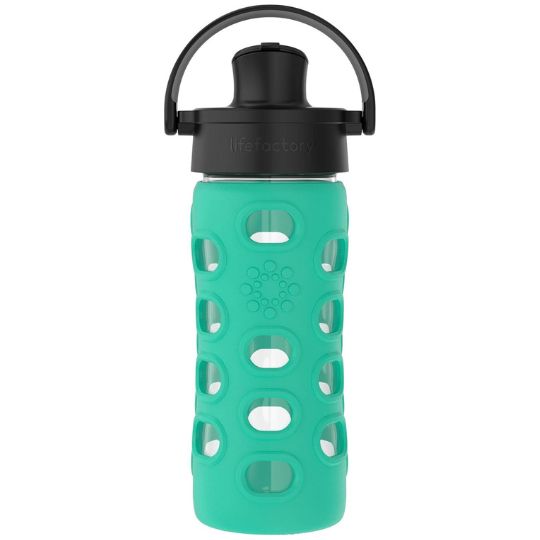
GLASSAre Glass Bottles Safe for Kids? Glass gives the cleanest drinking experience, and many people feel safest using glass because it’s a material that’s been in use for a long time and has a more natural feel to it. Many people prefer glass because they find that it doesn’t have an aftertaste that you might have with plastic, silicone, or stainless steel. And even though materials like BPA-free plastic and silicone are tested to be safe, glass is made with fewer additives and chemicals so many people feel safer that it helps avoid leaching of potentially harmful chemicals. Should You Avoid Glass Bottles for Kids? Now all that sounds great, but there is a big drawback. Glass is usually the heaviest bottle and can be extra bulky, so it may be more difficult for your child to manage than alternatives like plastic or stainless steel. And obviously, glass can also break and create a physical hazard with sharp edges. If you want to get a glass bottle for your child, make sure it has a protective sleeve and is made of borosilicate glass because it’ll less likely to shatter and is more temperature and shock resistant. You may want to avoid mason jars because most of them are not made of borosilicate glass. The Best Glass Bottles for Kids These are some of our favorite glass bottle options for kids within a few age ranges.
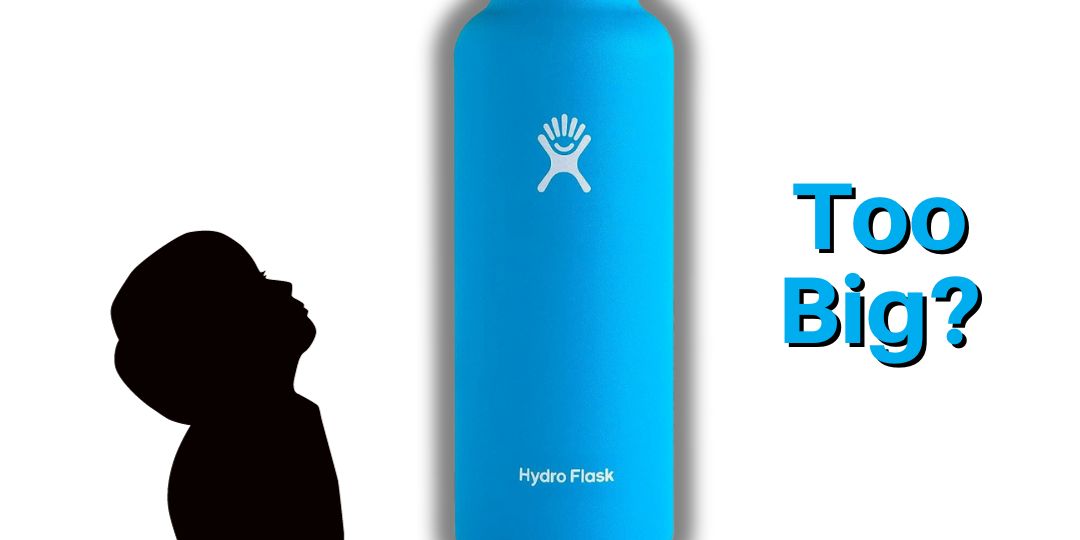
SPONSORFJbottle Real quick, I’d like to take a few moments to thank FJbottle for sponsoring this video. One thing they do well is clearly label what type of stainless steel is used in their bottles, and they have a mix of 304 and 316. With other brands, sometimes it can take more digging around online to know which grade it is, and higher-grade 316 stainless steel bottles can sometimes be hard to find. They sent us these bottles to help us have some content for this video, and we appreciate the different designs they’ve come up with. There are spout lids, straw lids with silicone tips, and quite a few different designs for whatever your kid is interested in. Each bottle comes with a cleaning brush and a straw cleaner if it’s a straw lid, so it’s easier to keep your bottle clean right from the start without having to buy a cleaning kit, though you eventually may want a more robust bottle cleaning brush. This one is a kid-size of the 34-ounce bottle that I used a lot over the last few months and honestly became one of my favorite bottles. It has a magnetic lid, a carrying strap on the side that I ended up using a lot more than I thought I would, and an anti-slip base that helps prevent a few dents and spills. Please note that they do have plastic under the lids, but the fact that they have 316 stainless steel options and silicone straw options tells me that they are very aware of material safety. We’re very thankful for their support, so we hope you’ll visit www.fjbottle.com to learn more! Question #2 - Which Bottles are Easiest for Children to Use?The next question you’ll want to ask yourself is whether the bottle will be easy for your child to use. What Size Water Bottle is Best for Children Pick a size that’s a good fit for your child depending on his or her age and ability. I’d recommend sticking to 16-ounces at most for younger kids because larger bottles like 20-ounce and especially 32 and 40-ounce would be too much to handle. Bottles can be pretty big and bulky, so look for features that make a bottle easier to carry like a carrying strap, pouch, or large handle. Are Straw or Spout Bottles Better for Children? To make it less likely to have spills, there are a few things to keep an eye out for. Straw lids are easier for many children to drink from, but they're also more prone to leaking, especially if you store a bottle on its side like in a backpack. So depending on your child's age, you may one one more than the other. Double-check the reviews since there’s almost always someone who will mention if it leaks easily. Question #3 - Will Your Child Like It?The third question you should ask is, will my child even want to use this bottle? Now for sure, buying a bottle that’s easy to use important to encourage regular use, but kids are all about style and sporting something that’s fits their interests. This is where having different styles really comes in handy. Is your kid into trains? Unicorns? Pink? Blue? Brands like FJbottle and Klean Kanteen have designs with different graphics and themes, while brands like Hydro Flask and YETI only have color variations. You know your kid better than anyone else, so get them a bottle that strikes a chord with what they’re interested in. That will help encourage them to keep their bottle with them and build on healthy hydration habits. 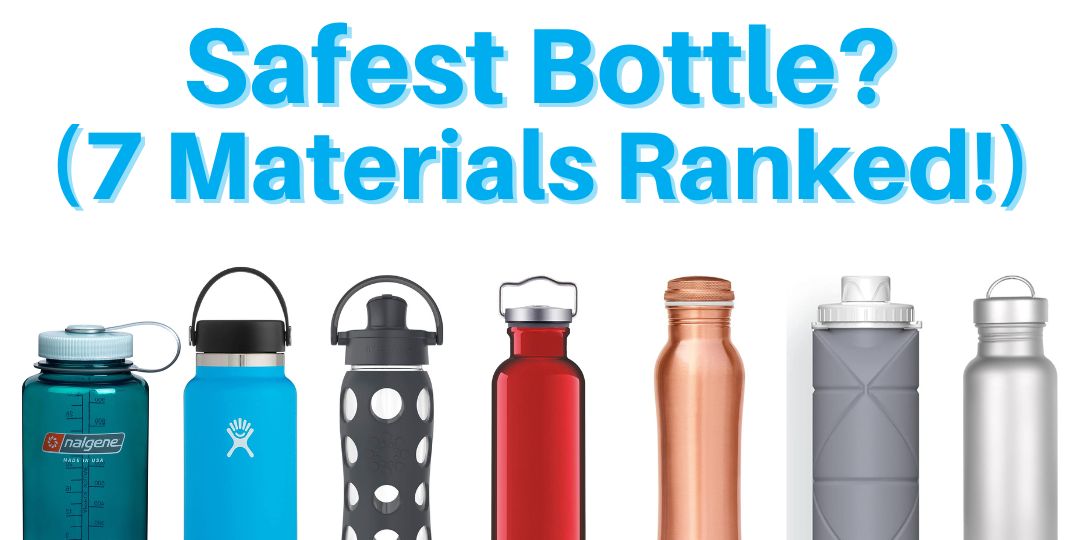 Update March 9, 2024: For more info about lead and Stanley bottles, see our more recent post here. What is the Safest Water Bottle Material?A common question that many people ask when buying a reusable water bottle is, will this bottle be safe to drink from every day? It's important to know that your bottles are safe for you and your family to use, so in this video, we are going to take a closer look at seven types of water bottle materials:
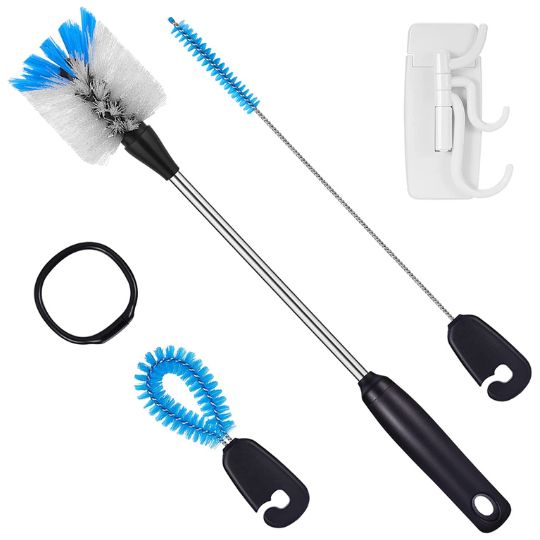
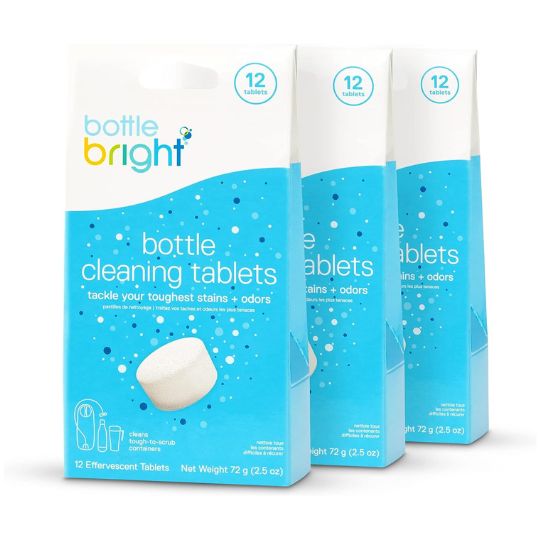
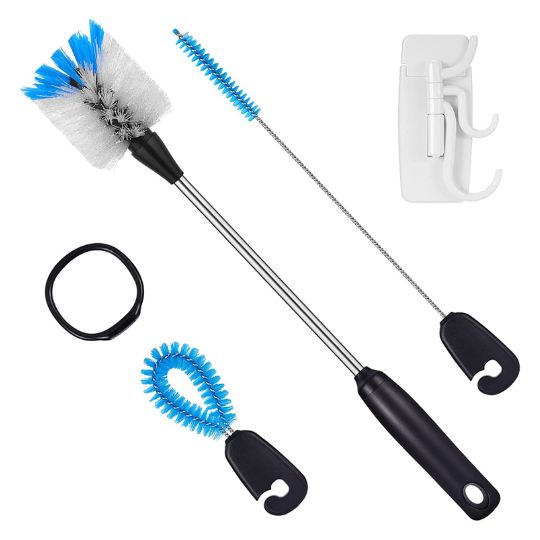
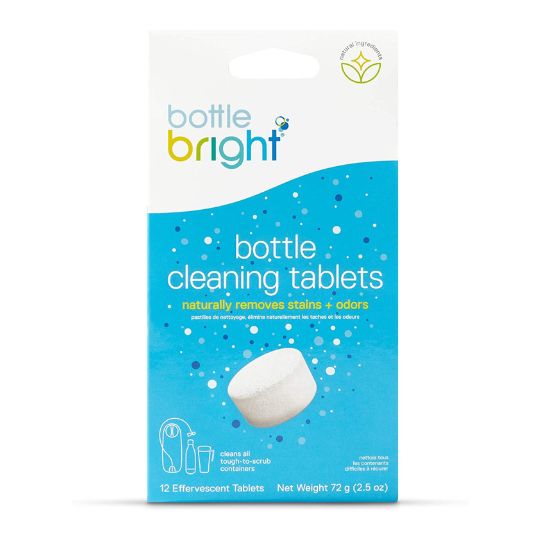
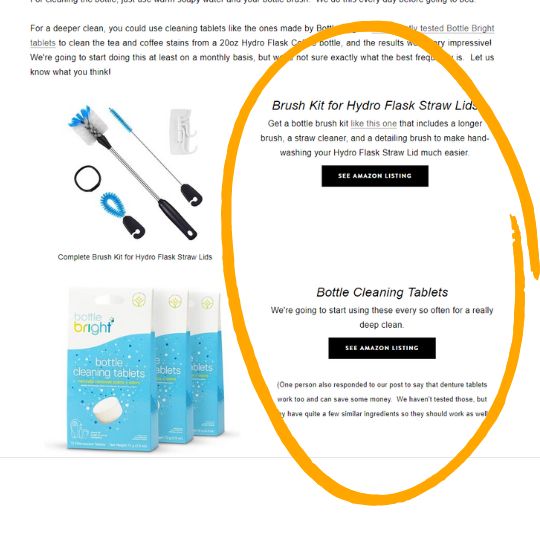
Our goal is to give you a better understanding of the available options on the market today so you can make the best decision for your situation. We'll review which ones are generally considered to be the safest, and which ones you may want to avoid. (Rankings are at the end) Don't Forget to Clean your Bottle RegularlyBefore we even talk about any water bottle materials, we need to talk about cleaning. Any bottle that isn’t cleaned regularly will eventually become unsafe to drink from due to bacteria buildup. In an ideal world, you should wash your bottle after every single use, but that’s not practical for a lot of people and situations. At the very least though, you should try wash your bottle thoroughly at least every 2-3 days if you use it each day . Using a brush kit like this one is really helpful to clean larger water bottles, especially narrow mouths. It’s also a good idea to give your bottle a deep clean every few weeks with a cleaning tablet, and I found that Bottle Bright’s tablets worked great to get stains out of my coffee bottle. We also recommend that you do not use bleach with your bottle. With some bottles, like 304 stainless steel, bleach can corrode the metal and cause damage. Just clean your bottle regularly with warm, soapy water and use a bottle cleaning tablet every week or two for a deeper clean and you’ll be good. Bottle Cleaning Products We Use Regularly LeachingThe main concern that usually comes up when talking about water bottle materials and health is leaching, which is when chemicals or toxins from the bottle seep into the drink. It’s the same process that created a widespread fear tomatoes in the 1700s when many people thought they were poisonous, as explained in more detail in this article by Reader's Digest. Of course the tomatoes themselves weren’t toxic, but the acid from the fruit would leach lead from the pewter plates and utensils, causing lead poisoning. More recently, BPAs have received most of the headlines, which leads us into our first material, plastic. Are Plastic Bottles Safe?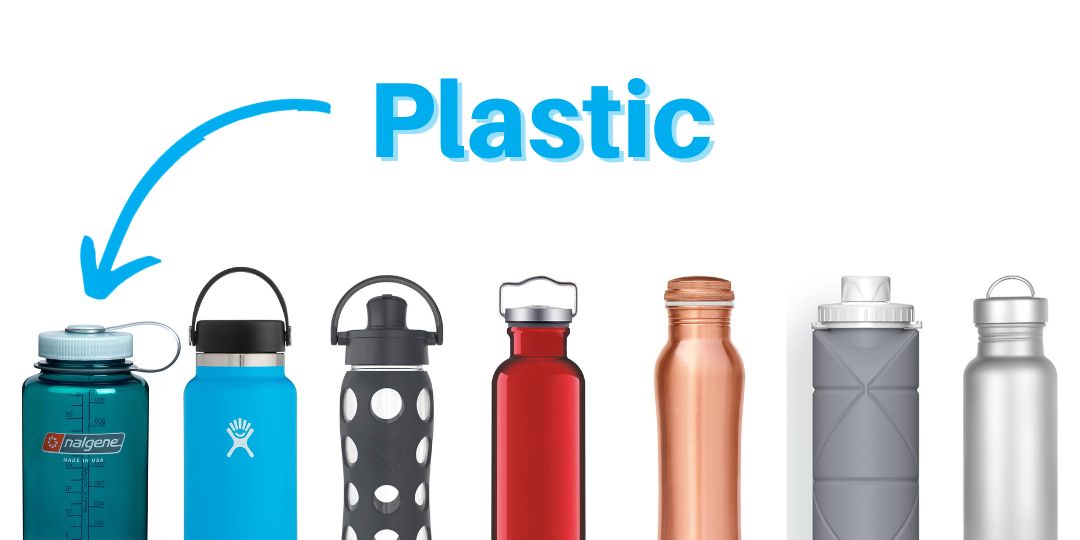 Plastic is the most commonly used material today for water bottles for several reasons, including how it’s inexpensive, easily manufactured, and extremely durable. When it comes to concerns with reusable plastic bottles, you’ve no doubt heard about bisphenol A compounds, more commonly known as BPAs. These are widely used in industrial and consumer goods, but they have also been associated with adverse health effects in many studies. One of the primary concerns is that BPA can mimic the effects of estrogen on your body, which can lead to hormone imbalance, but there are other potential health concerns as well. To be clear, the risk is not completely known. Researching any kind of low-dose, long term exposure like with BPAs is difficult, and there is some uncertainty on how of a risk BPAs actually pose for most people. With over 17,000 scientific papers on PubMed as of 2023, there is understandably a mix of results. And in fact, many studies indicate that most BPA exposure is so small that it is not a significant risk for the majority of people. However, there is enough evidence and uncertainty that’s led to most public health agencies taking steps to reduce BPA use, especially in products intended to be used with infants. For example, in 2012, the EPA officially amended its regulations to no longer allow BPA use in baby bottles and sippy cups. Nalgene's History with BPAs
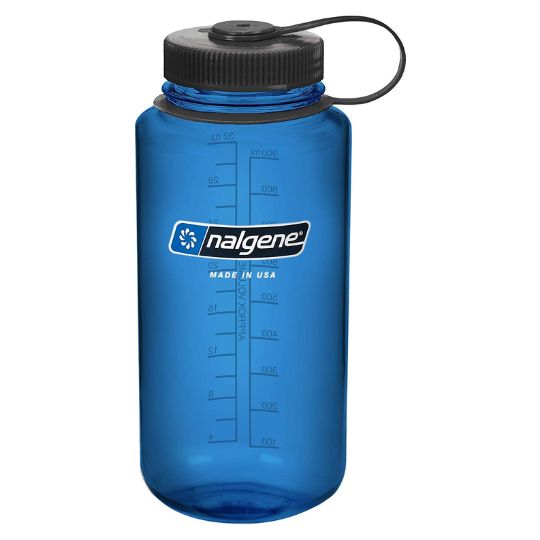
Are Plastic Water Bottles Safe Today? Given all these changes and public knowledge about BPAs today, you’d be hard-pressed to find a reusable plastic bottle on the market that isn’t BPA-free, but it doesn’t hurt to check. Just look on the product listing or on the packaging for the phrase “BPA-free.” And if you have an older plastic bottle that you’re not sure about, you might want to consider buying a replacement. In general, it’s a good idea to stick to Tritan bottles if you’re going with plastic. This type of material is really light, so it’s for hiking when you want to minimize how much weight you’re carrying. Nalgene and CamelBak have some tried-and-true bottles to choose from, and YETI recently released their Yonder series plastic bottle. Tritan Plastic Water Bottles We Use Are Stainless Steel Bottles Safe? The most popular alternative on the market today is stainless steel. This is easily the best option if you’re looking for an insulated bottle to keep your drink hot or cold since there are so many dual-wall vacuum insulated options available. Steel vs Stainless Steel Steel and stainless steel are not the same thing. Stainless steel has additives like chromium and nickel that help the alloy resist corrosion and rust better than regular carbon steel. But don’t be concerned if you see something online or talk to someone who references "steel" bottles because that’s just shorthand for stainless steel. If anyone reading this knows of a bottle that is made from non-stainless steel, also known as carbon steel, let me know because that’d be news to me and I’m guessing it’d involve some kind of wacky health claim that you probably shouldn’t trust. Grades of Stainless Steel in Water Bottles (304 vs 316 vs 18-8 vs 18-10) To go a step further down the steel rabbit hole, not all stainless steels are the same. The most common types you’ll see associated with water bottles are 304, 316, 18-8, and 18-10. I won’t get into the details here about these different grades, and honestly it can get a little confusing because there is some overlap between the classifications. You’ll most commonly see 304 or 18-8 listed in the product descriptions for stainless steel water bottles. Technically, 316 is better than 304 and 18-10 is better than 18-8 and, so if you’re really looking for the best-of-the-best, go with one of the higher grades. For example, 316 steel is more resistant to corrosion in salty environments, making it a better steel for marine construction projects that will be in and around salt water. But when it comes to water bottles for average consumers, it doesn’t make a practical difference which grade you go with. Any of these four stainless steel alloys are recognized as food-safe. Stainless Steel Bottles We Use Which Stainless Steel Bottles Avoid Plastic Under the Lid? Many people who want to avoid plastic contacting their water buy a stainless steel bottle and assume they are good, but the reality is that most water bottles still have exposed plastic under the lid that can come in contact with your drink. Don’t forget to check under the lid if you’re looking to have completely free plastic drinking. To my knowledge, all of YETI’s lids have plastic on the bottom. Hydro Flask’s standard lids have plastic on the bottom, but they sell a replacement lid with stainless steel. Klean Kanteen’s TKWide insulated bottles have plastic on the bottom of the lids, but I’ve included a link in the description to two of their bottle options that have stainless steel under the lid. Stainless Steel Bottles that Do Not Have Plastic Under the Lid Are Glass Bottles Safe?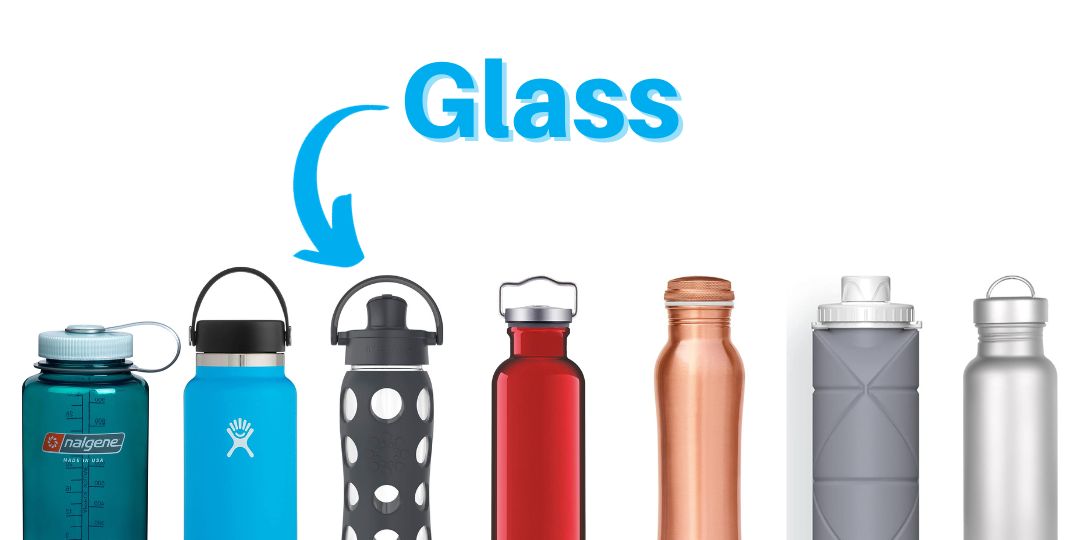 Glass is another good option to avoid plastic. It’s certainly been around longer than plastic or stainless steel, and it has more of a natural feel to it. Many people find that it doesn’t leave any kind of residual taste with some beverages that they experience with stainless steel or plastic. When it comes to a clean, natural material to drink from, it doesn’t get much better than using glass. Why You May Not Want to Use a Glass Bottle Safety with water bottles isn’t just related to what you ingest, and with glass, there is always a concern that it could break and create sharp edges. This is especially a concern for children. Glass is already pretty heavy and bulky, and it’s not hard to imagine a scenario where a child is running with a water bottle in his or her hand and trips. The natural reaction is to put your hands out in front to break your fall, and it could lead to some nasty cuts if the bottle breaks in your kid’s hands. It's worth noting that most glass bottles on the market are made with a specific type of glass called borosilicate. You may not have heard of this specific term before, but odds are that you’ve used this type of glass at some point. Pyrex is one of the most well-known borosilicate glass brands. This type of glass is more resistant to temperature changes and shock, so it’s less likely to crack or chip. In addition, many glass bottle brands manufacturers also sell their glass bottles with a protective silicone sleeve. So yes, this type of bottle is still more susceptible to breaking in a way that could be dangerous compared to plastic or stainless steel, but the combination of borosilicate glass and the silicone sleeve helps prevent this from happening in most situations. Popular Glass Water Bottles Glass Bottles that Do Not Have Plastic Under the Lid If your main goal is to avoid plastic contact completely, then any plastic lid is still obviously a problem. Thankfully there are some other brands like Sunkey, Mayu, and Anotion that have stainless steel or silicone under their lids. Are Aluminum Bottles Safe?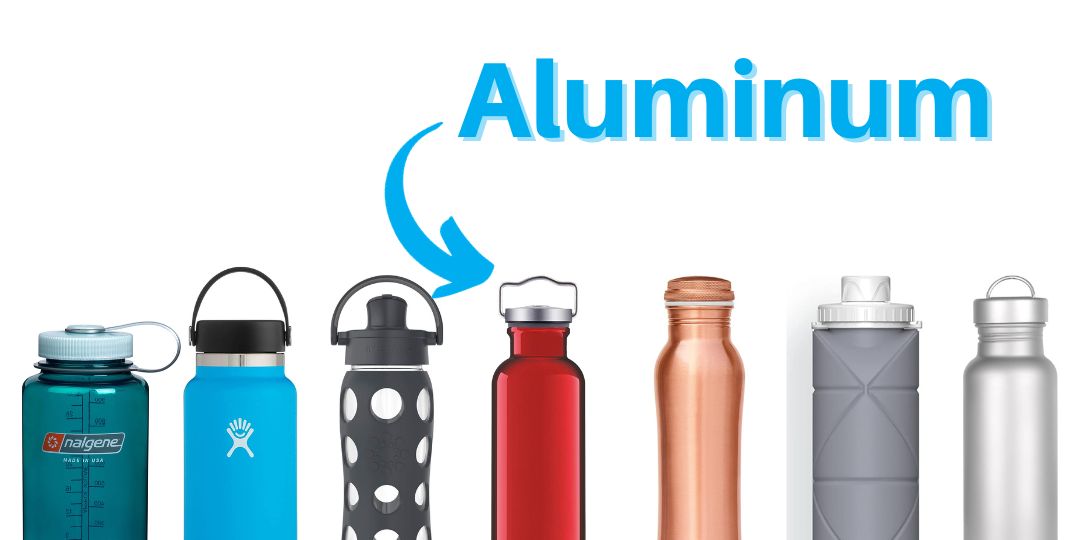 Aluminum is another common bottle material. It’s lighter and less expensive than stainless steel, but it’s not as durable and won’t insulate your drink as well as a dual-wall stainless-steel bottle would. You'll find aluminum is used in most single-use cans, like for soda and beer. The Liner Inside in Aluminum Cans One thing to be aware of is that aluminum reacts more with acidic liquids compared to other materials like stainless steel. For this reason, aluminum soda cans are made with a plastic liner, and that plastic liner often contains BPAs. Check out the short (51 second) video by Chemteacherphil that we've linked below because it does a really good job of showing this liner. Popular Aluminum Bottles
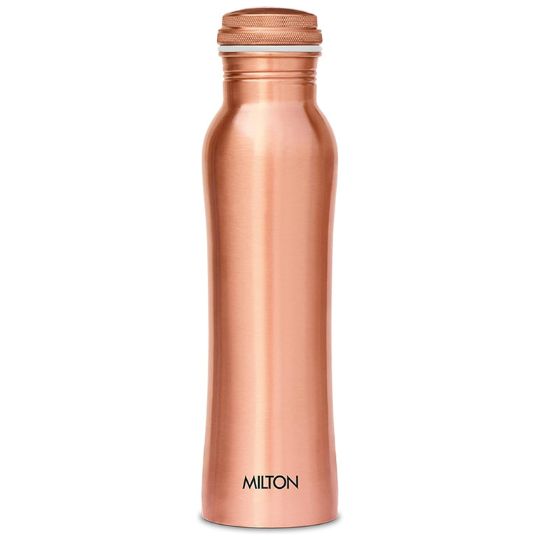
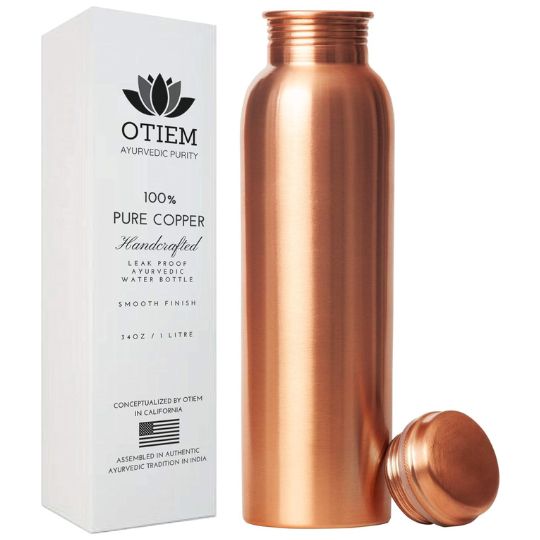
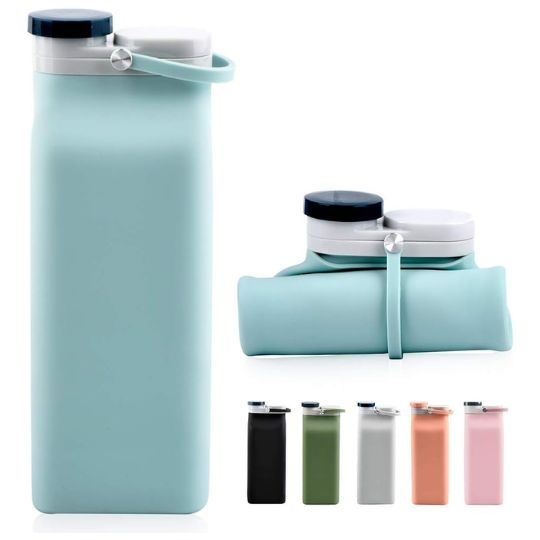
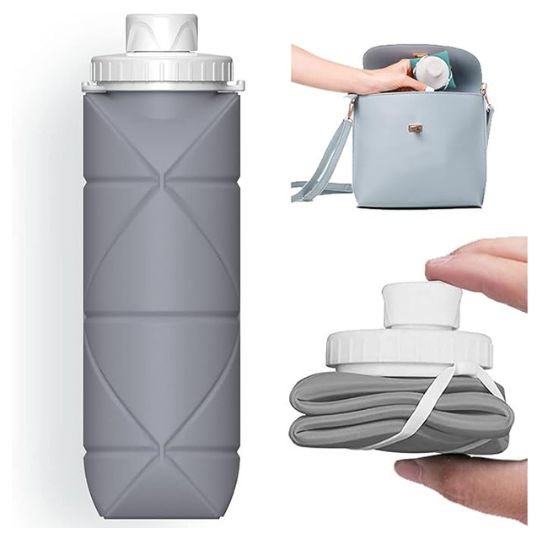
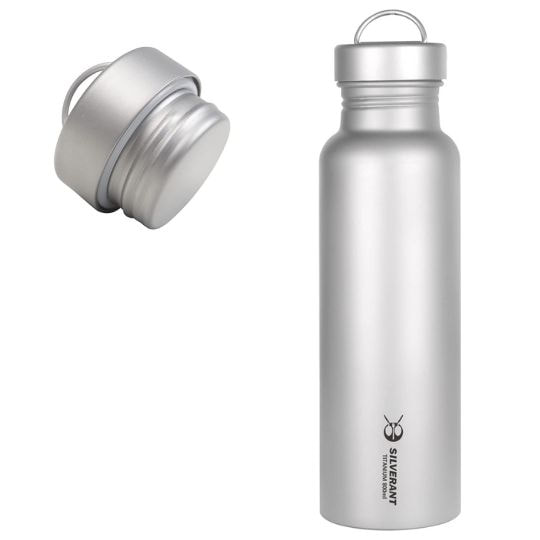
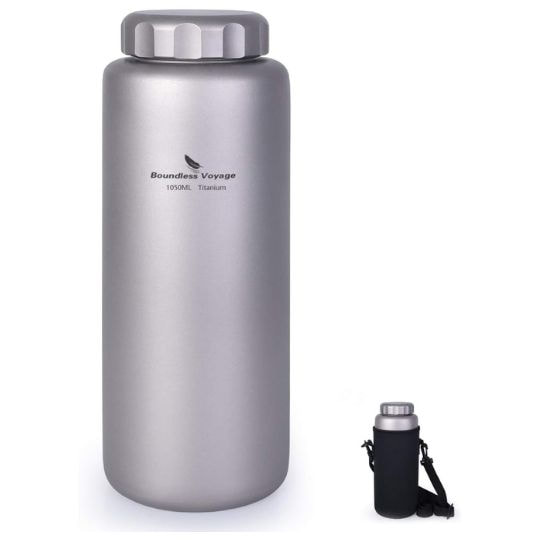
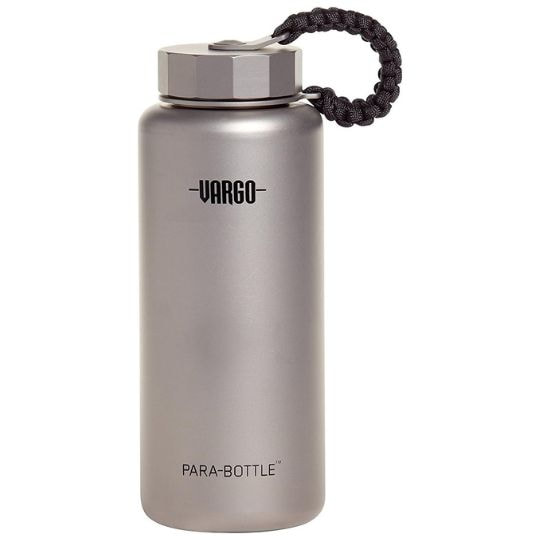
Are Copper Bottles Safe?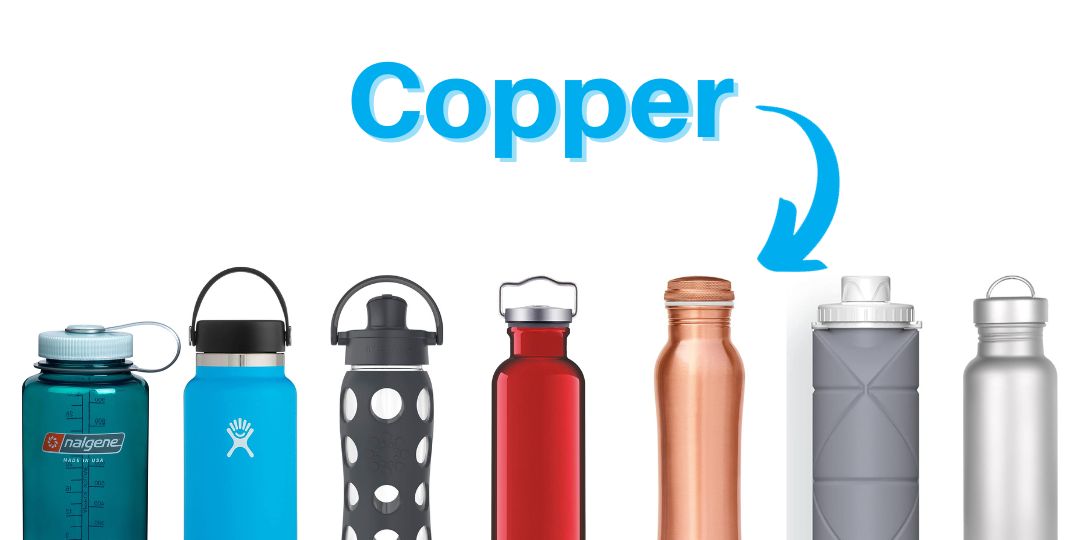 Copper is a newer option that you can find on the market today, like this one from the brand Milton that was released in 2020. From what we’ve read, copper is a double-edged sword. On the good side, they look really cool, and there is some evidence that the copper can kill bacteria and microbes in water. Some brands list additional health claims, including how copper is “known for its anti-oxidant, brain-stimulator and immunity booster properties.” However, as far as I can tell, this is dubious at best and is not backed up by trusted sources. In fact, too much copper intake can lead to symptoms like nausea, dizziness, and abdominal pain. Why You Shouldn't Buy a Copper Water Bottle Take this paper Q&A sheet from the Washington State Department of Health. It discusses the negative effects of ingesting water that’s been in contact with copper for too long, mostly involving old copper pipes. They recommend running water in copper pipes for a minute before using it, and whenever possible, use cold water only because hot water dissolves more copper. To be fair, this paper is referring primarily to old copper pipes that are used in construction, and I wouldn't be surprised if the high-grade copper that is allegedly used in many water bottles today is safer, especially because it's easier for you to clean and maintain it. However, there are other similar options like stainless steel that are generally accepted to be safer, so in my opinion, why take the risk? When Is a Copper Bottle a Good Option? If you do not have access to clean drinking water, then a copper bottle may be a good option for you. This is only because the antibacterial properties may provide enough of a benefit to overcome the negative effects of ingesting copper. But if you have access to clean drinking water, then we generally recommend against using a copper bottle. Copper Bottles on Amazon If you're set on buying a copper bottle, here are a couple popular options on Amazon. Are Silicone Bottles Safe?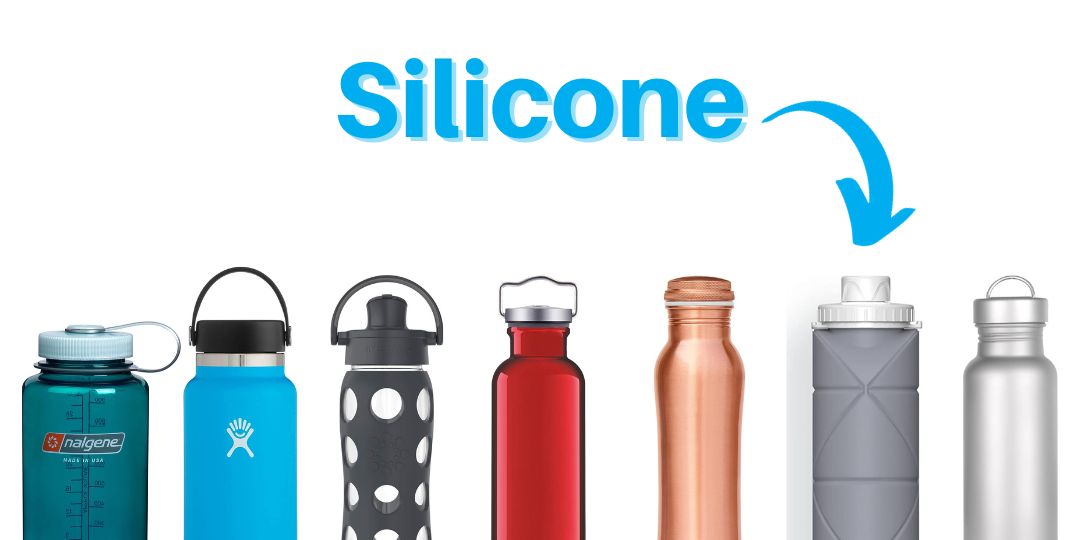 Silicone is a material that’s become more and more popular with food-safe products. It’s been used for a long time as a component, like with o-rings and gaskets to keep bottles water-tight, and now we’re even seeing some all-silicone options come out. They have some unique benefits given that they’re typically collapsible and lightweight, making them fantastic options for traveling and hiking. Yes, there are some plastic options like Platypus like this, but for those who want something that’s collapsible without the plastic, silicone is really the only good alternative. Does the Silicone Pinch Test Work? Quick note about silicone. There are silicone types that are not food-safe, and it’s typically when fillers used do not have the same food-safe properties. You might also read about a “pinch test” to verify if the silicone is safe. The thought is that if you pinch silicone and it turns white, this indicates it has fillers that can be unsafe. However, this is not necessarily true, and the pinch test is more of a myth from what I have read. There are food-safe silicone products that turn white when pinched but that are still perfectly safe. When buying a silicone product, make sure it says it’s FDA-approved, food-grade, or food-safe silicone, and if you have any questions, reach out to the manufacturer. Does Silicone Contain BPAs, and is Silicone Safer than Plastic? No, silicone does not contain BPAs. This article does a great job at explaining more of the details and information about silicone and how it's different and generally considered to be safer than plastic. And the Canadian government writes that there are no known health hazards. In the most basic terms, silicone uses silica, aka sand, which is the same primary component as glass. This avoids some of the more problematic polymers and compounds found in plastics. Having said that, silicone is obviously very synthetic and is relatively new-to-market compared to an alternative like glass. For that reason, I wouldn't fault you if you chose to avoid an all-silicone bottle for now until more research is completed. Silicone Bottles on Amazon There aren’t too many all-silicone bottles on the market yet, but two of the more popular ones now that are worth taking a look at are E-Senior and Special Made. Are Titanium Bottles Safe?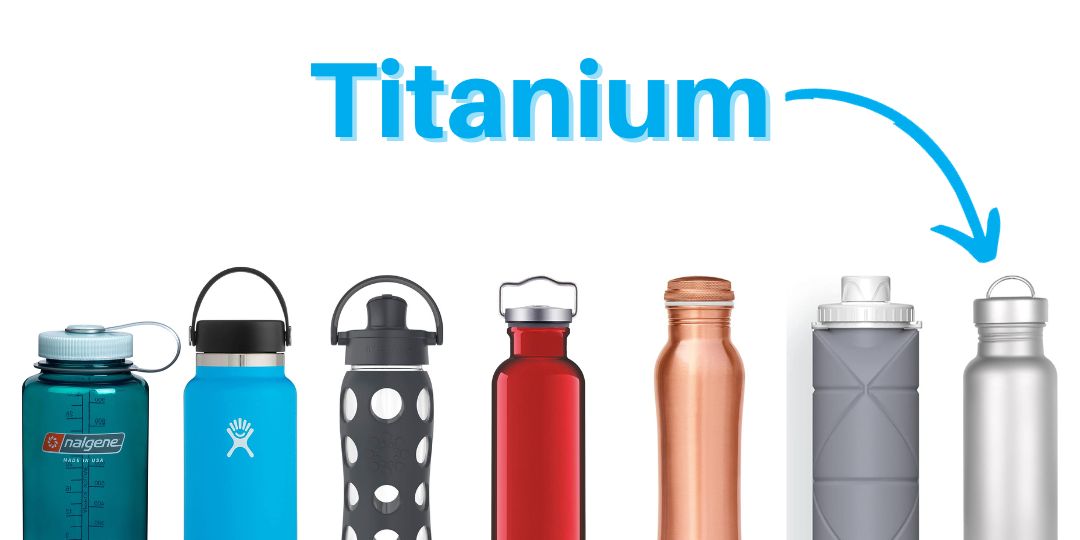 The last bottle material we’ll cover in this video is titanium. At first glance, this looks like one of the best options available. It’s extremely durable, more lightweight than stainless steel, and is corrosion-resistant. Because it is better than stainless steel in nearly every way including being almost 50% lighter, titanium is a fantastic option for hiking. Why Shouldn't you Buy a Titanium Bottle? But for all of that functionality, you can expect to pay a much higher price. The cheapest titanium bottle option we found is $80, and other options easily get up over triple digits. In short, titanium bottles appear to be one of, if not the, best material options available for water bottles, but they have a price point that reflects the premium nature of this material. One other downside worth mentioning is that there does not appear to be a dual-wall vacuum insulated option like you’ll find with so many stainless steel bottles. Some brands like Boundless try to spin this as a positive because you can put your bottle directly on a stove to boil water for cooking or to purify it, and for sure this is a benefit when camping or hiking long distances. But for most people, they just want a bottle that can hold ice for 4-8 hours, and I’m not sure a titanium bottle is a good option for that unless you get a thermal sleeve. Titanium Bottles On Amazon that We'd Love to Test Which Water Bottle Materials are the Safest? Yo sum things up, I like to think of safety with different water bottle materials in three tiers. Tier 3 - Avoid Copper At the bottom of the list is copper. It’s probably not a good idea to drink regularly from a container like this. You’ll pay quite a bit of money, and it doesn’t look like science backs up the health claims. Tier 2 - Probably OK, but there are some concerns Plastics (Tritan and Polypropylene) Aluminum Each of these materials are safe according to many studies and the manufacturers, but there are a few details that caused me to rank them a little lower, mainly because there are still some concerns about plastics in general and because aluminum bottles all seem to have an interior lining. Tier 1 - Safest Stainless Steel Silicone* Titanium Glass** And finally, the safest materials to use are stainless steel, silicone, titanium, and glass. From what I’ve read, these bottles all have consistent safety testing results, and you should feel safe and confident using any of them. *Silicone is newer and more closely related to plastic, so I wouldn't fault you if you wanted to avoid this type of bottle until more research is done. I almost ranked it in Tier 2 for that reason. **Glass would be at an even higher level if it weren’t for concerns with breakage and cutting yourself. But if you’re really looking for the cleanest, most natural drinking option, glass is probably the best material to go with. 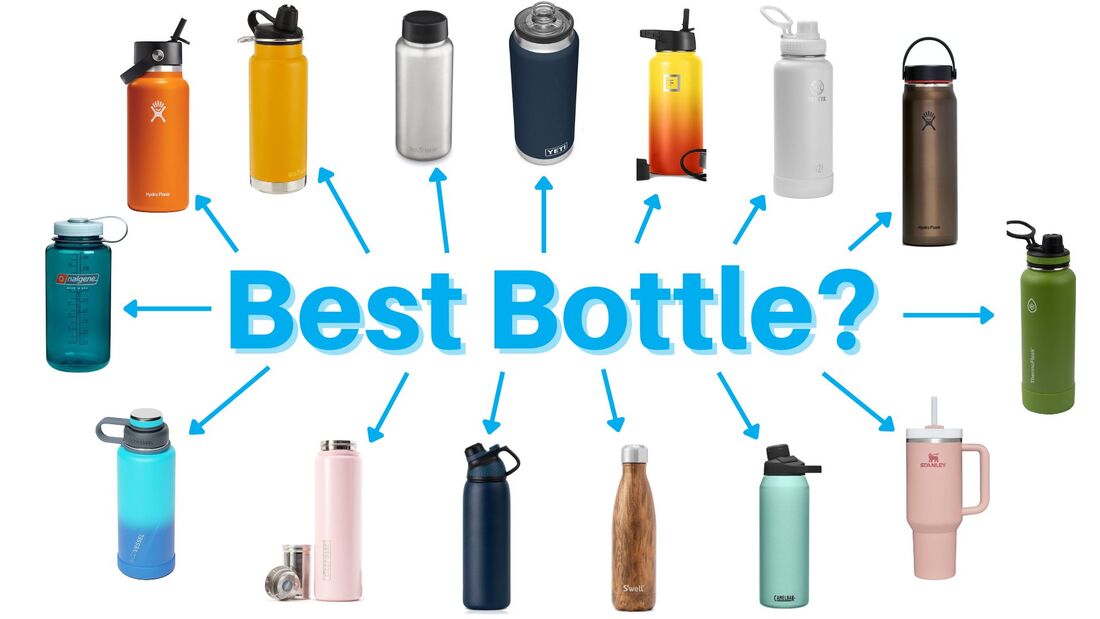 What is the Best Water Bottle?It’s 2023, and there are literally hundreds if not thousands of water bottle brands to choose from that initially can appear very similar. With such a saturated market you might be wondering, what is the best water bottle today? But really, that’s an impossible question to answer since different bottles are better for different situations. The better question to ask is, which water bottle is best for you based on how you plan to use it? Content Overview: Heads up, this is a pretty long post with a lot of information. Here's what we'll cover in case you'd like to skip ahead to a certain point.
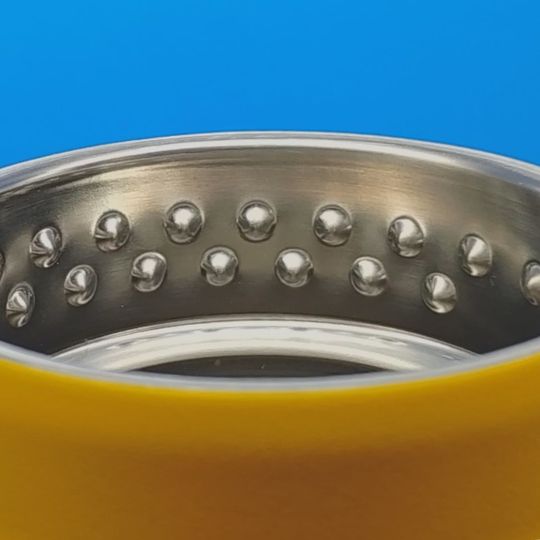
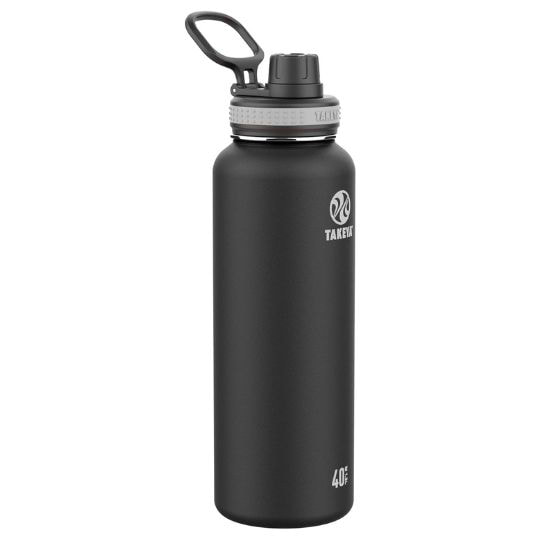
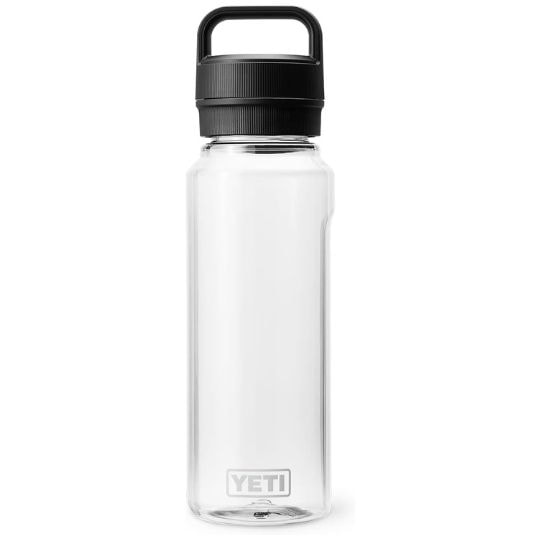
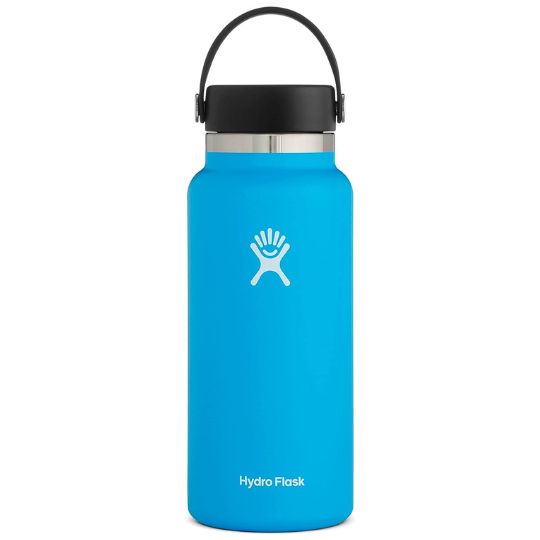
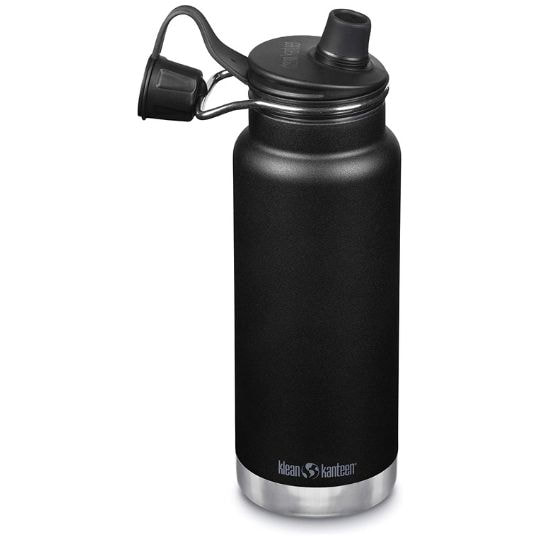
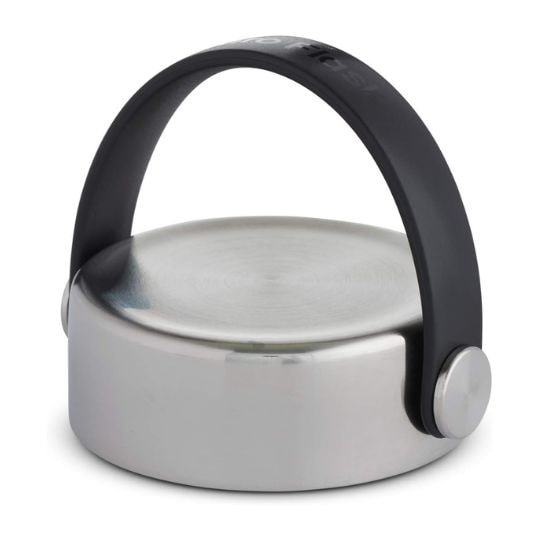
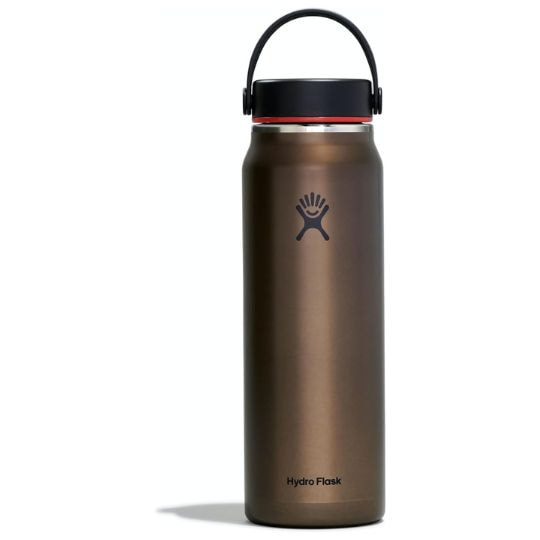
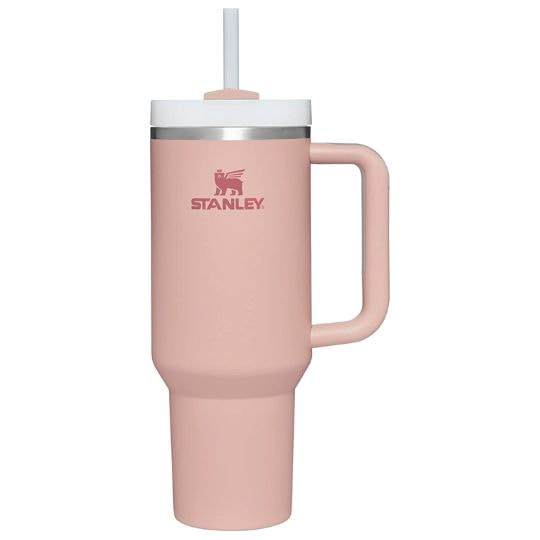
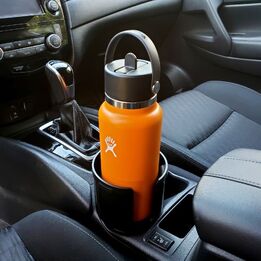
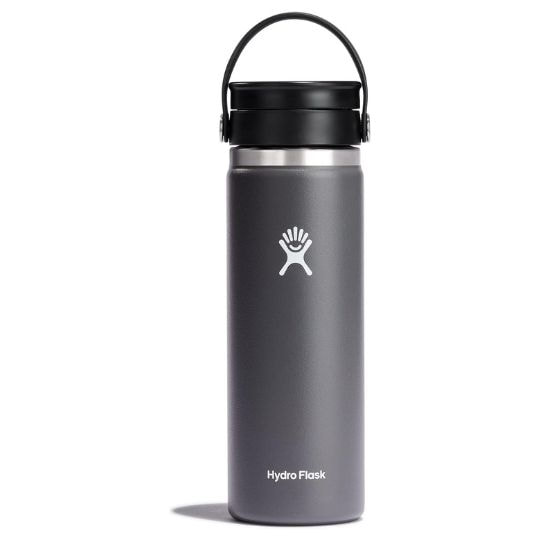
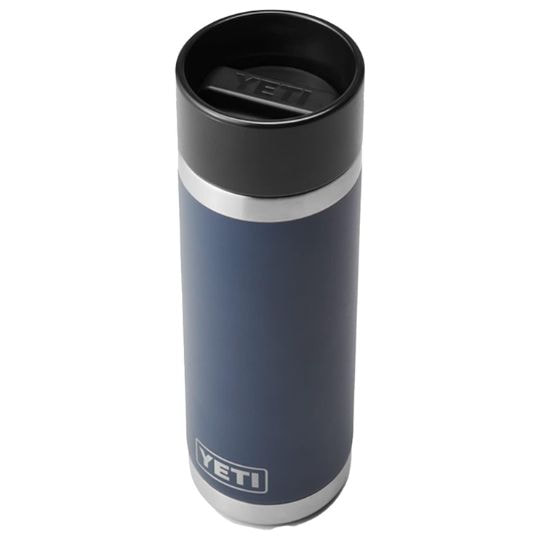
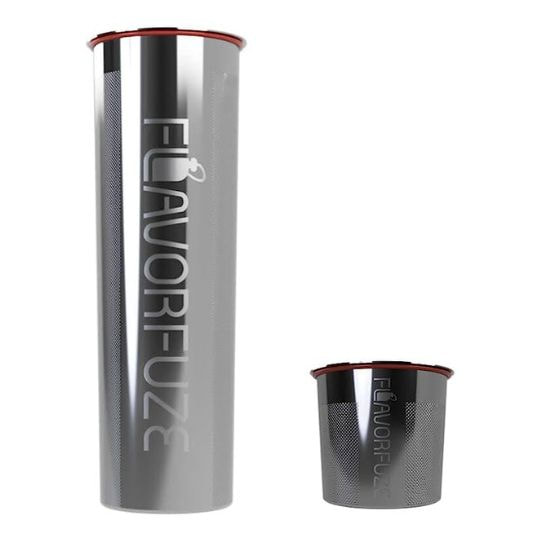
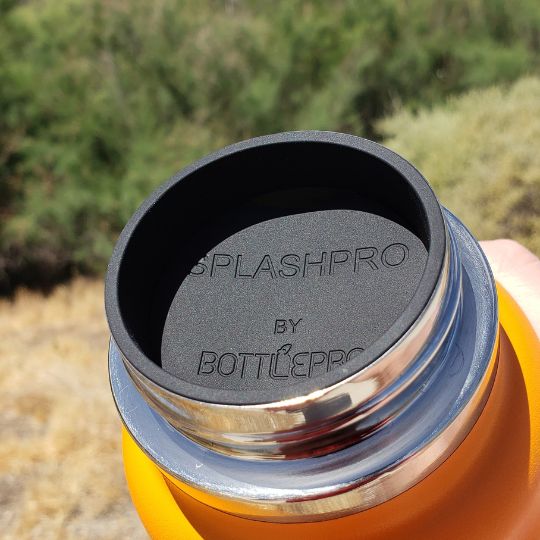
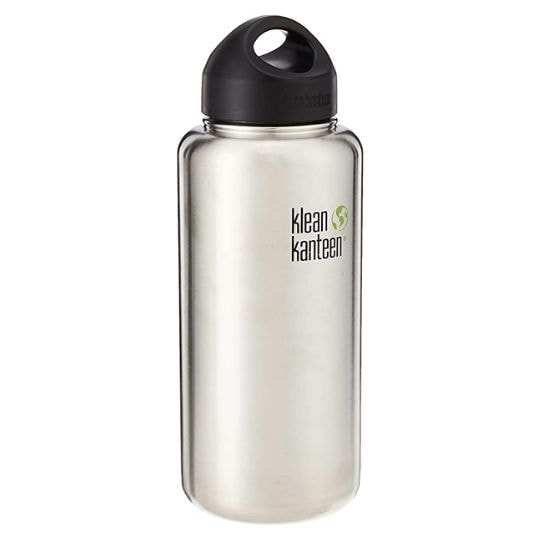
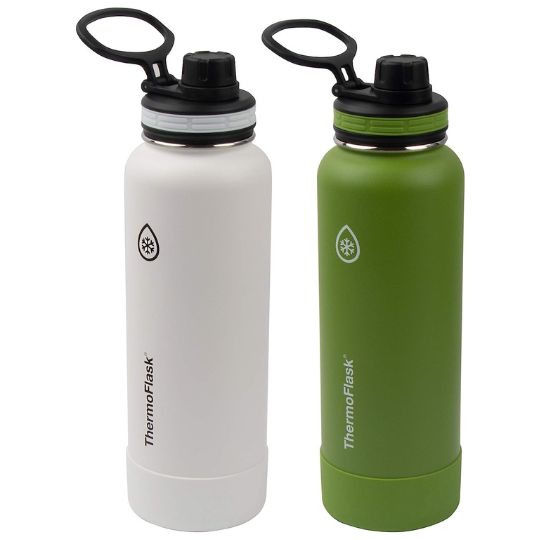
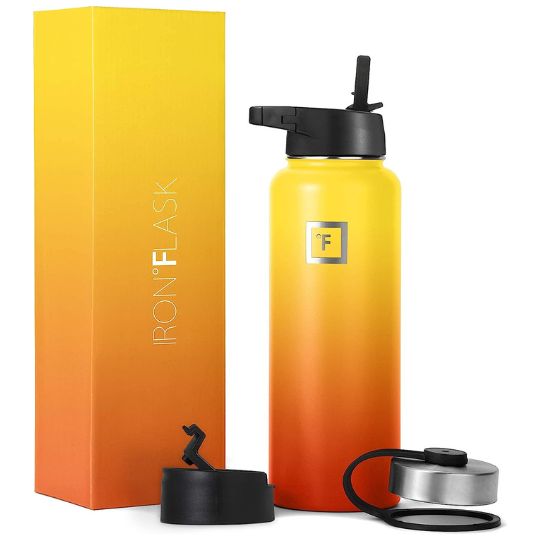
Our Video ReviewOur YouTube video covers the same information in this post, so click the link if you'd rather see the video. Otherwise, keep reading the full post below!
First, a few things to note.
 What Type of Water Bottle Do You Need?Before you even look at any bottles, ask yourself these questions.
 Popular and Notable Water Bottles and BrandsNow let’s look at some of the more popular bottles and brands. We'll cover:
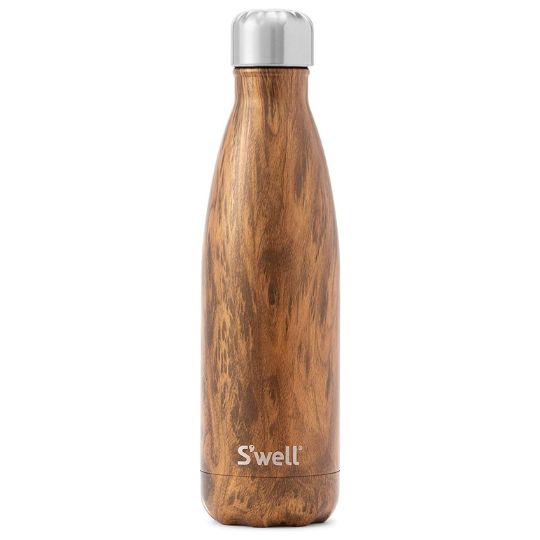
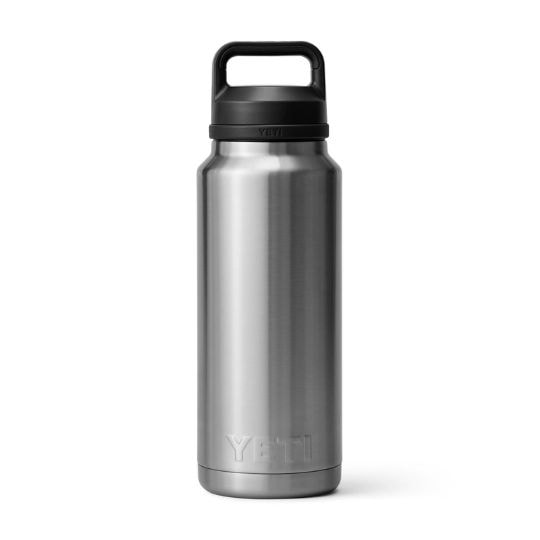
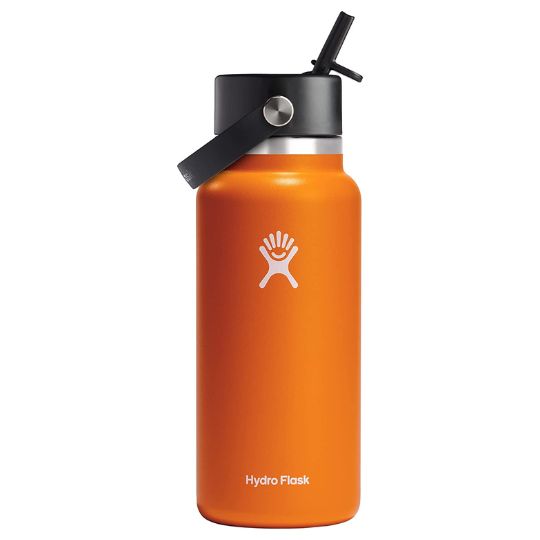
Nalgene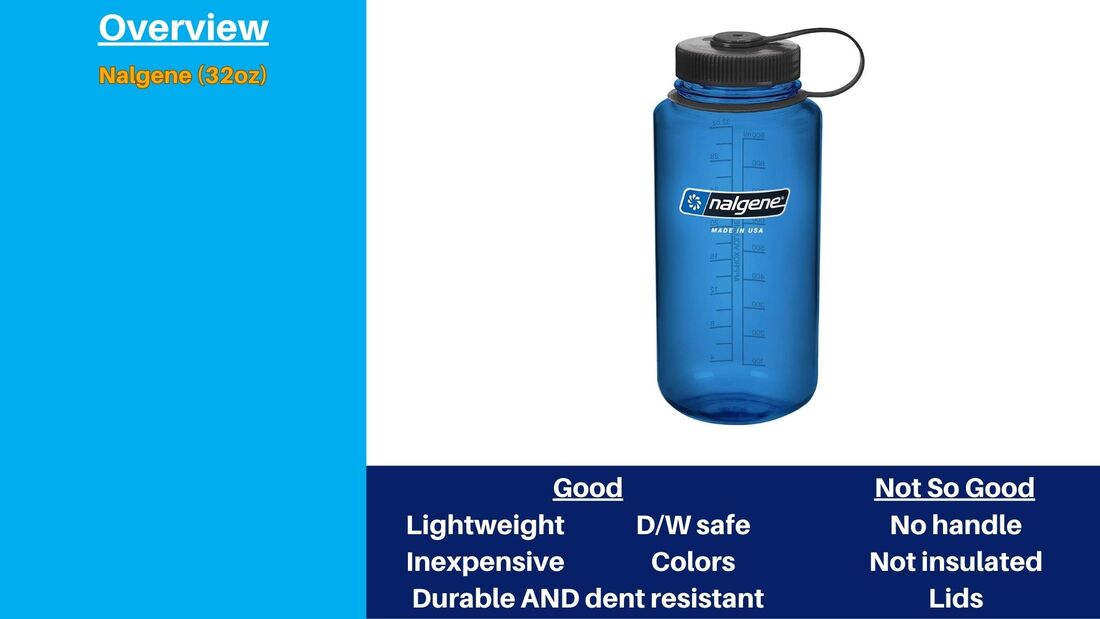 Nalgenes are lightweight, inexpensive, dishwasher safe, and they come in many color options. And while all of the bottles in this review are pretty durable overall since most are made of stainless-steel, Nalgenes are also much more dent resistant because of the plastic construction compared to stainless-steel bottles which can dent more easily. Nalgene is also the only bottle brand we looked at that is made in the USA. Some drawbacks are that they only come in plastic, they don’t have a built-in handle if you don’t count the tether for the lid, they don’t have an insulated version, and there aren’t many options to choose from for lids. It doesn’t feel like the brand has innovated like others have, which has left Nalgene struggling behind other bottles in many aspects. But they still make a great, dependable bottle at an affordable price point, which makes it a good option for many people. Klean Kanteen Classic (Non-Insulated)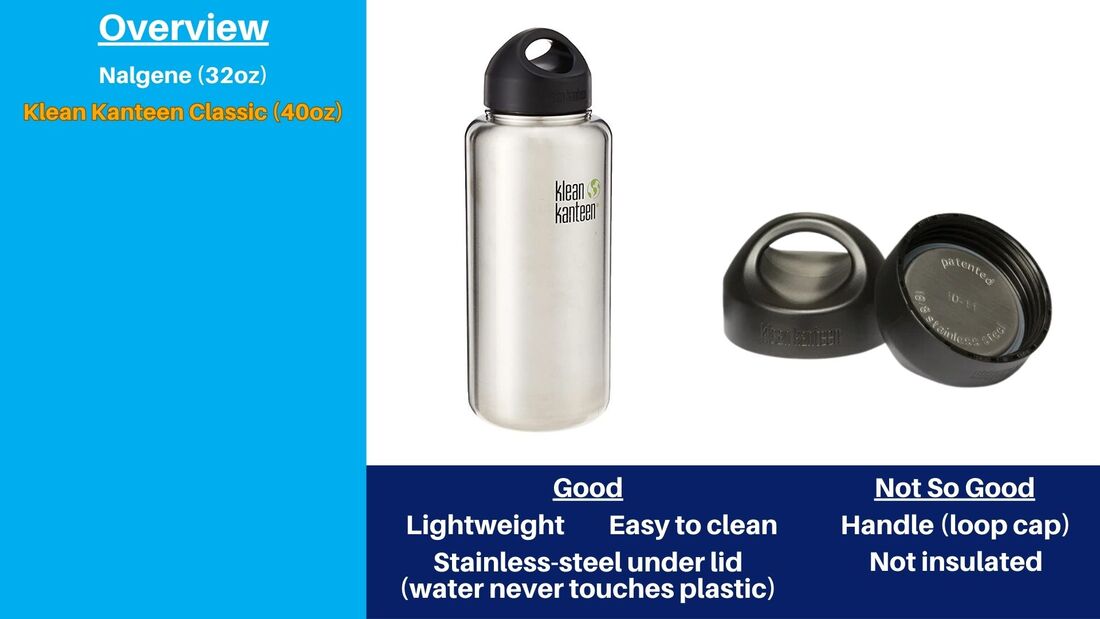 Klean Kanteen has a mix of insulated and non-insulated bottles. Non-insulated Klean Kanteens are lighter than dual-wall bottles, and they have a simple design that is very easy to clean. They’re also notable for how the standard cap has steel on the bottom, so your water never touches plastic. Most other stainless-steel bottles on the market, including Klean Kanteen’s own TKWide Series, have plastic under the lid. Some drawbacks are that we don’t like the standard loop caps very much, and they aren’t insulated. Klean Kanteen TKWide Insulated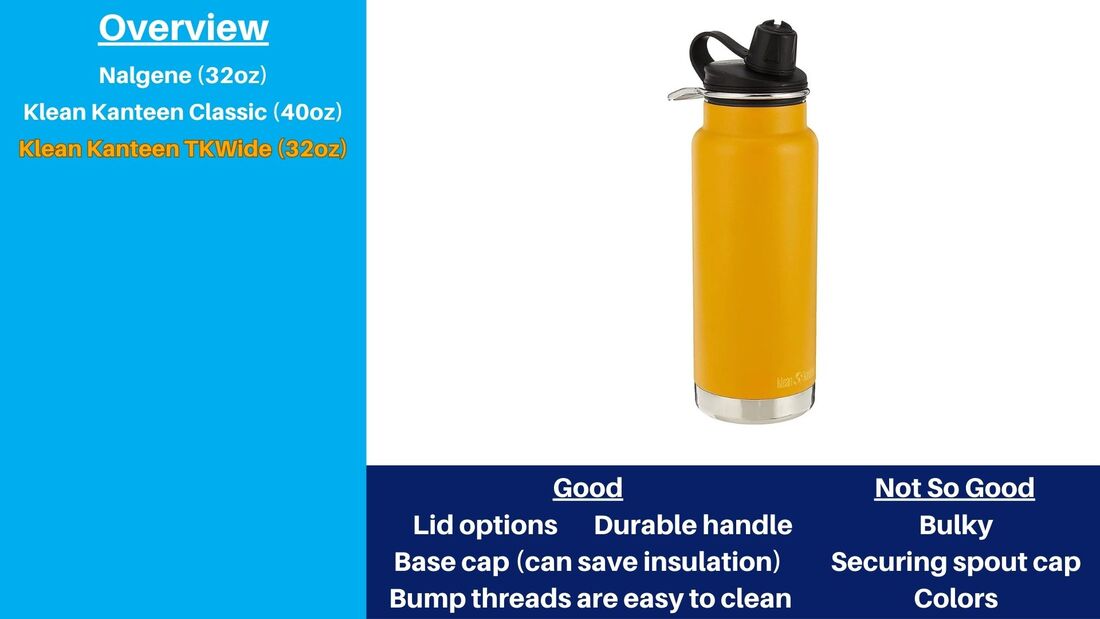 Klean Kanteen recently came out with their TKWide insulated bottles. They have a range of well-engineered lid options that feel unique compared to other brands. The rigid handle feels very sturdy, and one unique benefit is the Impact Base Cap on the bottom. This is a hollow cap that absorbs an impact if you drop your bottle, which lessens the chance that a dent could affect the vacuum insulation. This is one of the easier bottles to clean because the threads on the bottle are made of small bumps in the stainless-steel instead of traditional thread grooves. Some downsides are the overall bulk, both in terms of weight and size for a 32-ounce bottle. We also wish the spout cap was a little easier to keep out of the way. You have to snap it onto the metal handle, which isn’t as easy as some other bottles like Takeya, Camelbak, and FJbottle. There aren’t too many color options for Klean Kanteens, so keep that in mind if you’re looking for your own style. YETI Rambler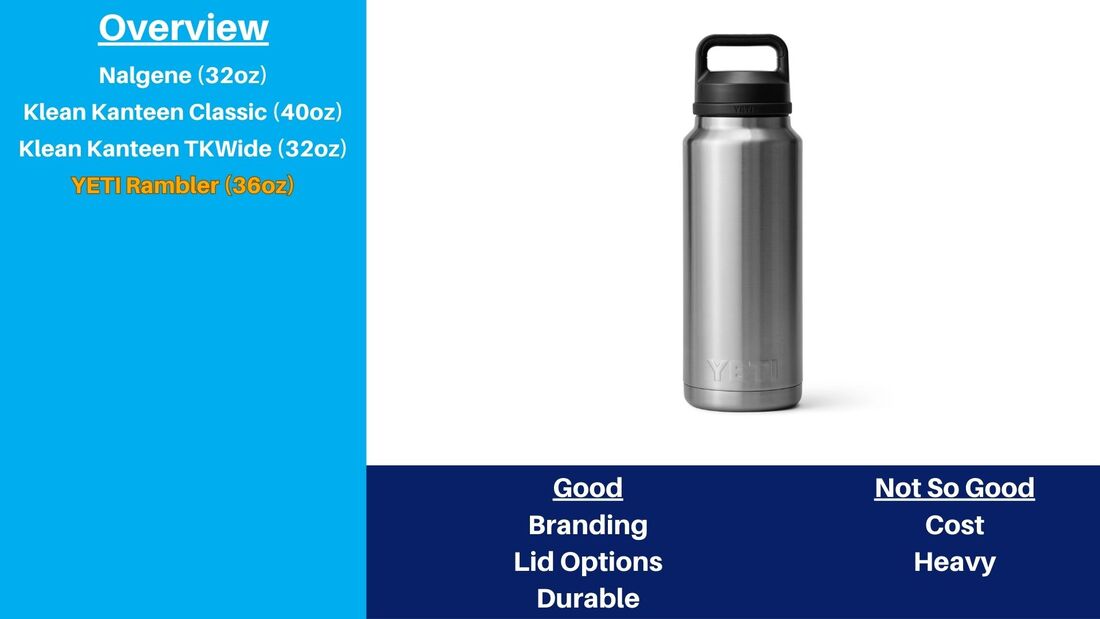 YETI is in the top-tier for brand prestige, and therefore cost. They are notoriously expensive, but their products are generally very high-quality, which has led to a devoted following of fans and supporters. There are six lid options for their Rambler series wide mouth bottles, so you can pick what’s best for you. Downsides are definitely the cost, but also that these bottles are heavier than some comparable ones on the market. Hydro Flask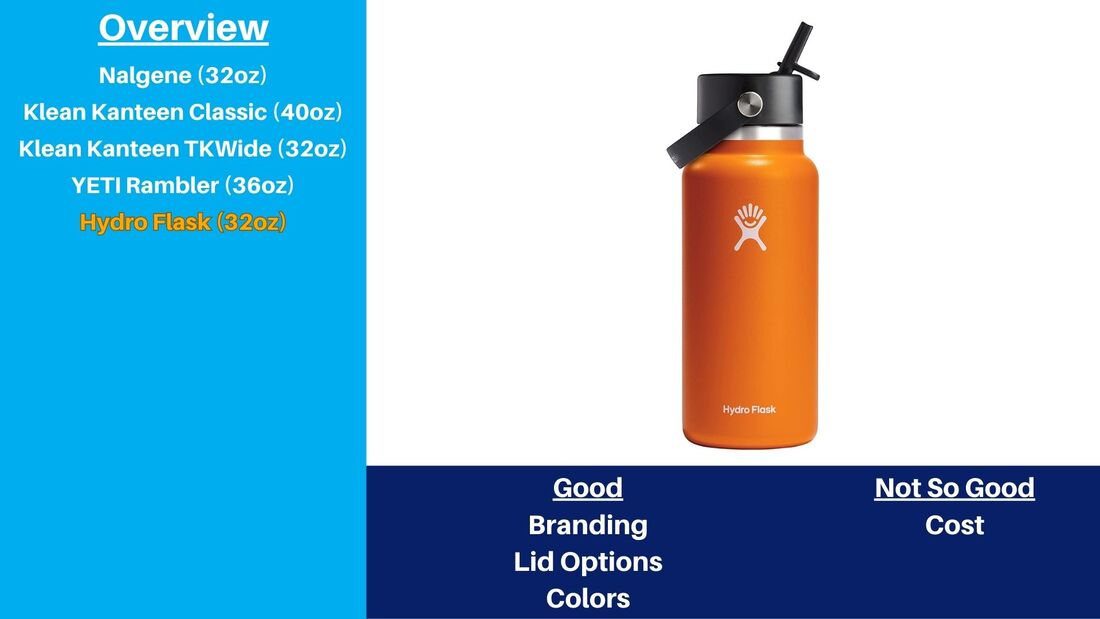 Hydro Flask is the brand that really catapulted dual-wall insulation into the mainstream, and they’re also a top-tier brand on par with YETI. Their bottles come in a wide range of colors, and they have a good range of well-engineered caps and accessories to choose from, though some are better than others. We love the Flex Straw, but we’re not huge fans of the Flex Chug. You can expect to pay a premium for any Hydro Flask, but the customer service is very good and the company stands behind their products. Hydro Flask Trail Series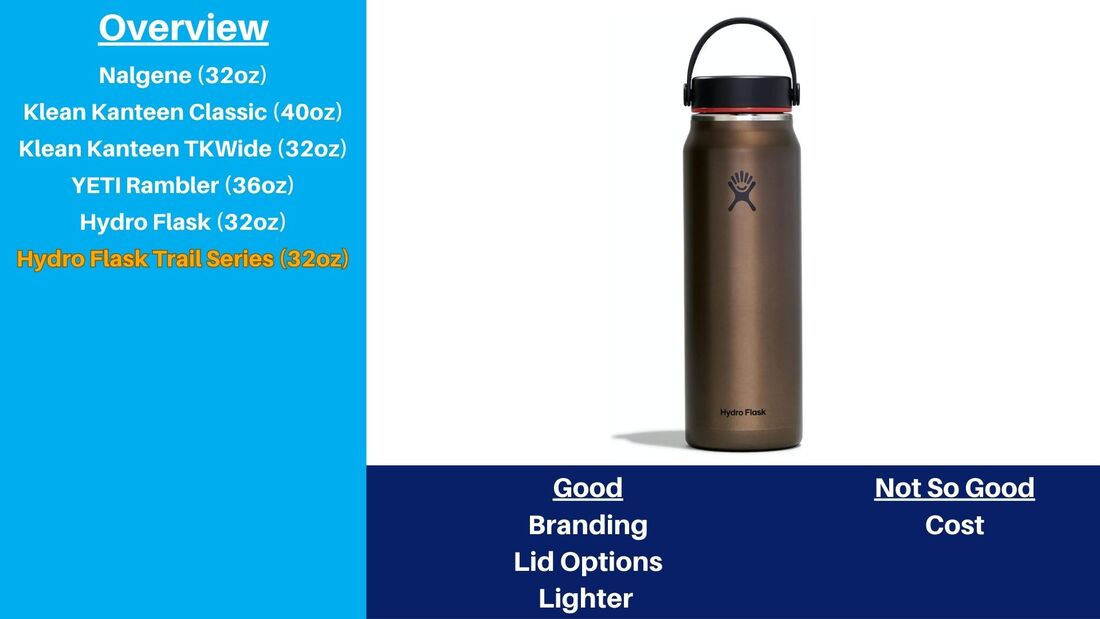 Another Hydro Flask bottle that’s good to know about is their Trail Series lineup. These bottles have the same great insulation, branding, and look, but Hydro Flask really focused on reducing the weight of the bottle so it’s easier to hike and get around with. This makes it one of the best insulated bottles for hiking compared to really heavy options like Klean Kanteen’s TKWide and YETI’s Rambler. Takeya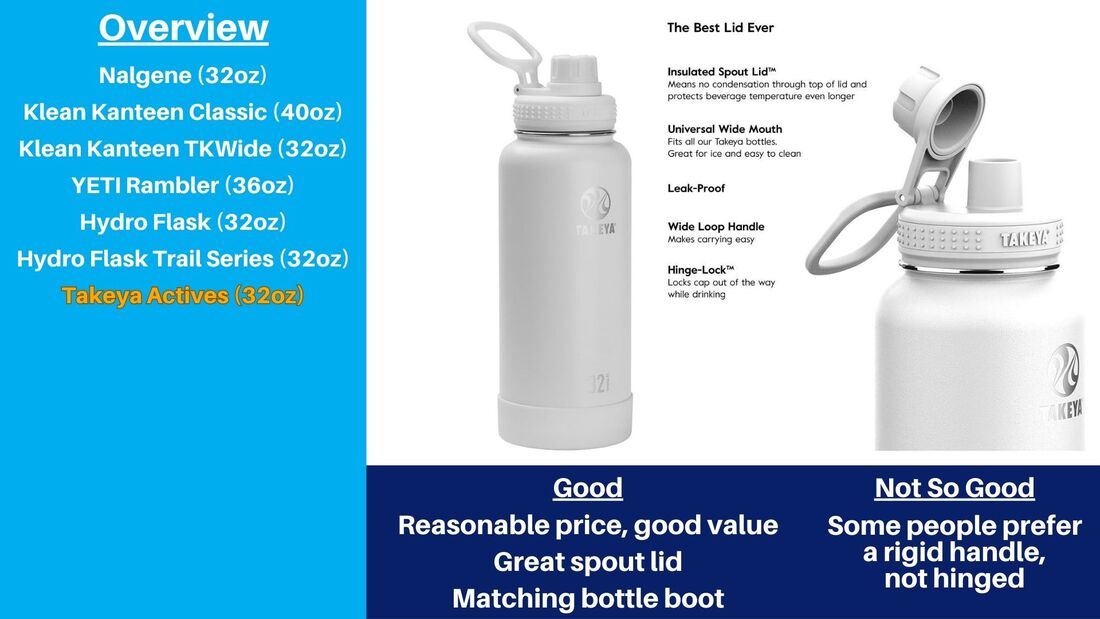 Takeya is a good mid-range alternative to Hydro Flask, and their Takeya Actives bottles in particular are a great all-around option. The spout lid is a really good design with a wide handle, a spout cap that locks out of the way for when you need to take a drink, and a nice textured grip. It also comes with a matching bottle boot to protect your bottle from dents and scratches. There aren’t many downsides and this is a jack-of-all-trades kind of bottle, but some people do prefer rigid handles instead of the hinged Takeya design. Iron Flask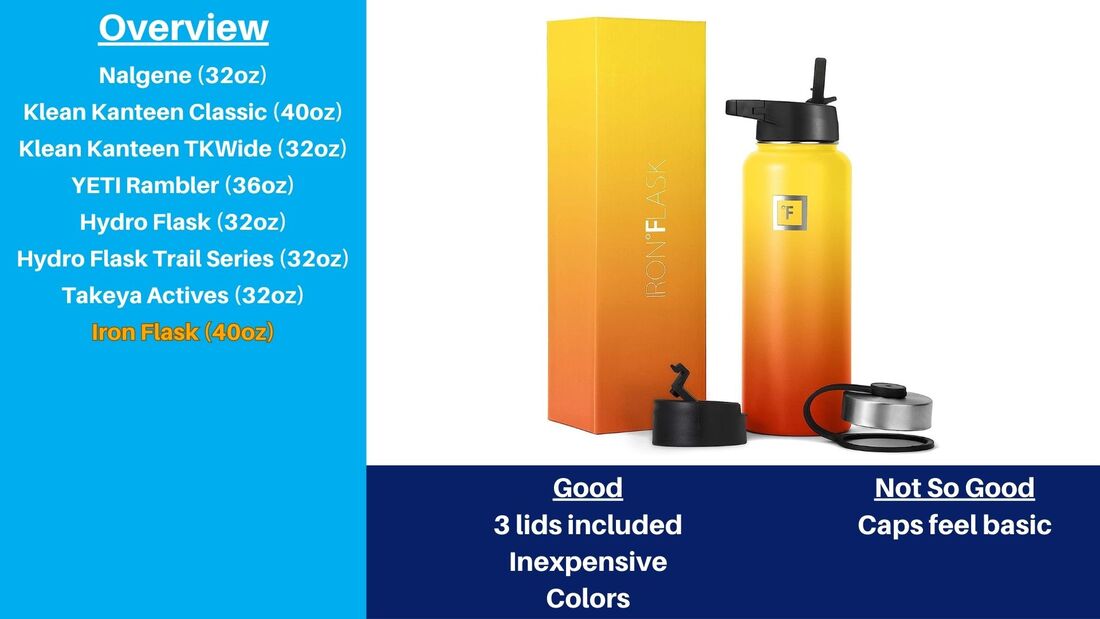 Iron Flask is an Amazon-focused knock-off of Hydro Flask, but they’re notable for a few reasons. They come with three cap options, so that helps you figure out which style you like without having to buy more lids. Iron Flask is definitely a good brand to consider if you’re looking for unique color options, including gradients. One downside is that the caps are good, basic options, but they do feel more standard and less engineered than Hydro Flask’s lids. ThermoFlask ThermoFlask is a bottle brand that we’ve always thought was a ripoff of Takeya, but while editing this video we found out that’s because ThermoFlask is a brand registered by Takeya. So if you notice a lot of similarities between the two, that’s why. But one difference we’ve noticed is that ThermoFlask seems to have more 2-pack options available on Amazon, which means you can get an even better value. One downside is that there don’t seem to be as many color options. Stanley Quencher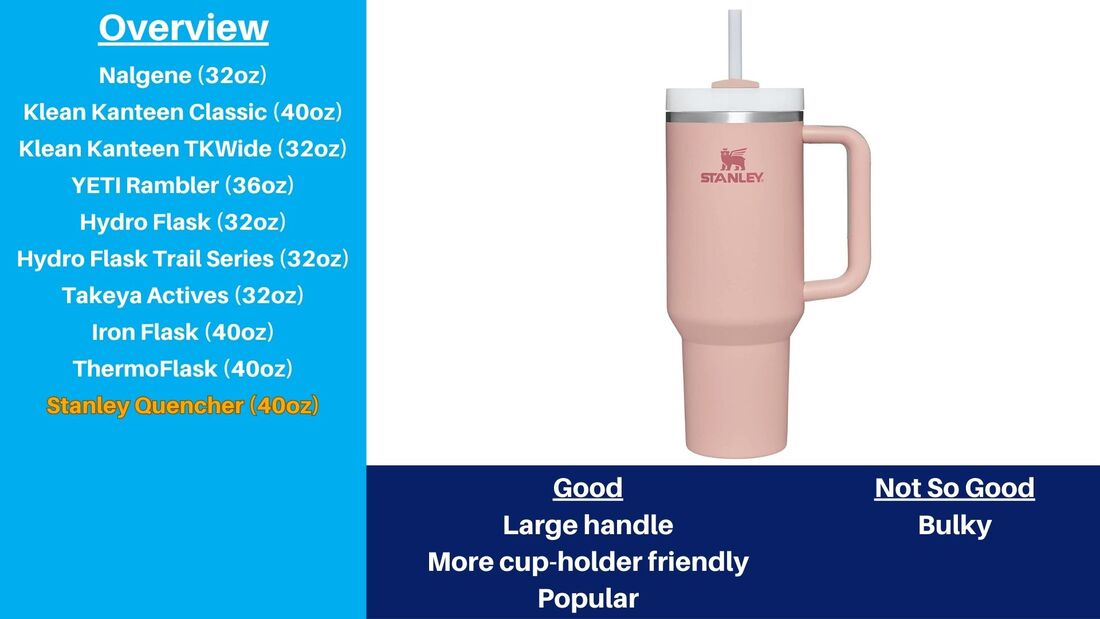 Stanley has been around a long time, but in recent years it has had a major resurgence thanks to their Quencher Series insulated tumblers. The main difference between this bottle and every other bottle on this list is the built-in handle on the side. Most of the other bottles have handles on the lid, but Stanley’s side-mounted handle, while not our personal favorite, is a big hit with many people. It’s also more tapered at the bottom like a classic tumbler-style, so it fits in more cup holders without needing an adapter. The biggest downside is the overall bulky design. Yes, this is easier to manage because of the handle and the tapered base, but it’s still a very bulky bottle. Camelbak Chute Mag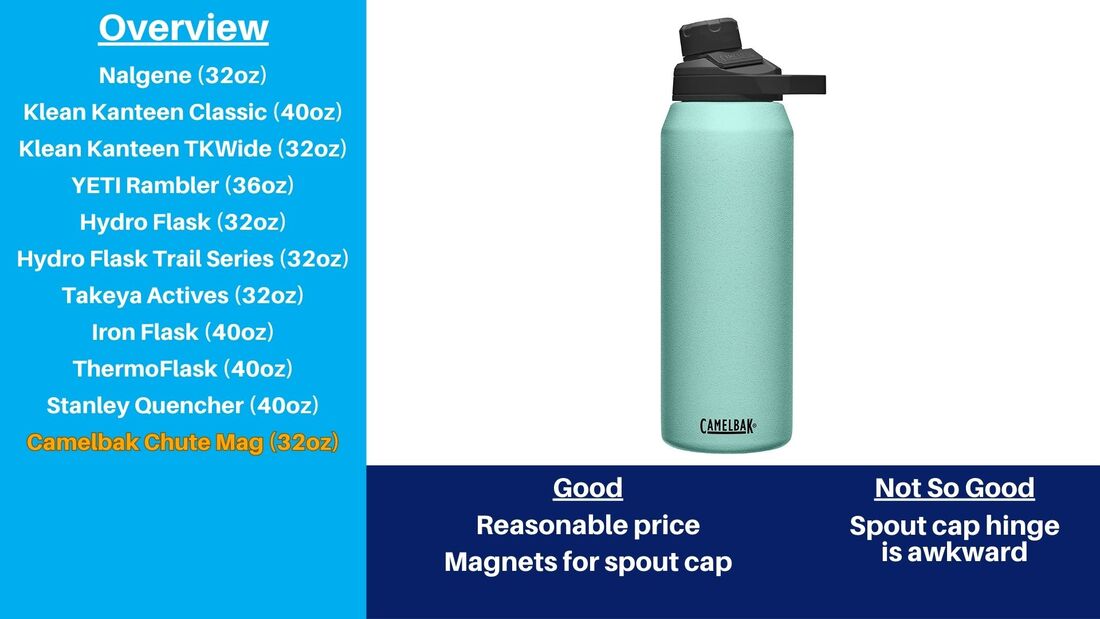 Camelbak is a well-known brand that really made a name for themselves with hydration bladder packs for biking and on longer hikes, but they have also released some solid bottle options as well. They are more reasonably priced than the other well-known brands like Hydro Flask and YETI, and the Chute Mag bottles in particular are very popular because of the magnets that lock the spout cap back when you go to take a sip. We’re not huge fans of the hinge design though, as it doesn’t flip open as smoothly as other spout caps like Takeya and FJbottle. S'well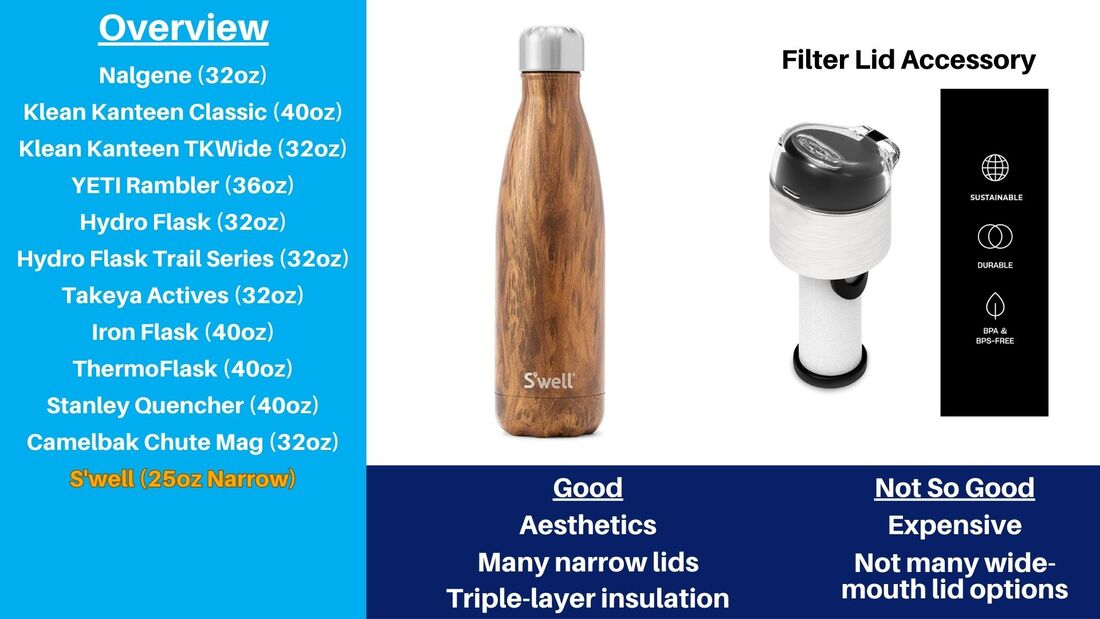 Many bottles on this list can be difficult to distinguish at first glance, like Hydro Flasks, Iron Flasks, Takeyas, and ThermoFlasks. On the other end of the spectrum, you have S'well, which is another high-end brand on par with Hydro Flask and YETI. The aesthetic design and sleek look are the main selling points, and they’ve also come out with many narrow mouth lids, including a filter cap that’s unique to this list. They are also the first brand we’ve talked about that has triple-wall insulation. However, they are pretty expensive, and there aren’t many lid options for their wide-mouth Traveler series bottles. FJbottle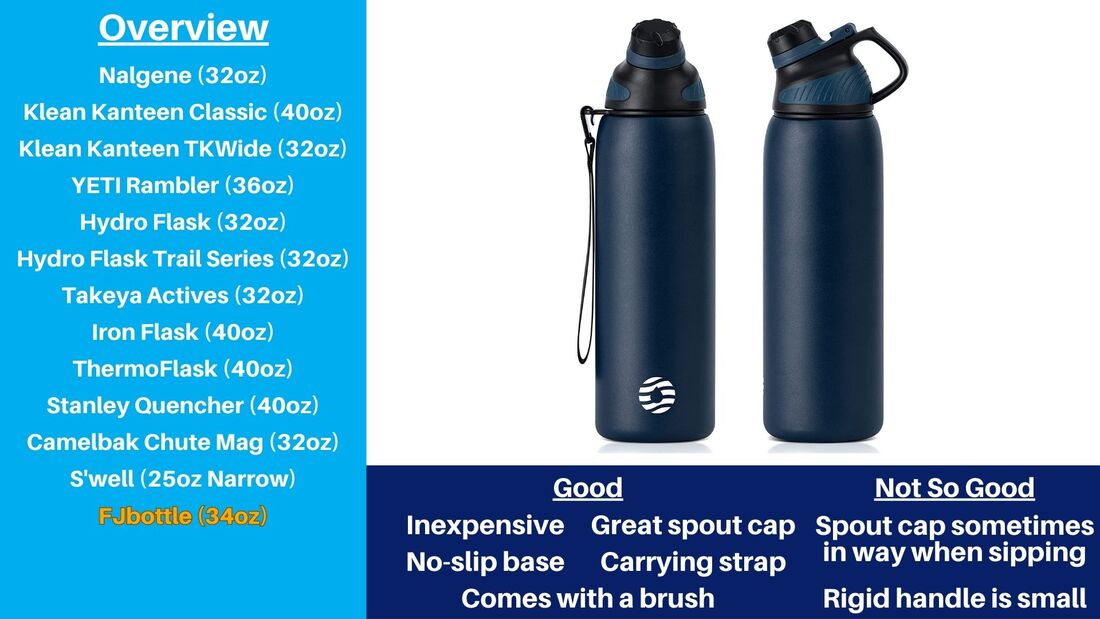 The next brand is FJbottle. Quick disclosure, they reached out to us and sent us a bottle to test. We told them we would only cover the bottle if we liked it, but after using it for a few weeks, we can honestly say that we like this bottle way more than we thought we would. It’s right up there with Takeya for our favorite spout-style lid. Like Camelbak’s Chute Mag, it uses magnets to keep the spout cap out of the way when you’re taking a drink, but the hinge design is much better and is easier to open, especially if you’re just using one hand like when you’re driving. The spout cap also takes the least amount of turning to unlock compared to any of the other spout lids, which is also helpful when driving. There’s a silicone grip pad on the bottom that keeps your bottle from sliding around and protects against some scratches, though not on the outside edges. There’s also a strap on the side, and we’ve ended up using this strap all the time. They also include a brush with each bottle to help with cleaning right out of the gate. One downside is that the spout cap doesn’t flip out of the way as much as Takeya’s version, but you can either tilt your head more or angle the bottle to get around this issue. Also, the rigid handle on top is a little small, but in our opinion the strap on the side more than makes up for this. Overall, we honestly do like this design, and it might become our go-to bottle for a while. Steepware Everest Steepware’s Everest tumbler was made primarily for one thing, and that’s brewing tea. And they really do have a good product for this purpose. There’s a built-in tea strainer that you can use for loose-leaf tea, or you can use it as an ice strainer if you’re looking for a cooler drink. The strainer is pretty big too, so there’s quite a bit of surface area for your loose-leaf tea to steep. You could always take out the strainer and use it like a regular bottle, but the larger strainer is really the feature that sets this bottle apart. EcoVessel Boulder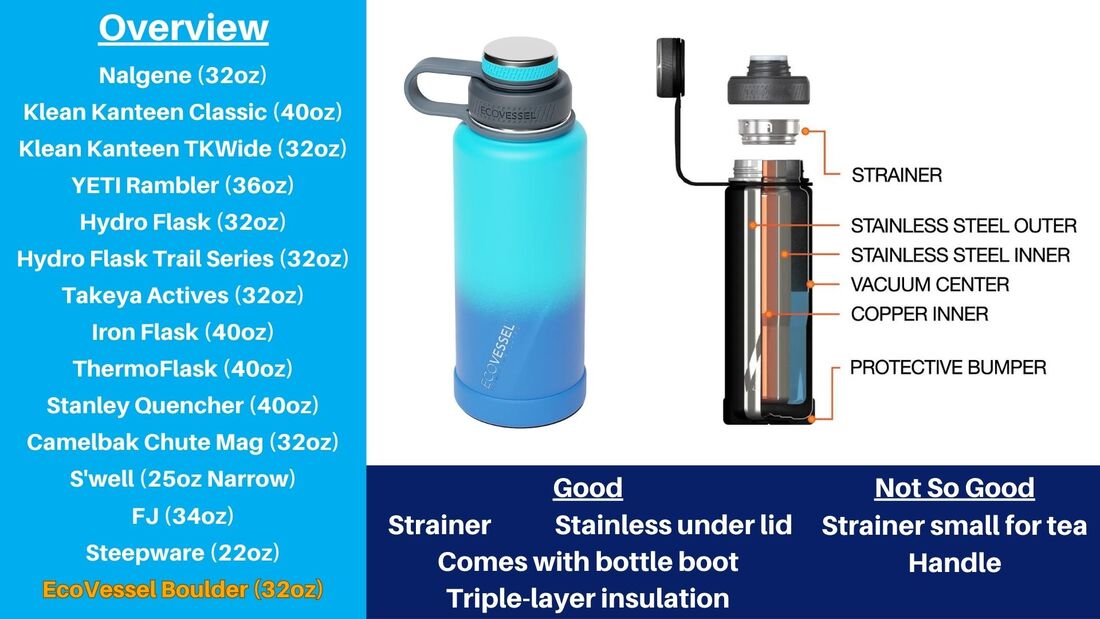 The last brand we’re discussing is EcoVessel. Their Boulder series bottles might have the most features and accessories packed into one bottle that we’ve seen yet. It has a strainer for ice and fruit, comes with a silicone bottle boot to protect the base of the bottle, and has triple-layer insulation. Some drawbacks are that the strainer is smaller compared to Steepware’s version, so it’s not as good for loose leaf tea, especially in larger 32-ounce bottles. We’re also not a huge fans of lid tethers that double as handles in general, but that’s more of our personal preference and at least EcoVessel has a wider tether compared to Nalgene. It’s hard to put our finger on it, but the construction feels cheaper in a way compared to some other bottles we’ve reviewed. But with so many extra features and a reasonable price, this bottle has a lot going for it.  Our Recommendations for Best Water BottlesNow let’s move on to our recommendations by category. We’ll give you a few of our favorites, and we encourage you to check out each one to decide which is the best fit for you. Best Water Bottle for Hiking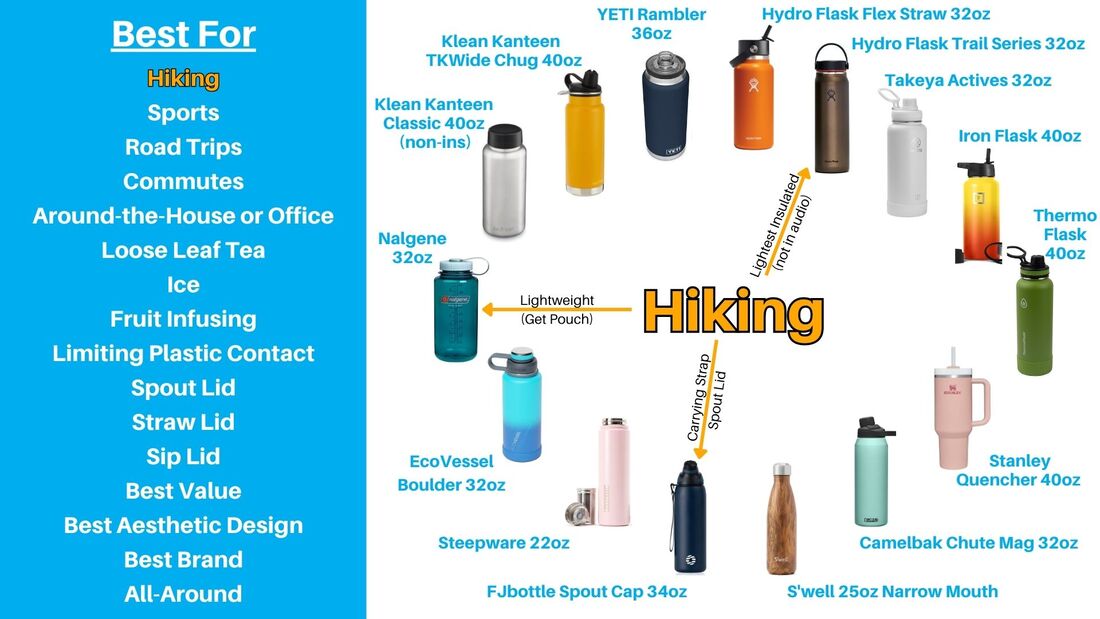 For hiking, we like Nalgenes because they are lightweight, but we highly recommend getting a carrying pouch like this one because the lid tether isn’t much of a handle. For insulated bottles, FJbottle is a great choice because it has both a rigid handle and a strap, and the lid is the spout style that we prefer when hiking. Hydro Flask's Trail Series bottles are also worth a look because they are the lightest insulated design. Best Water Bottle for Sporting Events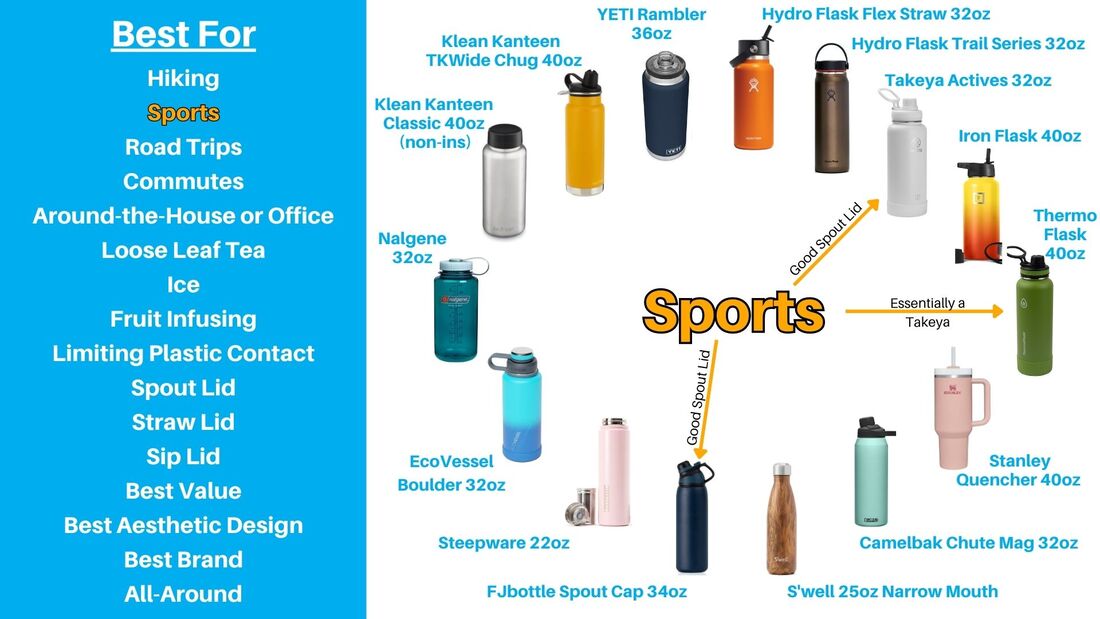 When it comes to sporting events, there are some different considerations compared to hiking. You don’t have to worry as much about the weight of the bottle, and you don’t have to carry it around for long distances. Because of these reasons, it really opens the door on the number of bottles that we recommend, and we really think you should just get a bottle with a spout cap. This cap style lets you get a good amount of water quickly without it all splashing in your face. Our favorite spout cap bottles are Takeya and FJbottle, and keep in mind that ThermoFlask has a 2-pack option with a lid that’s nearly identical to Takeya’s. Hydro Flask and YETI have pretty good spout cap design options that many people love, but they’re not our favorites for varying reasons. Honorable mention in this category goes to EcoVessel’s Boulder series bottles because they have spout caps and you can use the strainer for ice. Best Water Bottle for Road Trips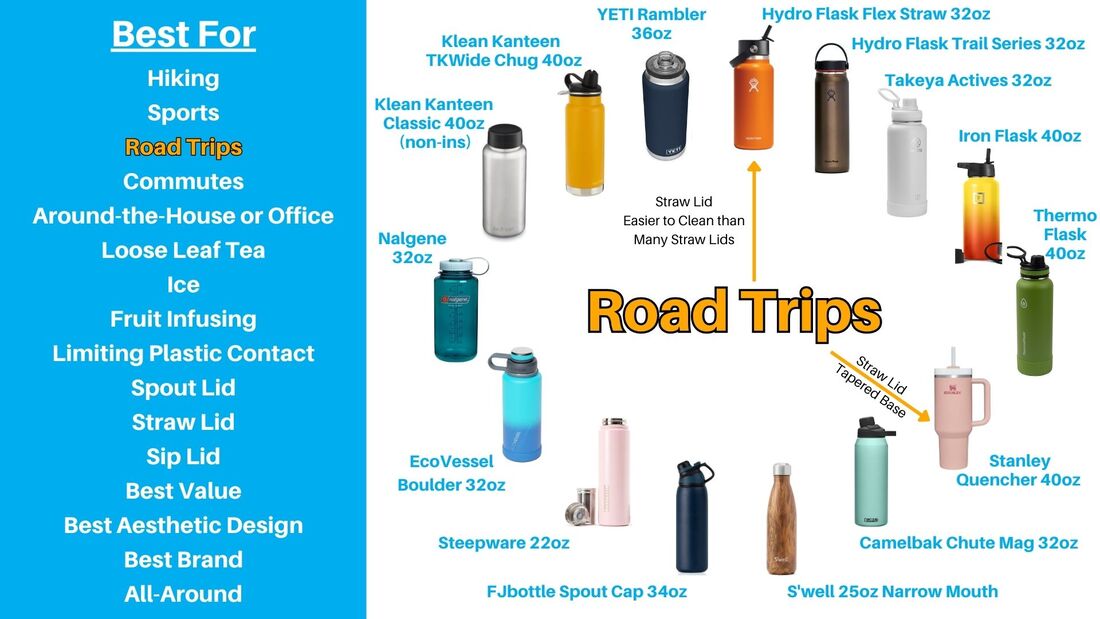 For road trips and driving in general, we like straw lids because you don’t need to tilt your head back and potentially take your eyes off the road. Stanley’s Quencher is a good choice because it has a large volume but still has a better chance of fitting in your car’s cup holder. We also like Hydro Flask’s Flex Straw more than most other straw lids because it’s easier to clean thoroughly without popping off the spout. We don’t recommend using standard lids when driving because it’s so easy to splash water all over your face. Spout or sip caps are OK if you’re not into straw lids, but we recommend getting one that’s easier to use one-handed. For example, FJbottle and Takeya’s spout lids are a lot easier to open one-handed than Camelbak’s design, and the spout caps are attached so you can’t accidentally drop it like you could with YETI or Hydro Flask. Bottle doesn't fit in your cup holder? Best Water Bottle for Commutes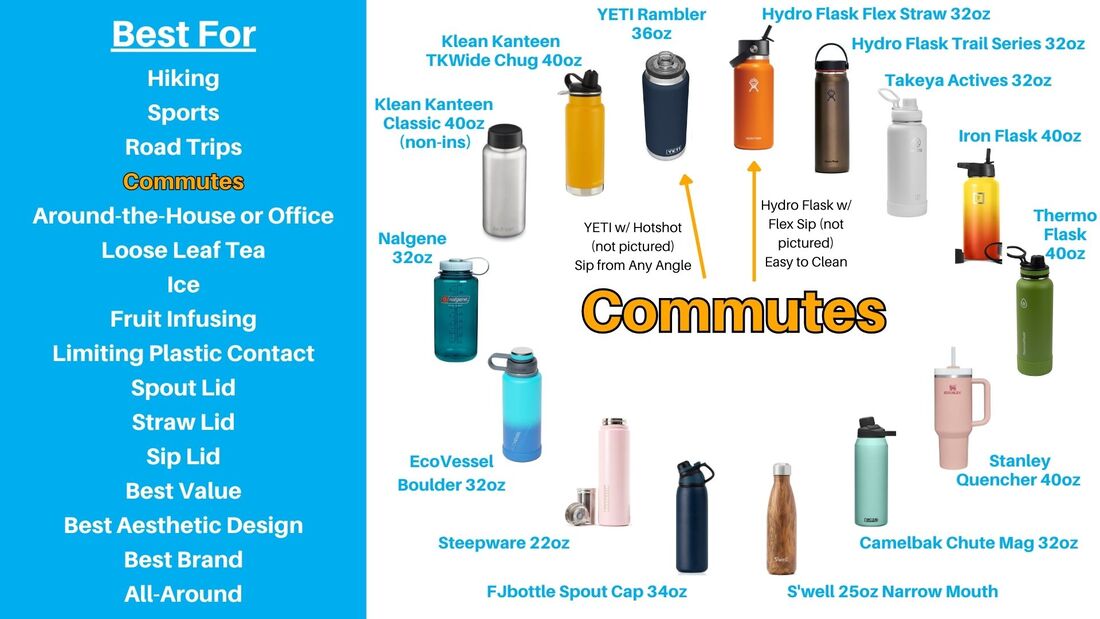 For shorter commutes to and from work, we’d wager you’re probably drinking coffee or tea. Any sip-style lid is pretty good for this, but we really like Hydro Flask’s Flex Sip Lid in particular because, like with their straw lid, their sip lid is easy to disassemble for cleaning. YETI’s Hot Shot Lid is another good option too because you can take a sip from any angle. And you’re probably OK with a smaller bottle like a 16 or 20 ounce, which means you’re less likely to need a cup holder adapter. Best Bottle for the House or Office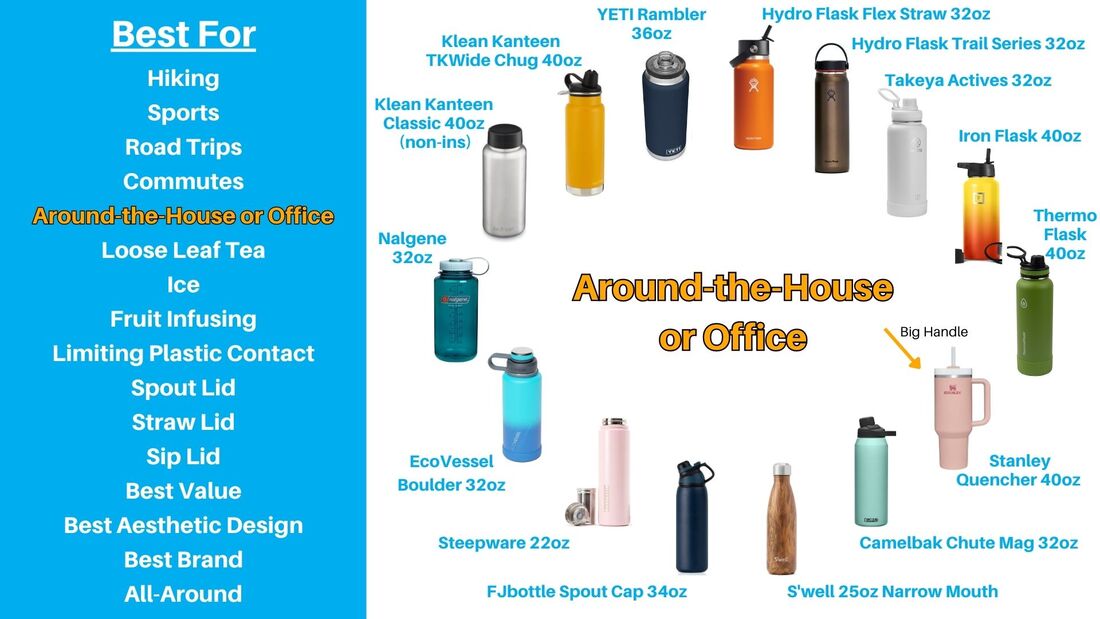 For general use around the house or office, it’s really up to you. Any of these bottles can be a good option since you probably can refill it easily, and the lid style doesn’t need to factor as much in your decision compared to other situations like driving. The Stanley Quencher is a good one to consider though because of the big handle. 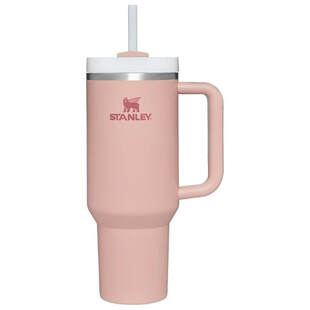 Best Water Bottle for Tea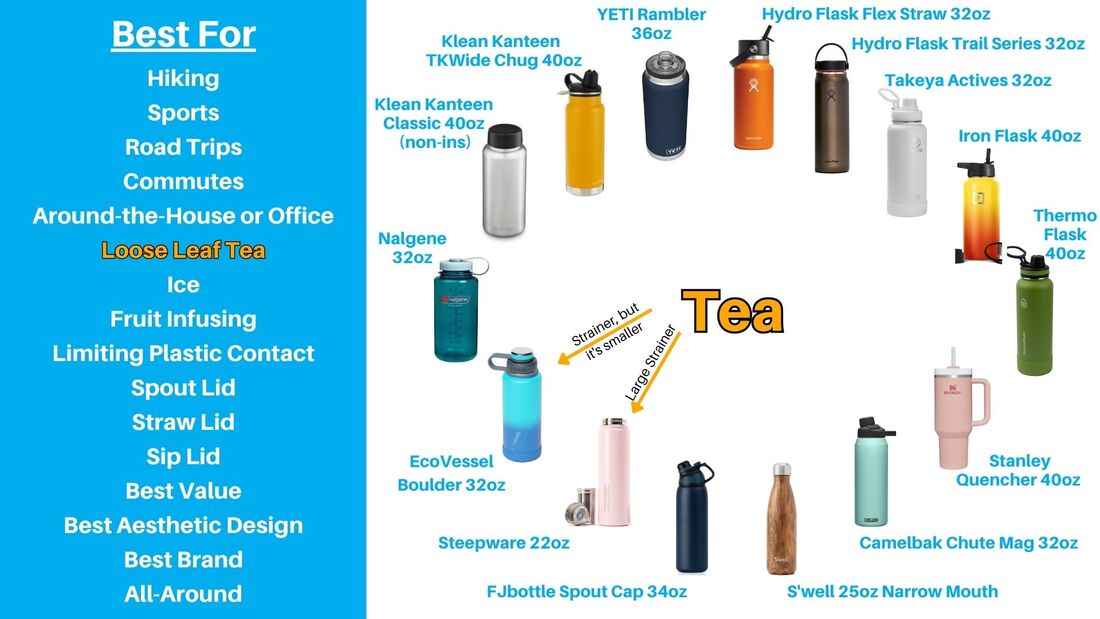 The best bottle for loose-leaf tea or coffee infusing is without a doubt Steepware’s design, with EcoVessel coming in second because the strainer is much smaller and is really better for blocking ice or fruit instead of brewing tea or coffee. For wide mouth Hydro Flasks and similar bottles like Iron Flasks and ThermoFlasks, you can also look at our FlavorFuze Steel infusers. They come with a small and large size infuser, and they are specifically designed to fit wide mouth Hydro Flasks. Best Water Bottle for Ice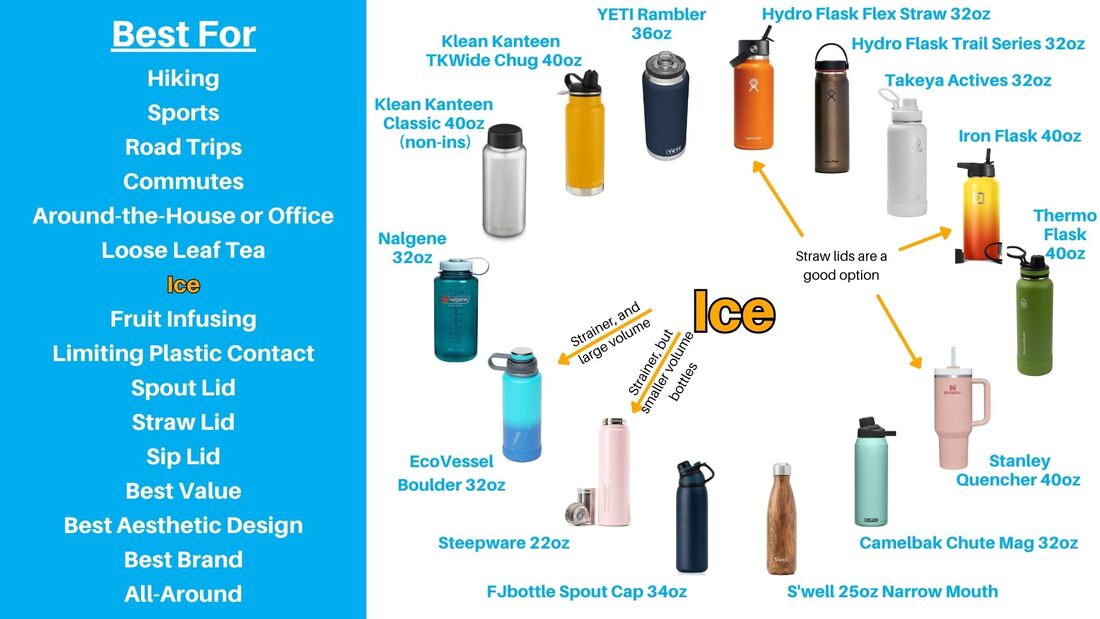 For ice, EcoVessel is a good option because of the built-in strainer. Other spout lids can have ice cubes sneak out once they melt down some. Straw lids are also a good option, and as mentioned before, we really like Hydro Flask’s Flex Straw. If you have a Hydro Flask with a standard Flex Lid, you can also use our SplashPro splash guard. We designed it specifically for Hydro Flask lids so it fits around the insulation. Best Water Bottle for Fruit Infusing For fruit infusing, you can also go with Steepware or EcoVessel and add the fruit so it’s loose behind the strainer. Alternatively, try our FlavorFuze Pod fruit infuser. Just add your fruit into it, pop on the lid, then drop it into any wide mouth bottle. Our FlavorFuze Straw infuser is a really good option too for Hydro Flask straw lids. Just slide and snap it onto the straw. Best Water Bottle for Limiting Plastic Contacting Water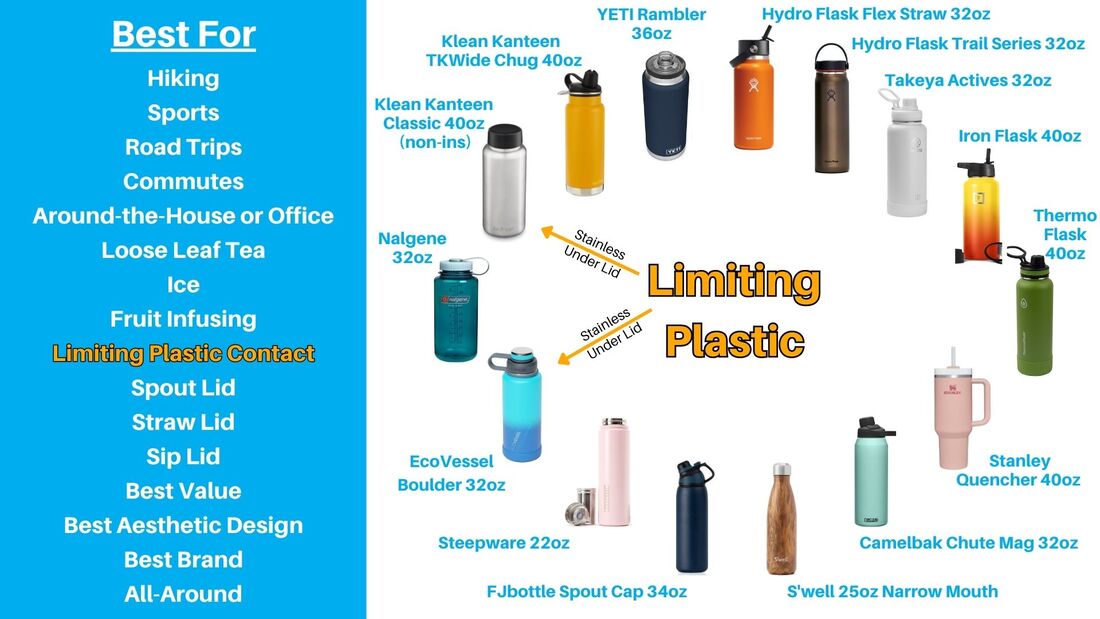 We also wanted to highlight which bottles do the best job limiting how much plastic touches your water. Nalgenes are the only all-plastic bottles in our video, but most of the other bottles also have exposed plastic under the lid that can touch your water. The only bottles that have all-stainless-steel interiors, including under the lid, are Klean Kanteen’s non-insulated classic bottle and EcoVessel’s Boulder series. Best Spout (Chug) Lid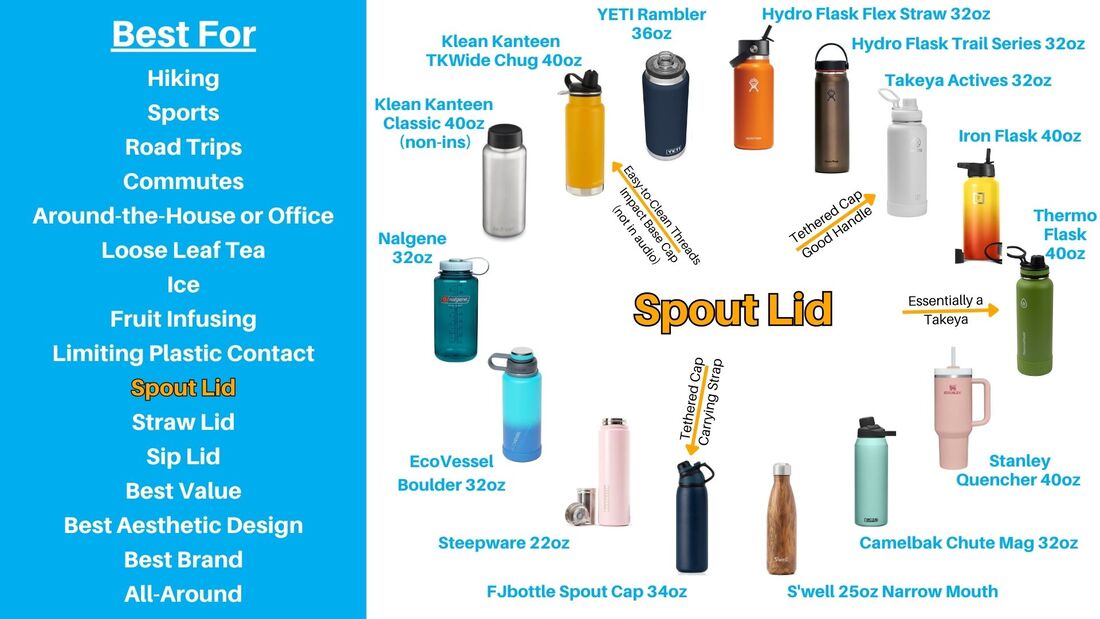 For spout lids, we love Takeya and FJbottle. They’re a little different from each other, but they both do several things well. The spout cap is easy to open, stays attached so you can’t drop it, and locks into the open position easier than some other designs. They are also easier to carry around because of Takeya’s good handle and FJbottle’s strap. ThermoFlask has a spout cap that is essentially the same as Takeya, and you can get them in 2-packs for a better deal. Klean Kanteen's TKWide has a few novel features as well. The threads on the bottle are rounded metal bumps that are much easier to clean thoroughly than traditional threads, and impact base cap can absorb dents that may otherwise have affected the dual wall insulation. Best Straw Lid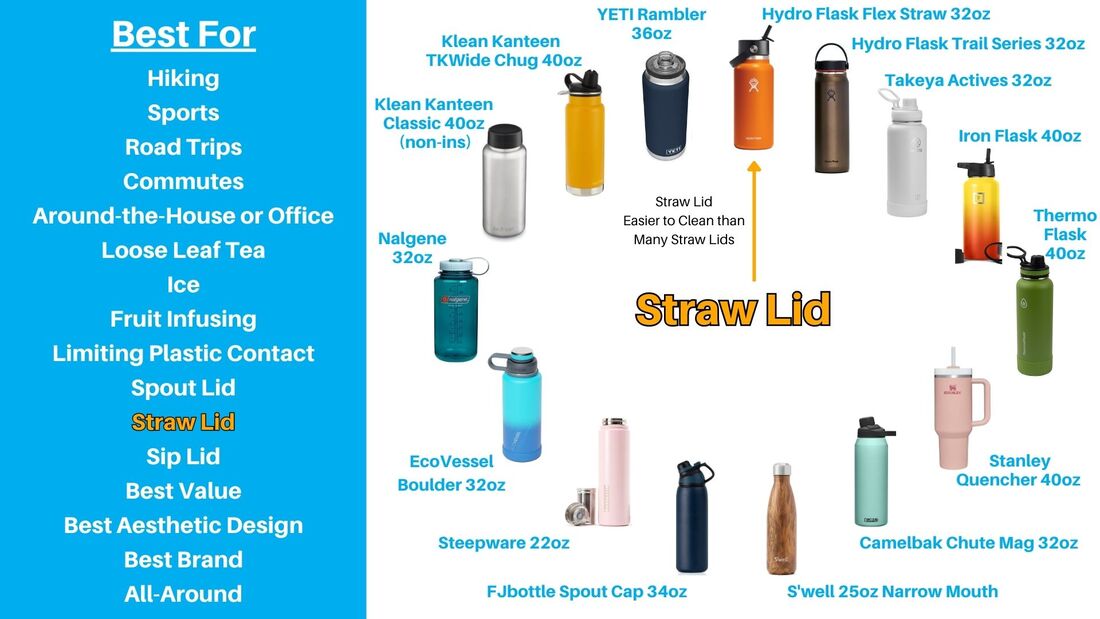 For straw lids, we really like Hydro Flask’s Flex Straw because it’s the easiest straw lid to clean more thoroughly without having to pop off the spout.  Easier to clean thoroughly than other straw lids Best Sip (Cafe/Commuter) Lid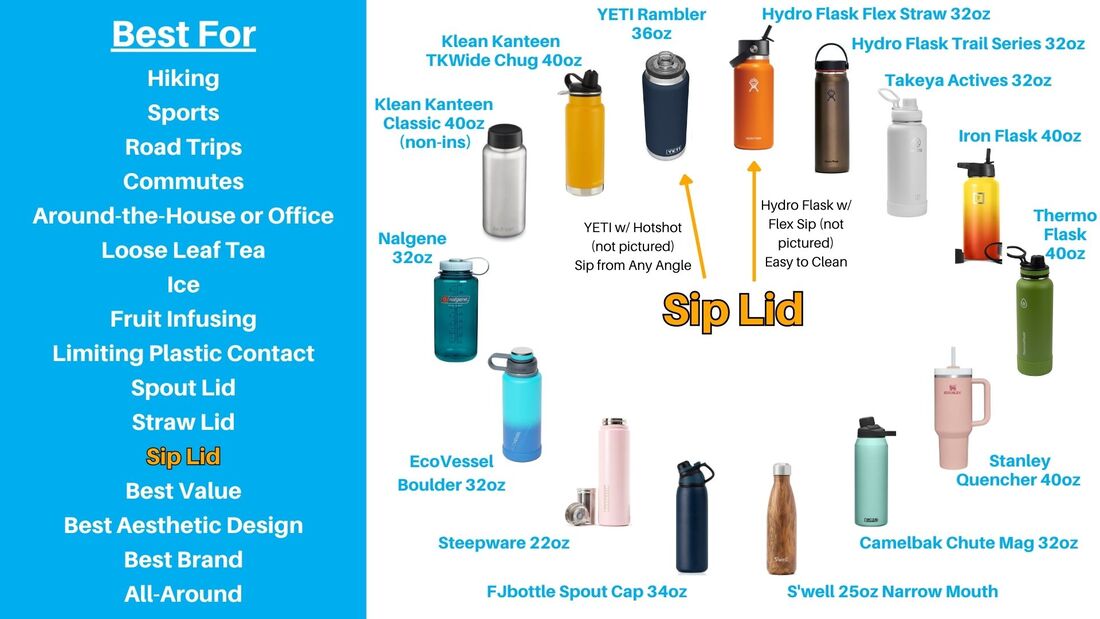 For sip lids, we also like Hydro Flask’s version, the Flex Sip, because it’s easy to disassemble for cleaning. YETI’s Hot Shot is a good one to consider too because you can sip from any angle. Best Value Water Bottle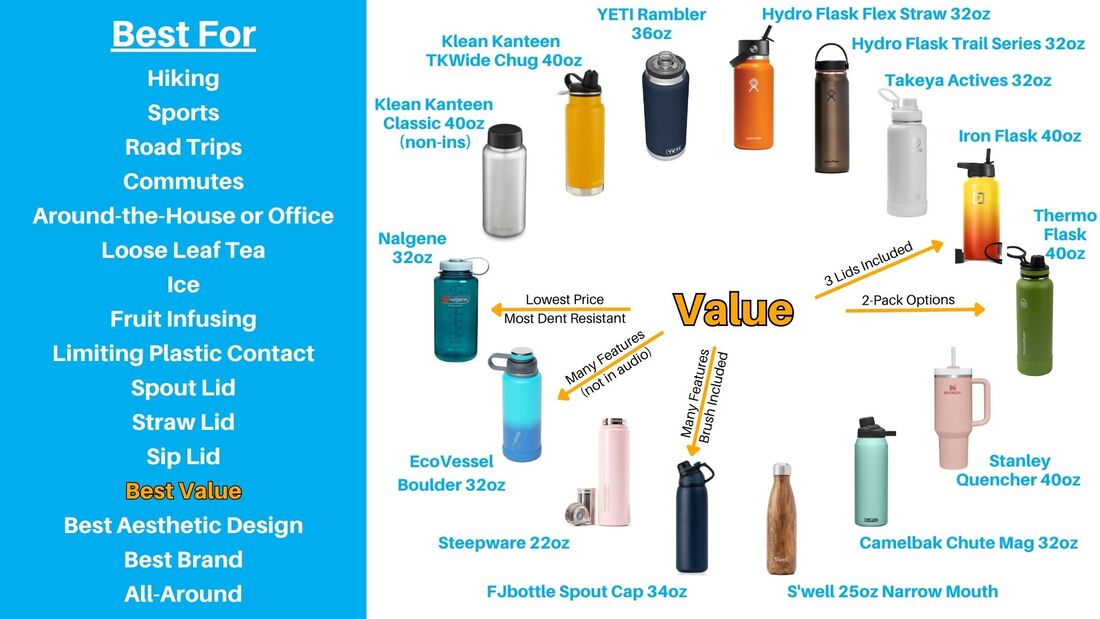 The best value bottles in our opinion are Nalgene, Iron Flask, ThermoFlask, and FJbottle because they’re more affordable but they are still great at what they do. Best Looking Water Bottle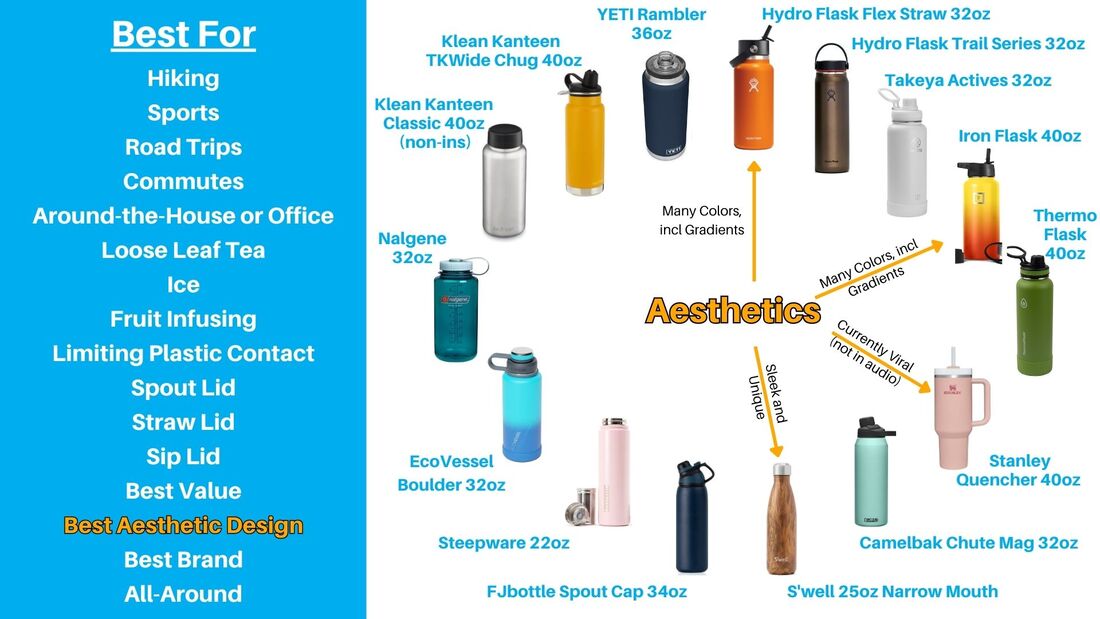 The best aesthetic design goes to S’well, and brands like Iron Flask and Hydro Flask are great options too with so many color choices. Best Water Bottle Brand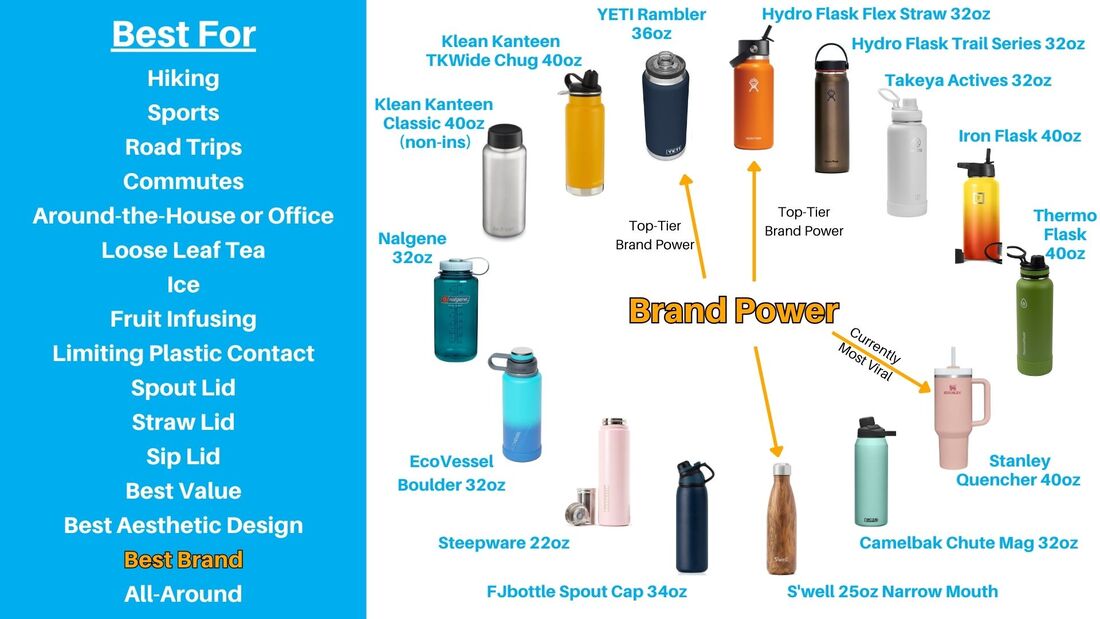 The best brands in terms of brand power in today’s market are YETI and Hydro Flask, with an honorable mention to Stanley and S’well because of their unique designs really being core to their brand. Best All-Around Bottle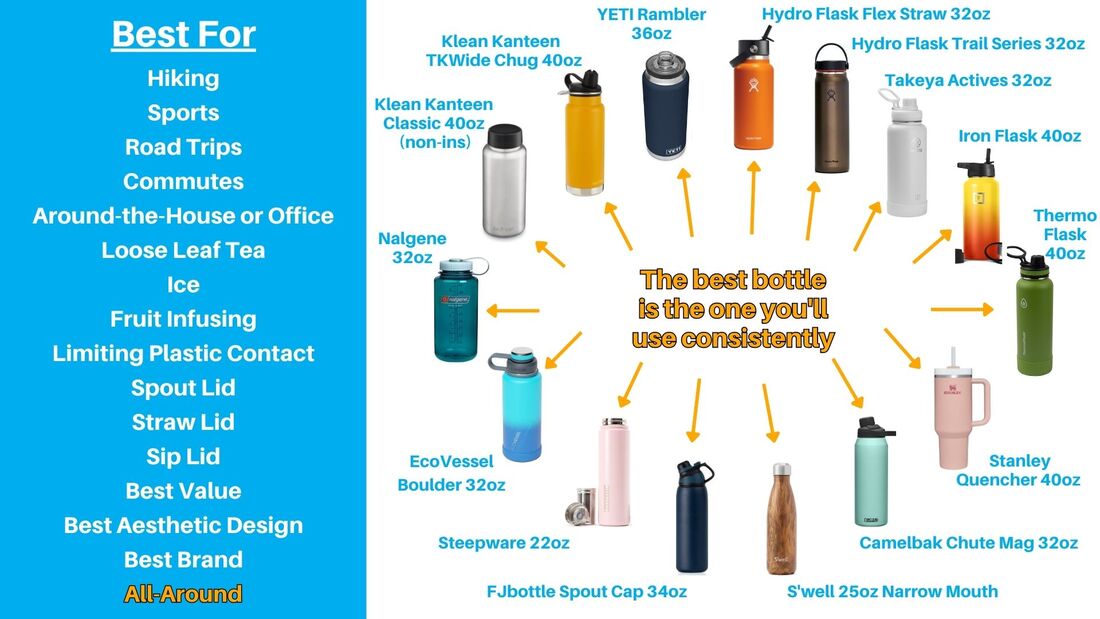 We thought about giving our recommendation for best all-around bottle, but we decided against it because of the countless variations for each person, like budget, preferences, lifestyle, and plenty of other factors. For us, we will probably use the FJbottle because it impressed us so much, but we encourage you to make your own decision. If you’ve made it to this point in the video, you’ve already heard more than you ever thought you ever needed to know about water bottles so hopefully you have a better idea of which bottle will work best for you. And that’s it! Hopefully this helps you figure out which bottle works best for you. Again, we'd love it if you could use our links to purchase since we get a small referral fee, but either way we hope this information helps you on your path towards better hydration habits. Thanks again! 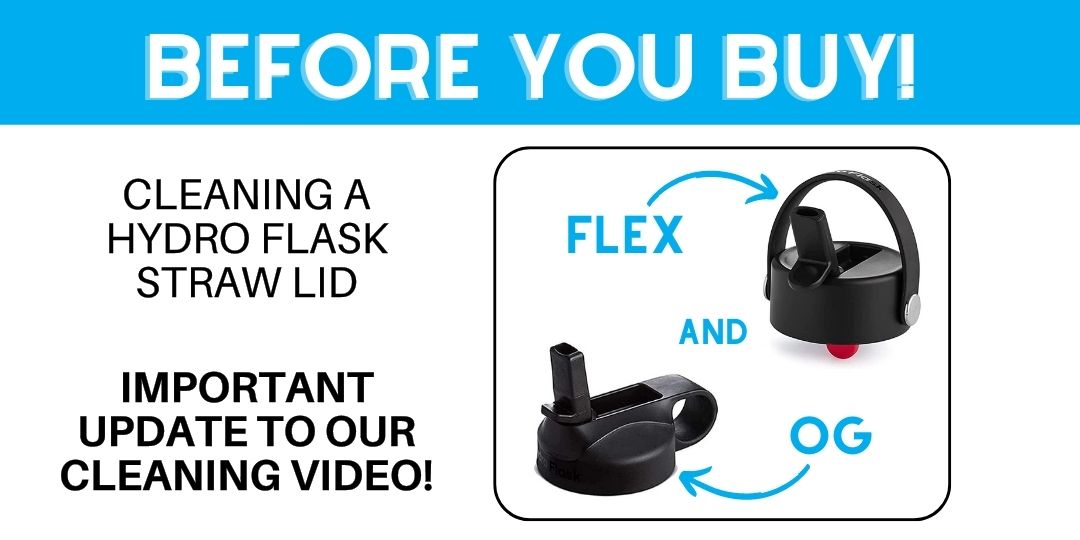 Content Overview:
Products Mentioned in this Post:
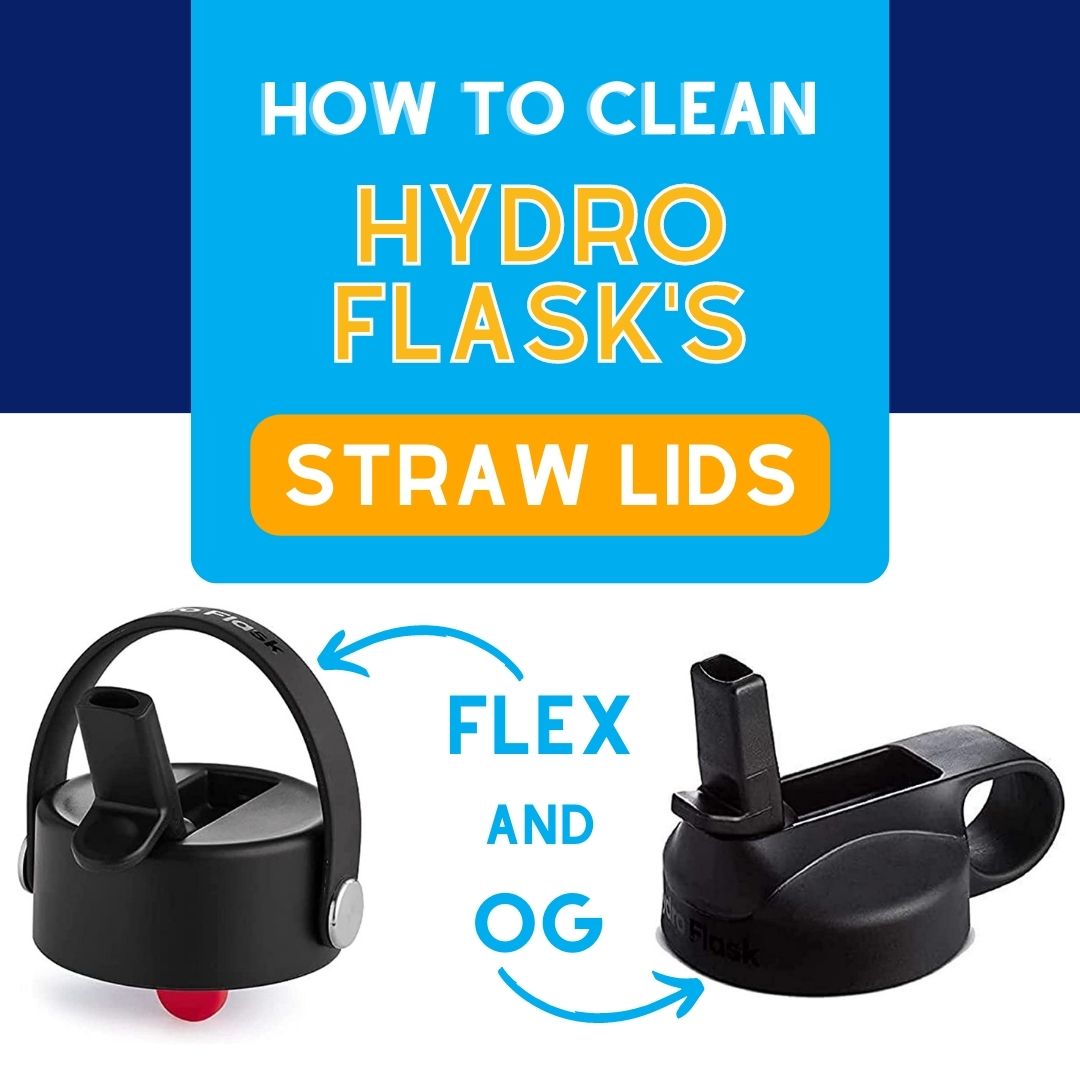
Update to our Previous Videos about Cleaning Hydro Flask Flex Straw and Original Straw LidsThere’s something you should be aware of before you buy a Hydro Flask straw lid, and it’s related to how you clean it. Back in February and March, we made two videos (links in the pictures below) showing how you can remove the spout from both of Hydro Flask’s straw lids, and this video reviews an important consideration that we’ve learned from comments received in those previous posts.
Our Video Review
Our YouTube video covers the same information in this post, so click the link if you'd rather see the video. Otherwise, keep reading the full post below!
Some Backstory - Removing the Flex Straw SpoutThere are quite a few videos out there about the original straw lid that show how to remove the spout, and in many of those videos, you can see a horrible amount of mold and residue built up because most people don’t clean under the spout regularly. We didn’t see any videos yet about how to remove spout from the newer Flex Straw lid, and we thought it would be important to know how to do it to make sure those lids can be deep cleaned too. The problem we ran into at first is that we found it much more difficult to remove the spout from the Flex Straw lid. We couldn’t figure it out initially, and we were afraid of breaking our lid. We reached out to Hydro Flask to make sure it was intended to be popped off like with the original lid.
After reading Hydro Flask’s response, we tried harder to pop off the spout, including pushing it at different angles compared to the original straw lid. Eventually we got the spout off, and we noticed why we had such a hard time. The way the spout attaches to the lid, including how the grooves and the pivot points line up, is different compared to the original straw lid. 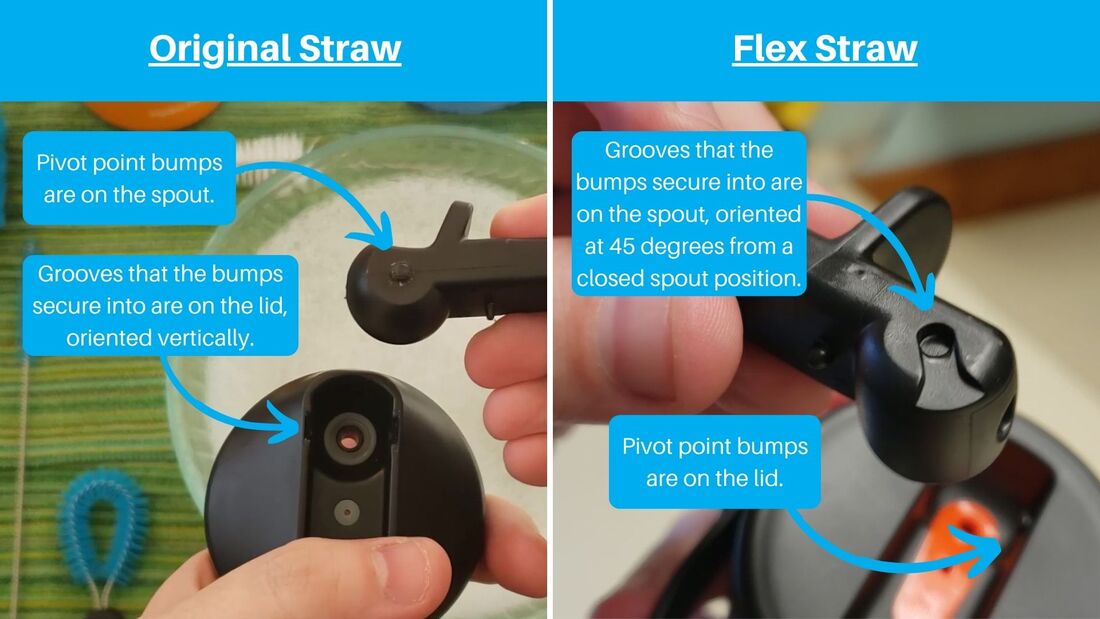 Differences in Flex and Original Straw Lid Spout Connections In order to pop off the spout, it helps to push against it at a different angle (45 degrees from closed) which isn’t very intuitive at first. Once we realized this difference, we made two videos to help share what we had learned with other Hydro Flask users so they can get a truly deep clean with their straw lids. Comments Received - Issues with the Spouts Wearing OutOver the couple of months since we posted those videos, several users left comments saying that popping the spout off wore down the plastic connections, and that caused their spouts to be looser than they were originally.
After reading these comments, we wanted to post a followup video to our one about cleaning Hydro Flask straws lids and give our thoughts. What this Means, and What You Should Know about Cleaning your Straw LidFirst of all, we want to acknowledge that it is possible to have the plastic wear out where the spout connects to the lid. The way the spout attaches with either lid means that the small bumps that act as pivot points for the spout have the potential to flatten out some when the spout is detached then reattached. This can then cause the spout to have a looser fit. But even when considering the potential wear-and-tear, we still think it’s a good idea to pop off the spout with either straw lid to get a truly deep clean. There can be a lot of mold buildup under the spout if you don’t stay on top of it. But the main point we want to drive home is that this type of deep cleaning comes with some risk of additional wear-and-tear. In some ways you might mean that you need to think of your straw lid as an accessory that needs to be replaced periodically, which is unfortunate because it costs extra money and is inconvenient. But we’re not really sure of another way to give these lids a deep clean since there are always spaces under the spout that aren’t possible to reach unless you take the spout off. So What Can You Do?There are a few things that can help. #1: Get a Flex Straw instead of the Original Straw
So if you’re trying to decide between the two straw lid options and deep cleaning everywhere including under the spout is a priority for you, go with the Flex Straw. #2: Use Cleaning Tablets
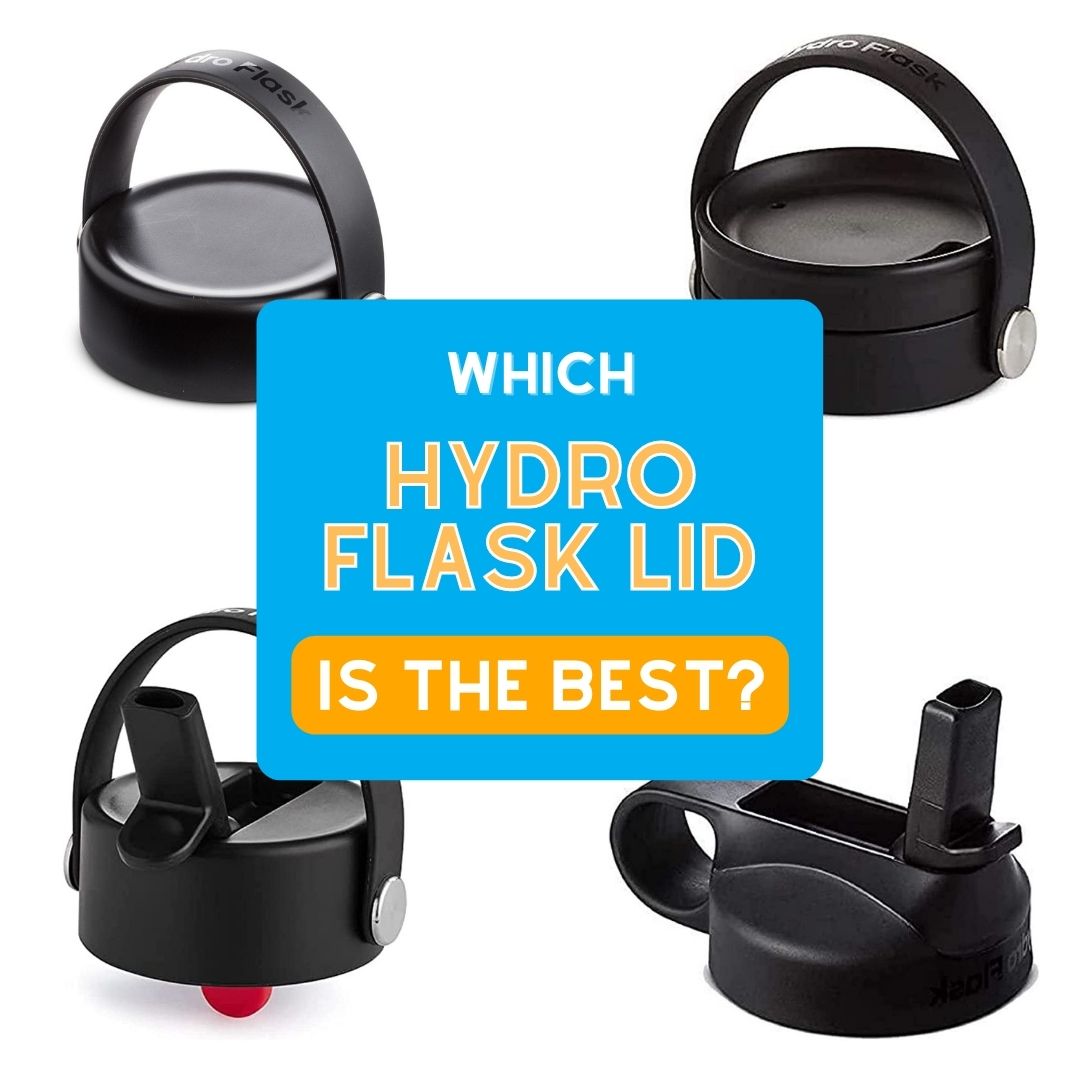
#3: Use a Different Lid One other obvious solution is to avoid the straw lids altogether. Hydro Flask has several other good lid options, and there are 3rd party ones as well. See our previous posts where we compare Hydro Flask's lid options!
SummarySo in summary, we acknowledge that popping off the spout with either Hydro Flask straw lid can lead to the spout fitting more loosely, but we still highly recommend doing it every once and awhile to fully clean your lid and prevent mold buildup. Just pop off the spout once every few months or whatever you’re comfortable with based on how often you use your straw lid, but not every time you clean your lid. This will help extend the life of your lid and prevent the plastic connections between the spout and the lid from wearing out prematurely. And that’s it! Hopefully this information helps you decide what cleaning schedule you’re comfortable with and which lid you want. If you find a better way to deep clean your straw lids, please let us know in the comments below so we can share it with other users. Keep BottlePro in mind for accessories for your large bottles, and happy hydrating! 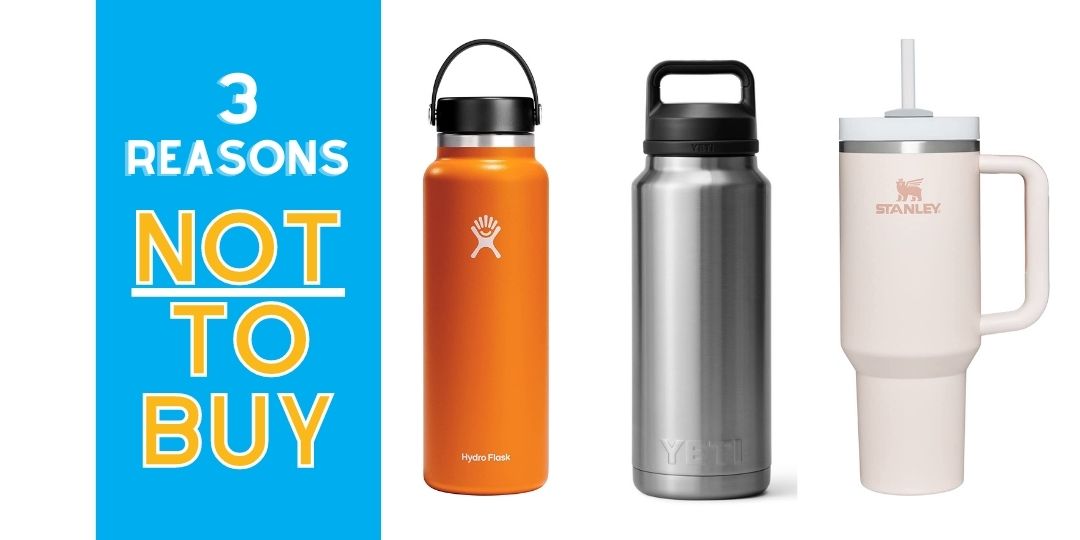 Content Overview:
Products Mentioned in this Post: Counterpoint - Why you should Think Twice before Buying a Hydro Flask, YETI, or Stanley Water BottleYETI recently released a new bottle with a straw lid, and it’s their answer to Stanley’s Adventure Quencher bottles that took the internet by storm. You may have noticed articles like these predicting that the new YETI straw tumbler will go viral. These kinds of articles come up seemingly every week describing the next big Hydro Flask, YETI, or Stanley product that you should buy.
But we’re here to give the counterpoint with three reasons why you shouldn’t buy a Hydro Flask, YETI, or Stanley. Our Video ReviewOur YouTube video covers the same information in this post, so click the link if you'd rather see the video. Otherwise, keep reading the full post below!
Reason #1 Why You Shouldn't Buy a Hydro Flask, YETI, or Stanley - Affiliate MarketersHere’s the deal. The people and companies writing these articles are affiliate marketers. They get paid if you click a link and make a purchase, so it’s in their best interest to promote the most popular and expensive items.
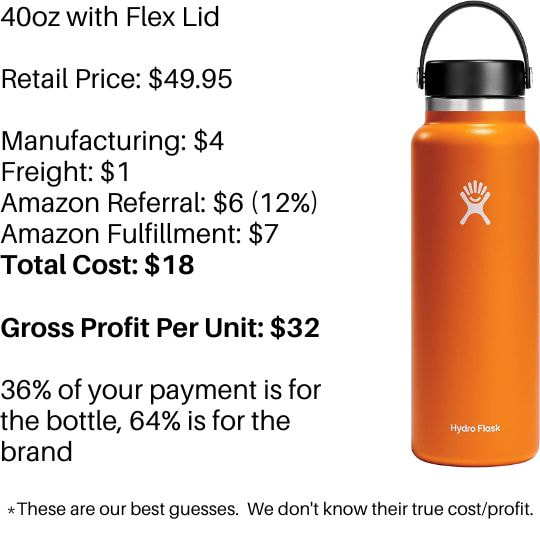
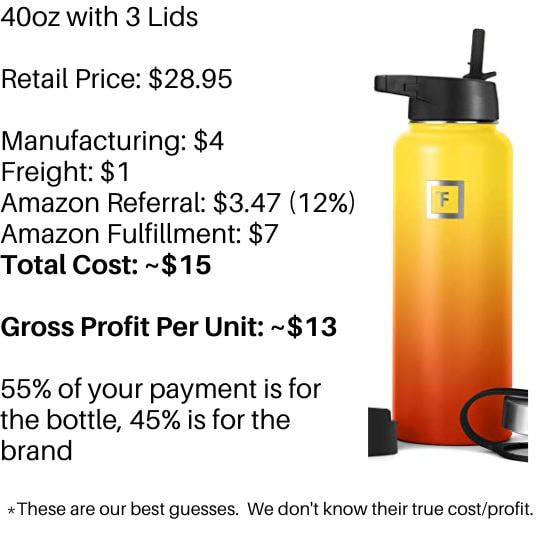
Always remember that there is no such thing as a perfect product for every person and situation. Every single product has a drawback or something that can be critiqued. If the article you’re reading doesn’t list at least one negative to be aware of, then you might want to get a second opinion elsewhere. Reason #2 Why You Shouldn't Buy a Hydro Flask, YETI, or Stanley - You're Mostly Paying for the LogoWe run a business selling products on Amazon and ordering items from China. Our manufacturing and shipping volumes are obviously not nearly as high as Hydro Flask, YETI, or Stanley, but we can take what we’ve learned and use that to take our best guess at what kinds of costs they have.
Now obviously there are many other costs that will bring down Hydro Flask’s true net profit, including customer service, marketing, facilities costs, and employee wages. We’re not going to try to guess what Hydro Flask’s costs are in these categories, but it’s clear to see that a minority of what you pay for with a Hydro Flask bottle is in the bottle itself. If you think of customer service, marketing, the facilities, and the employees as essentially being the brand, then this little logo basically costs you around $30 per bottle. Most of the price you pay is for the brand, not the bottle. And though there are surely some differences between brands, we wouldn't be surprised if YETI and Stanley bottles are in this same ballpark. Let’s compare these costs with Iron Flask, which is a well-established knockoff brand on Amazon. They were close on our insulation test, and they’re almost exactly the same size and shape.
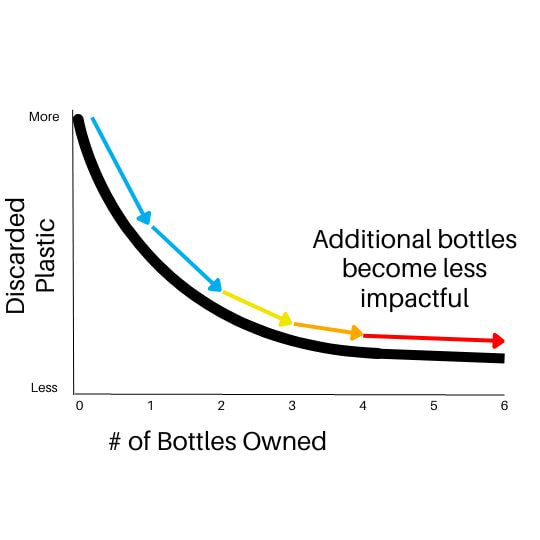
Now some of Hydro Flask’s higher costs are well worth it. They have great customer service, and they make really good products that last a long time. But in our opinion, it’s still a lot to fork over for the logo and we’d rather have a greater percentage of the price we spend go into the product, not the company. YETI’s branding-related costs are possibly even more excessive. Stanleys aren’t quite as extreme, but you're definitely still paying for the logo. Reason #3 Why You Shouldn't Buy a Hydro Flask, YETI, or Stanley - The EnvironmentIt's a little counter-intuitive at first because one of the most important reasons why you should get a reusable bottle is for the environment. Disposable water bottles are terrible, and upgrading to a reusable bottle is one of the best things you can do on an individual level to reduce plastic consumption. But the reality is that most people only really need one or two bottles to get them through the day. This why we really don’t like how viral bottles and excessive marketing budgets always push customers to get the next best bottle or color. It's one thing if you if you want a different type of bottle for specific reason, like a smaller one with a sip lid for coffee. But do you really need a 6th color of a 40-ounce bottle when you already have 5 similar bottles?
Sooner or later, the total environmental cost related to manufacturing and shipping your next reusable bottle will be greater than the environmental benefit from the reduction to your plastic consumption. So before you buy your next reusable bottle, take a second to think about whether you really need it. And that’s it! You might find it a little weird for our company to tell you to not buy a water bottle given that we’re in the business of making accessories for these bottles. But like always, we try to give our honest thoughts and recommendations that will actually help. And we know we railed on affiliate marketers before, but we did include links to the products we talked about. If you make a purchase after clicking one of the links, then we get a small commission. It helps our small business out, and we appreciate the support so we can continue making unbiased posts and videos like this one. Keep BottlePro in mind for accessories for your large bottles, and happy hydrating! Our Review of Hydro Flask’s Carrying Pouches – Which is the Best, and What are Good Alternatives?3/3/2023 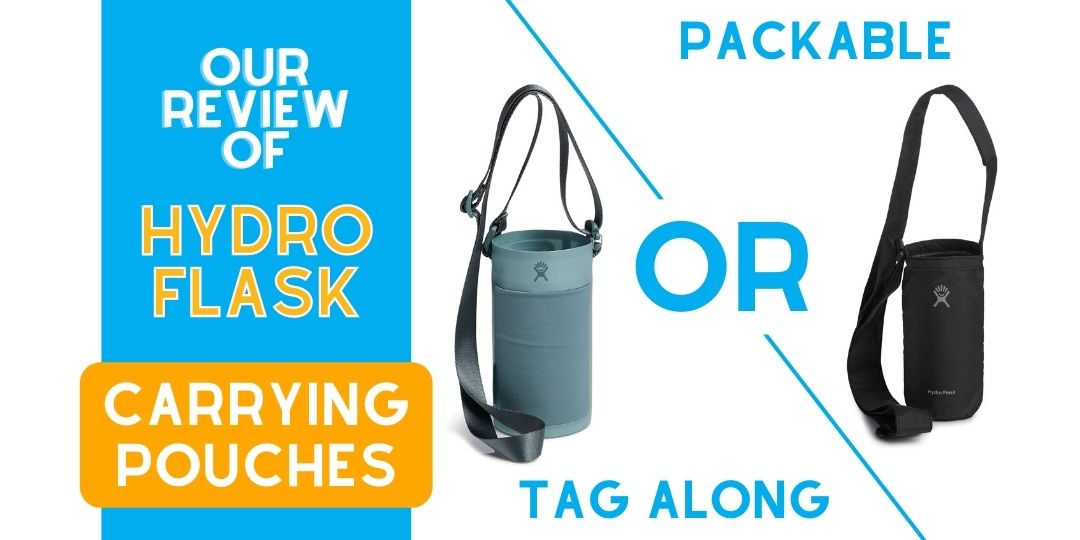 Content Overview:
Products Mentioned in this Post:
Which Hydro Flask Bottle Sling is the Best?Hydro Flask has two bottle slings, the Packable and the Tag Along. We’re reviewing how they are different, which one you should get, and whether any alternative options could be better for you. The short answer is that different pouches are better for different situations, and at the end of the post we’ll give our opinions on why you might want to pick one over another. Video ReviewOur YouTube video covers the same information in this post, so click the link if you'd rather see the video. Otherwise, keep reading the full post below!
Review of Hydro Flask's Packable Sling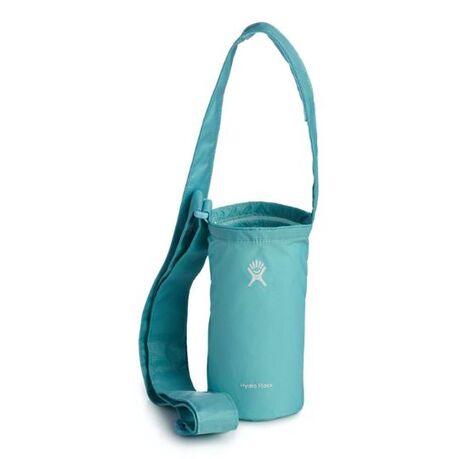 Hydro Flask's Packable Sling First, we’ll start with Hydro Flask’s Packable sling. Some benefits are:
But there are a few downsides to keep in mind.
All-in-all, this bottle sling is successful in what it was primarily designed for, which is to be super portable and stowable. This makes it a great choice for certain situations like keeping it in your car or pack for whenever you might need it, but this is not the best sling for daily use. Review of Hydro Flask's Tag Along Sling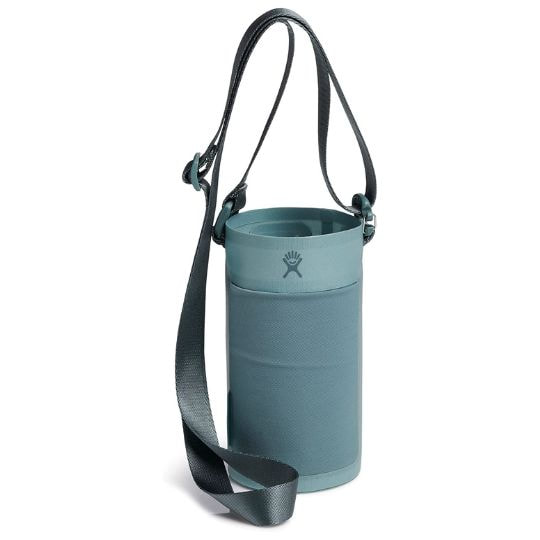 Hydro Flask's Tag Along Sling Next we’ll look at the Tag Along. Some benefits are:
But this also leads to the first downside.
Overall, the Tag Along bottle sling is a really good option for daily use. It comes in two sizes, so be sure to check which one is good for you. Hydro Flask's Slingback Bottle Pack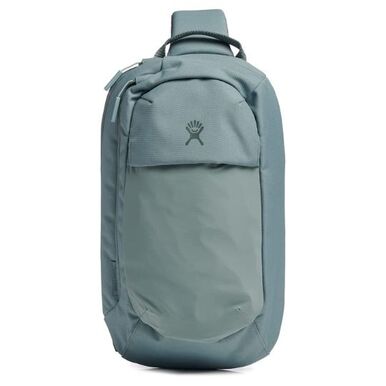 Hydro Flask's Slingback Bottle Pack One Hydro Flask brand option that we didn’t review was their newer Slingback bottle pack. This thing looks really cool and seems like it would be the best option for longer hikes and walks because of the extra storage and padded strap. We hope to test it out in the near future. Summary of Hydro Flask Sling OptionsOverall, we recommend getting the Packable Sling if you’d like to store a carrying pouch in your car or pack for whenever you might need it. But for everyday use, the Tag Along is the more user-friendly and useful Hydro Flask sling. And definitely consider trying the Slingback if you’re looking for more of a backpack for longer hikes or walks and let us know what you think below. 3rd Party Slings for Hydro FlasksBefore you buy a Hydro Flask product, you should also look at the competition. Here are a few ones to consider. 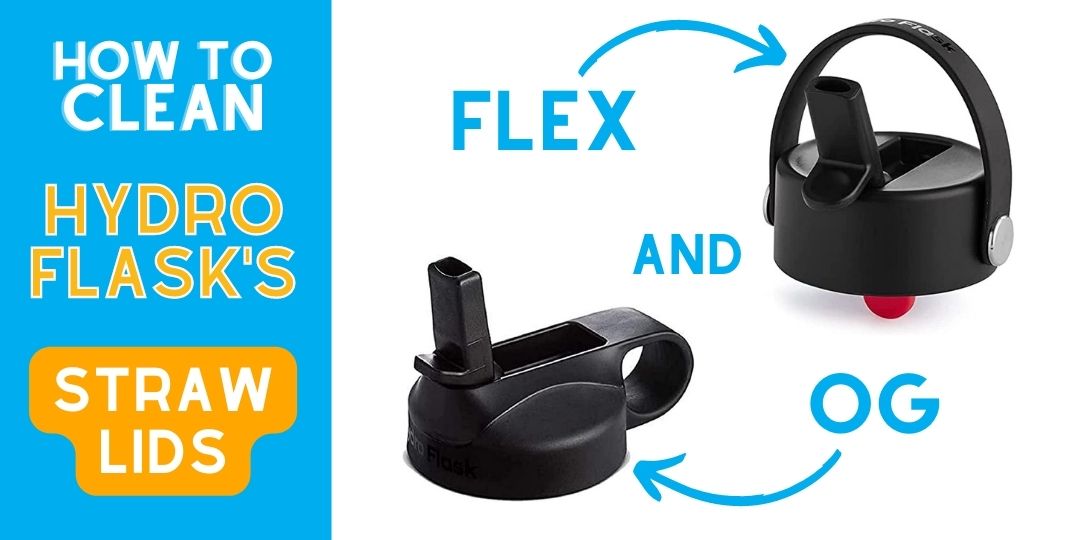 How to Clean a Hydro Flask Straw LidHydro Flask has two straw lid options, their original design and the newer Flex Straw that was released in early 2022. They can be fairly tricky to clean, but we're going to review the step-by-step process so you can get a better deep clean on your Hydro Flask Flex Straw or original straw lid. This includes showing the complete disassembly of each one, as well as giving some general recommendations. Content Overview:
Recommended Products: Video ReviewOur YouTube video covers the same information in this post, so click the link below if you'd rather see the video showing our cleaning process. Otherwise, keep reading the full post below!
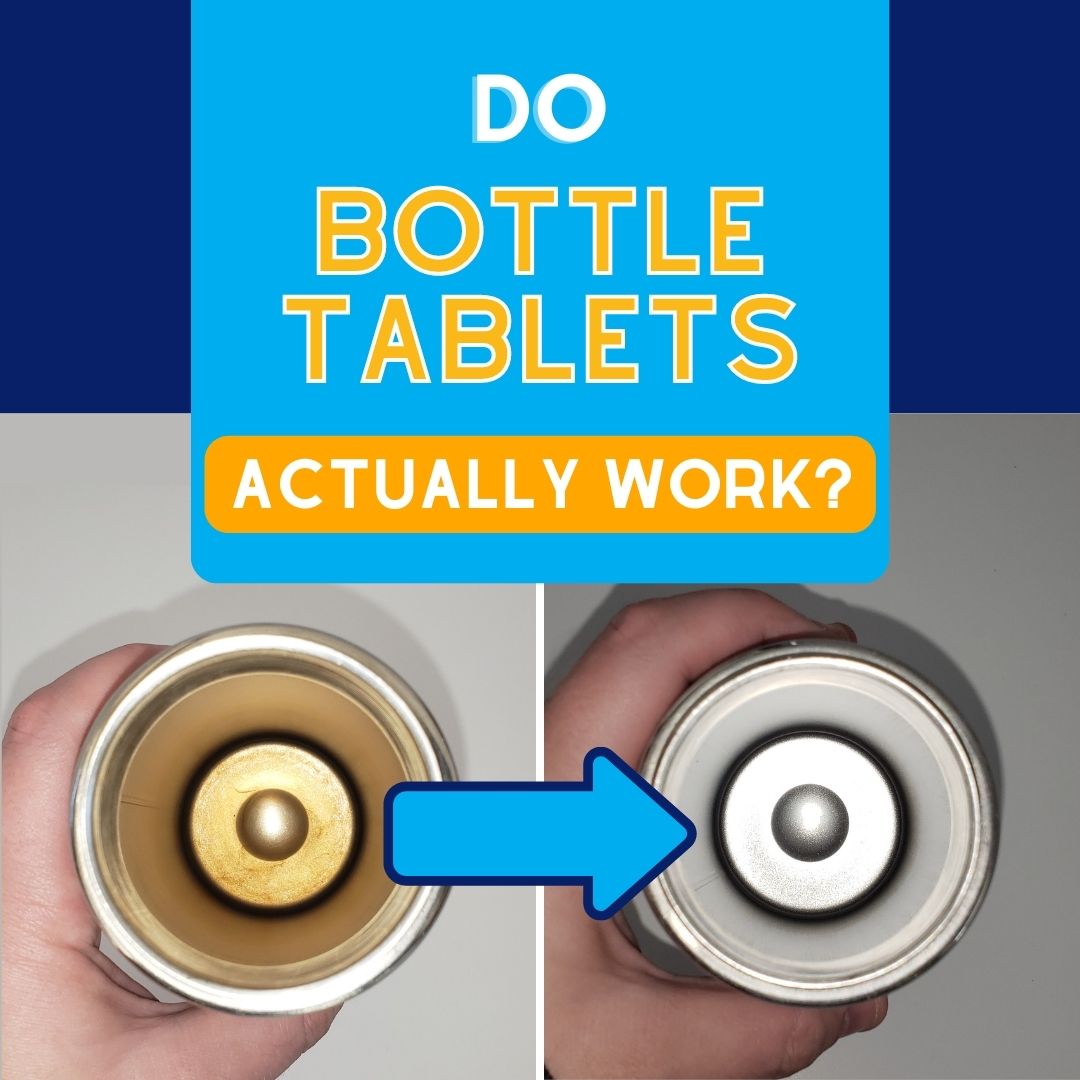
A Real Quick Thank You!If you found this post helpful, you can use the links to buy any of the items you need off Amazon. We get a small commission if you purchase that way, and every little bit helps our small business. It enables us to keep making information videos and posts like this one. We really appreciate the support! Are Hydro Flasks Dishwasher-Safe?Let’s get this out of the way first. We know it’s a pain in the butt, but we generally recommend hand washing all Hydro Flask products. The reason why is that it’s pretty confusing to know which Hydro Flask products are actually dishwasher-safe and which ones aren’t. Even if it says the product is dishwasher-safe, Hydro Flask mentions that some accessories like caps may last longer if they are hand washed. So to be safe, we recommend sticking to hand-washing as much as you can to help your Hydro Flask products work well for many years to come. How to Clean a Hydro Flask BottleThis one's pretty self-explanatory, and here are two of the items we use most for deep cleaning our large bottles. For cleaning the bottle, just use warm soapy water and your bottle brush. We do this every day before going to bed. For a deeper clean, you could use cleaning tablets like the ones made by Bottle Bright. We recently tested Bottle Bright tablets to clean the tea and coffee stains from a 20oz Hydro Flask Coffee bottle, and the results were very impressive! We're going to start doing this at least on a monthly basis, but we're not sure exactly what the best frequency is. Let us know what you think!
Now on to the lids. Get your brush kit, a sponge or rag, a butterknife or some other kind of picking tool with an end that won’t cut silicone, and a bowl with warm, soapy water. It’s also a good idea to get set up at least a few feet away from your sink since you’ll be handling some pretty small parts, and you don’t want to accidentally drop them down the sink. How to Clean a Hydro Flask Straw Lid (Original Version)
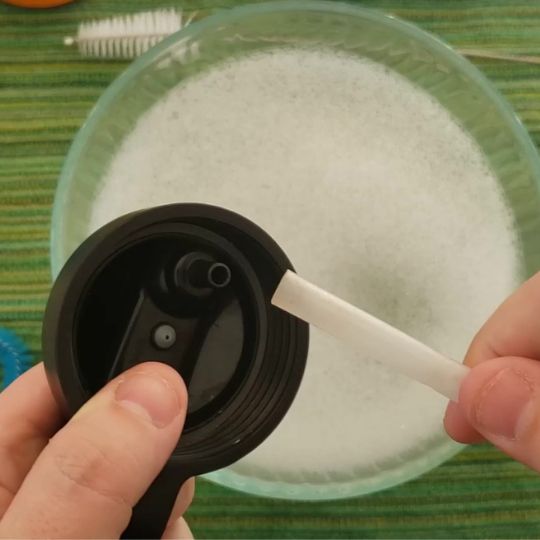
Step 1: Disassemble the Lid Start by disassembling the lid. The straw is attached with a friction fit on the cap, so you can just pull it off. Next, pop off the spout by pushing it past the open position.
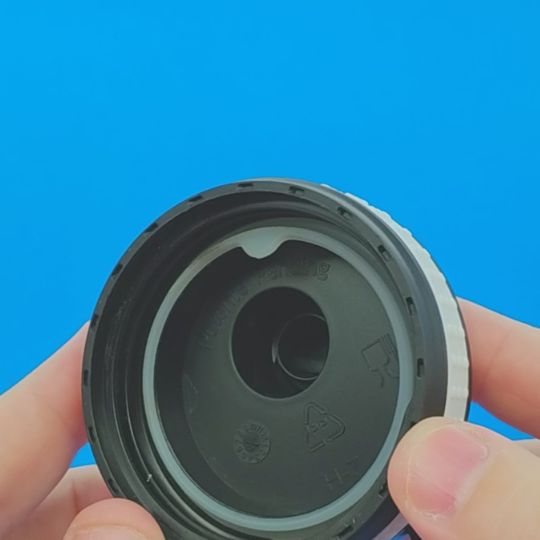
Remove the spout seal either by tapping the lid upside down, using your fingernails, or use a small tool like tweezers or the butterknife.
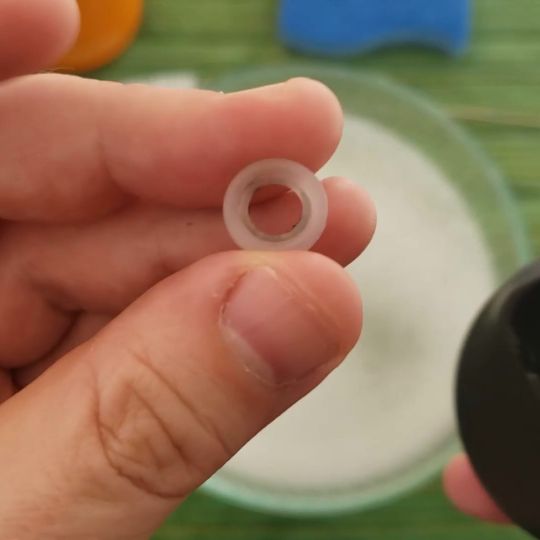
The silicone vent hole insert doesn’t usually get that dirty, but for a really deep clean you can pop that out too. Just use your thumb or fingernail to pry it out from the bottom.
And the last removable piece is the big o-ring under the threads. This o-ring generally doesn’t get as dirty so you may not need to clean it as often, but it’s still good to clean it every once and awhile. You need to use a butterknife or other kind of tool to get it out, but it’s not too difficult. 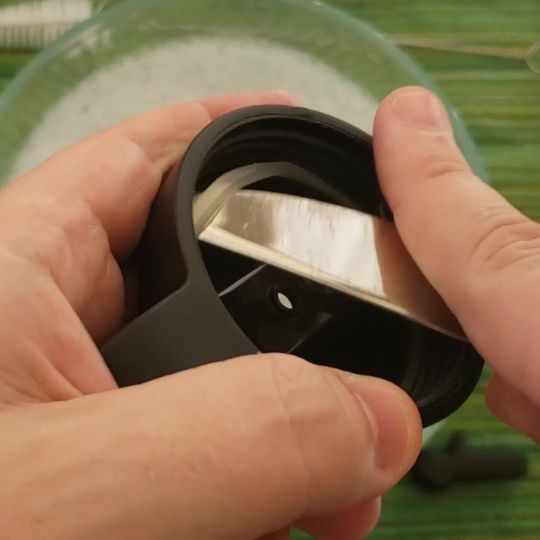 Main O-Ring under the Threads Step 2: Clean Everything Clean each piece thoroughly.
Step 3: Reassemble the Lid Once it’s all dry, we put it back together the way it was before. This should be pretty simple since you saw how it all came apart, but there are a few things to double-check to make sure you don't have too much leaking.
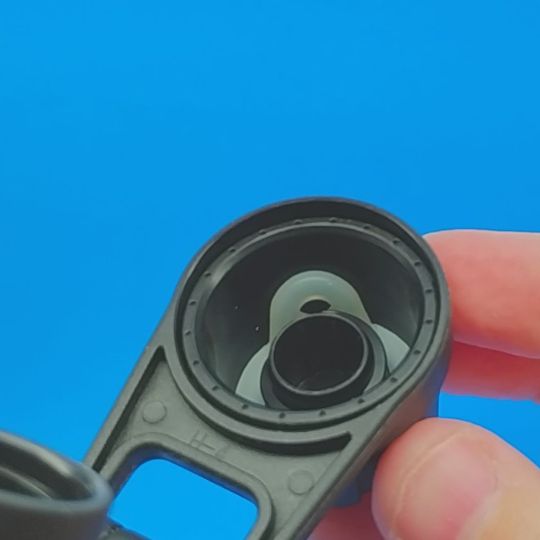
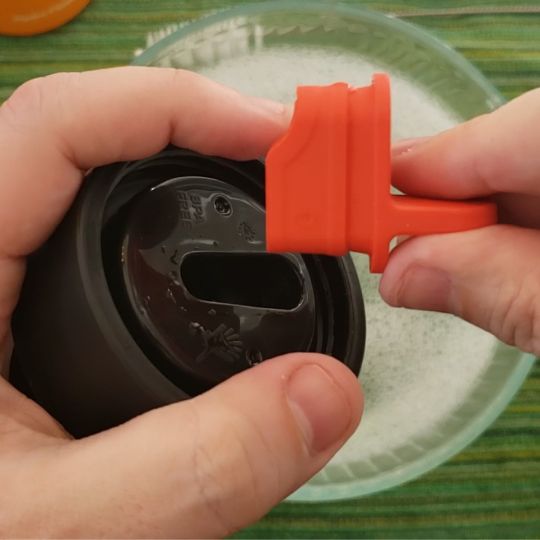
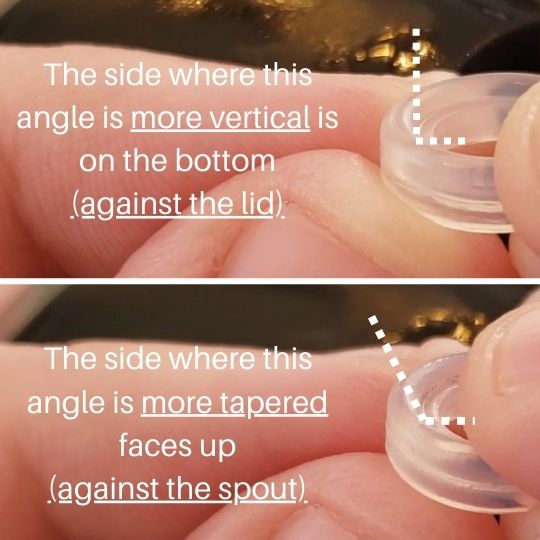 Slight Taper (Hard to See) If you followed all of these steps, then you should be all set with your deep-cleaned Hydro Flask with the original-style straw lid! How to Clean a Hydro Flask Straw Lid (Flex Straw)Step 1: Disassemble the Lid Next we’ll look at the Flex Straw lid, which is honestly the better version. In some ways it’s easier to clean because the pieces are harder to lose, but it’s also a little trickier to take apart. Like before, the first step is to disassemble the lid. Pull the straw out of the red silicone insert, then pull the red insert itself out from the bottom.
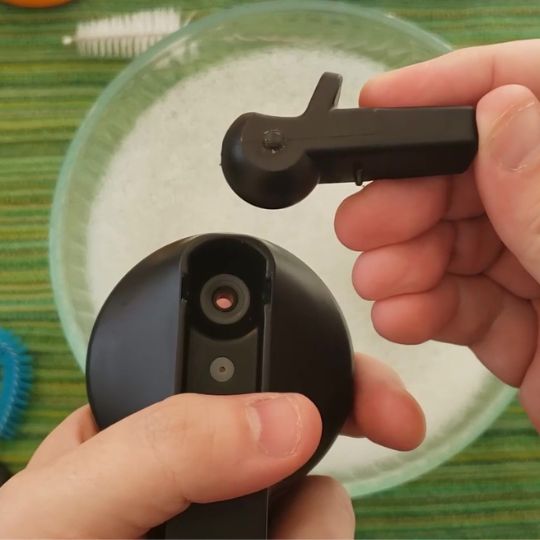
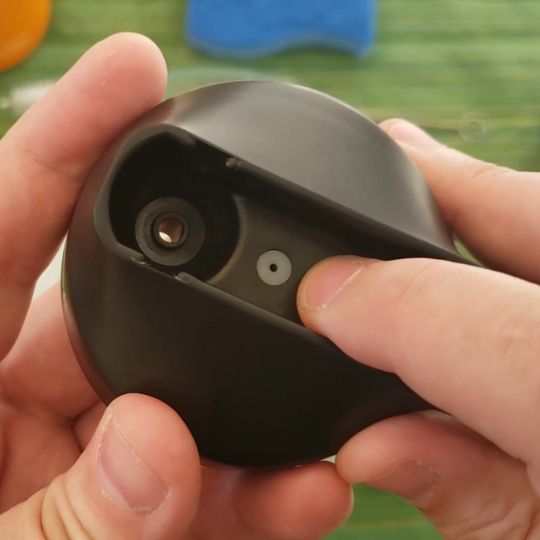
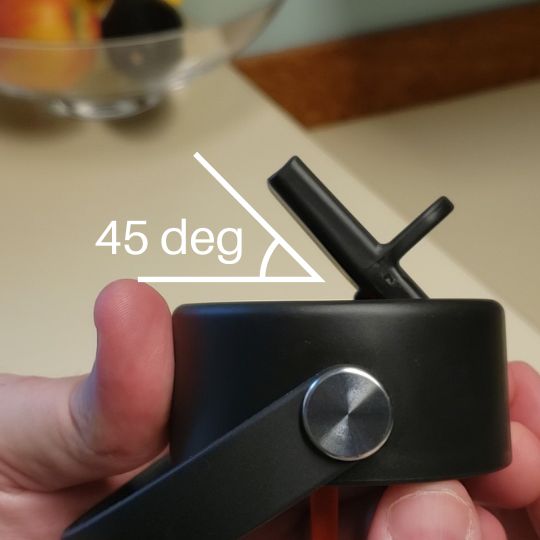
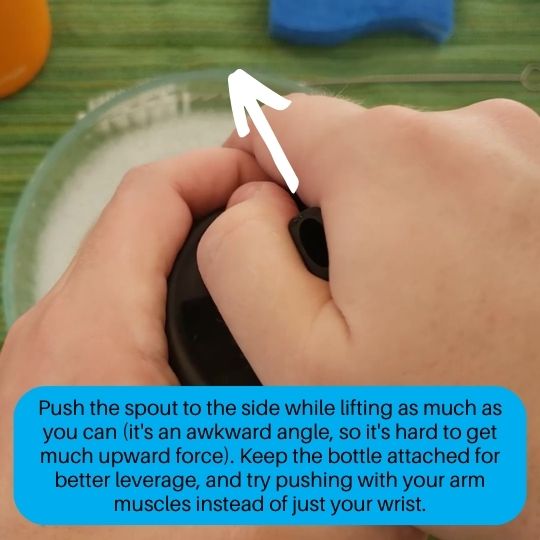
Detaching the spout is a little different and trickier compared to the old lid, but you can still do it. Lift the spout to about a 45-degree angle, then press it to the side and up. We like to keep the lid on the bottle for more leverage, and we put the spout between our thumb and index finger then push with our arm muscles and not our wrist. The spout should then pop out of place. It takes a lot more force that you have to apply at an awkward angle compared to the original straw lid. You might even feel like you're about to break it, but follow these steps and it should pop out!
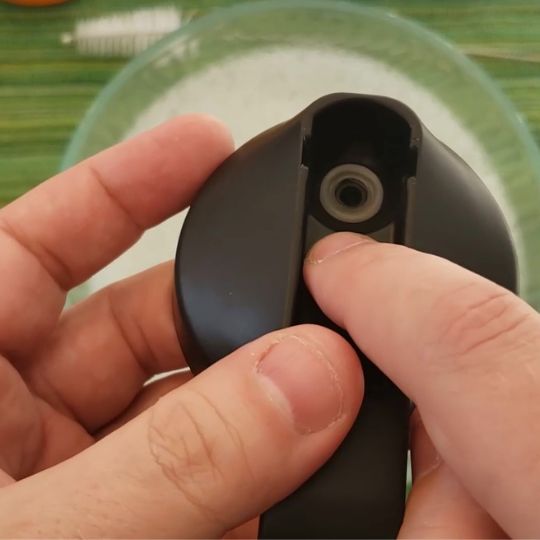
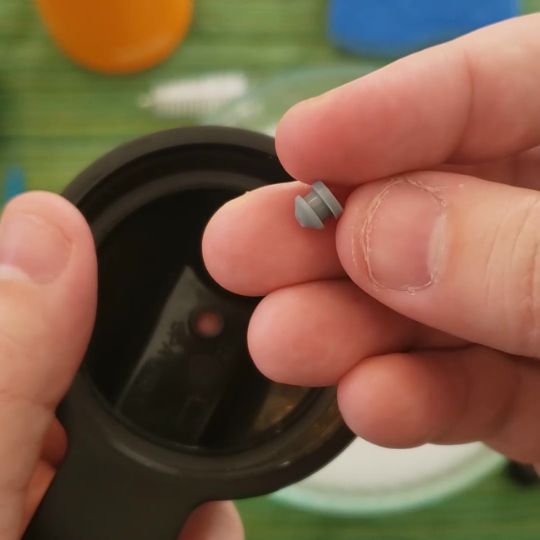
 What the Detached Spout Looks Like The last removable piece is the large o-ring up under the threads. This seal doesn’t get as dirty so you may not need to clean it as often, but it’s still good to include in your deep clean every once and awhile. It's much more difficult to get out compared to the original straw lid, and you’ll need to find a tool with a fine-tip end to get it out. I couldn’t get it with a butterknife, but I was able to use the pointy end of this letter opener to get up under the seal and lift it, just making sure to only use the plastic part of the letter opener and not letting it go all the way to the blade. I’m sure there are better tools out there, and if you find something that works great for you, please comment on it below to let us and other people know.
Step 2: Clean Everything Clean each piece thoroughly.
Step 3: Reassemble the Lid Once it’s all dry, we put it back together the way it was before. This should be pretty simple since you saw how it all came apart, but there are a few things to double-check to make sure you don't have too much leaking.
After these steps, you should be good to go with your deep-cleaned Hydro Flask Flex Straw! 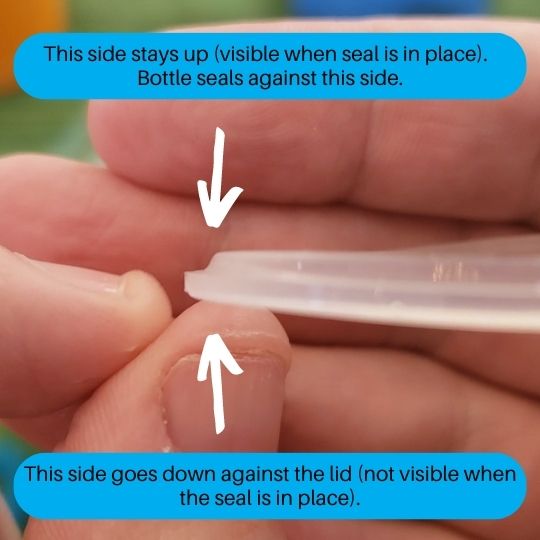 O-Ring Orientation If you found this video helpful, let us know! And thanks again if you make a purchase through one of the links in the description. It really helps our small business out. Keep BottlePro in mind for accessories for your large bottles, and happy hydrating!
|


PS Kreative, LLC, Licensed in North Carolina, USA (ID # 2514262), DBA "BottlePro"